Setting Up Google Cloud Credentials
To connect akaBot to Google Cloud services (such as Google Cloud Storage), the Google Cloud Scope activity requires a Service Account and its associated JSON key file. This guide walks you through creating a Service Account on the Google Cloud Console and configuring it in akaBot Studio.
Prerequisites: You need access to a Google Cloud project with the IAM & Admin permissions required to create Service Accounts. The required role is Project IAM Admin or higher.
Overview of Authentication Modes
The Google Cloud Scope activity supports three Credentials Mode options. Before starting, choose the one that fits your environment:
| Credentials Mode | How It Works | When to Use |
|---|---|---|
| AutoDetect | akaBot automatically detects credentials from the environment — for example, from the GOOGLE_APPLICATION_CREDENTIALS environment variable or the Google Cloud metadata server. | Use this when running akaBot on a Google Cloud virtual machine (Compute Engine) that already has a Service Account attached, or in an environment where credentials are pre-configured. |
| ServiceAccountKey (default) | Authenticates using the raw JSON content of a Service Account key, provided directly as a SecureString in the activity. | Use this when you want to supply the key content directly from akaBot Center (Orchestrator) Assets without storing a physical file on the robot disk. |
| ServiceAccountKeyFromFile | Authenticates using the path to a Service Account JSON key file stored on the robot machine's local disk. | Use this when the JSON key file is deployed to the robot machine and you want to reference it by its local file path. |
Step 1 — Create a Service Account
- Sign in to the Google Cloud Console.
- Select the project you want to use for automation from the project dropdown at the top of the page.
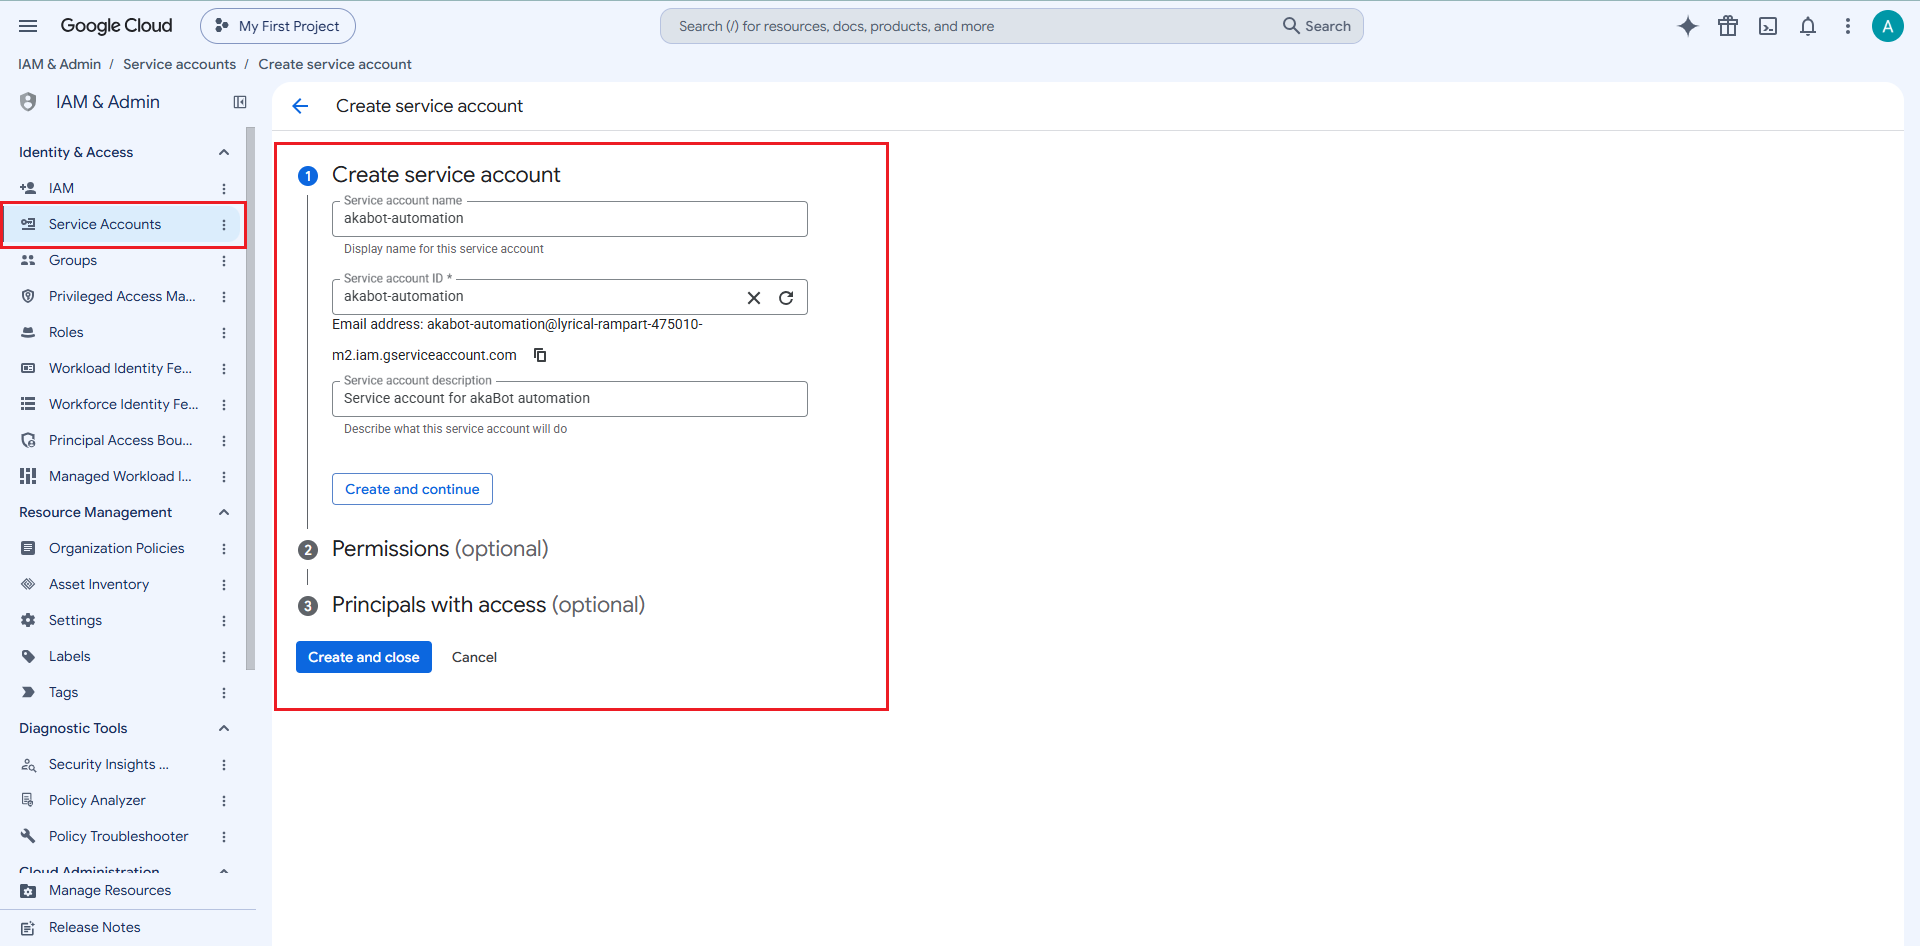
- In the left navigation menu, go to IAM & Admin > Service Accounts.
- Click Create Service Account at the top of the page.
- Fill in the service account details:
- Service account name: Enter a descriptive name (e.g.,
akabot-automation). - Service account ID: Auto-filled based on the name. It forms the service account's email address (e.g.,
akabot-automation@your-project.iam.gserviceaccount.com). - Service account description: Optional. Describe the purpose of this account.
- Service account name: Enter a descriptive name (e.g.,
- Click Create and Continue.
Step 2 — Grant a Role to the Service Account
The service account must be granted a role that gives it permission to access the Google Cloud resources your automation needs.
-
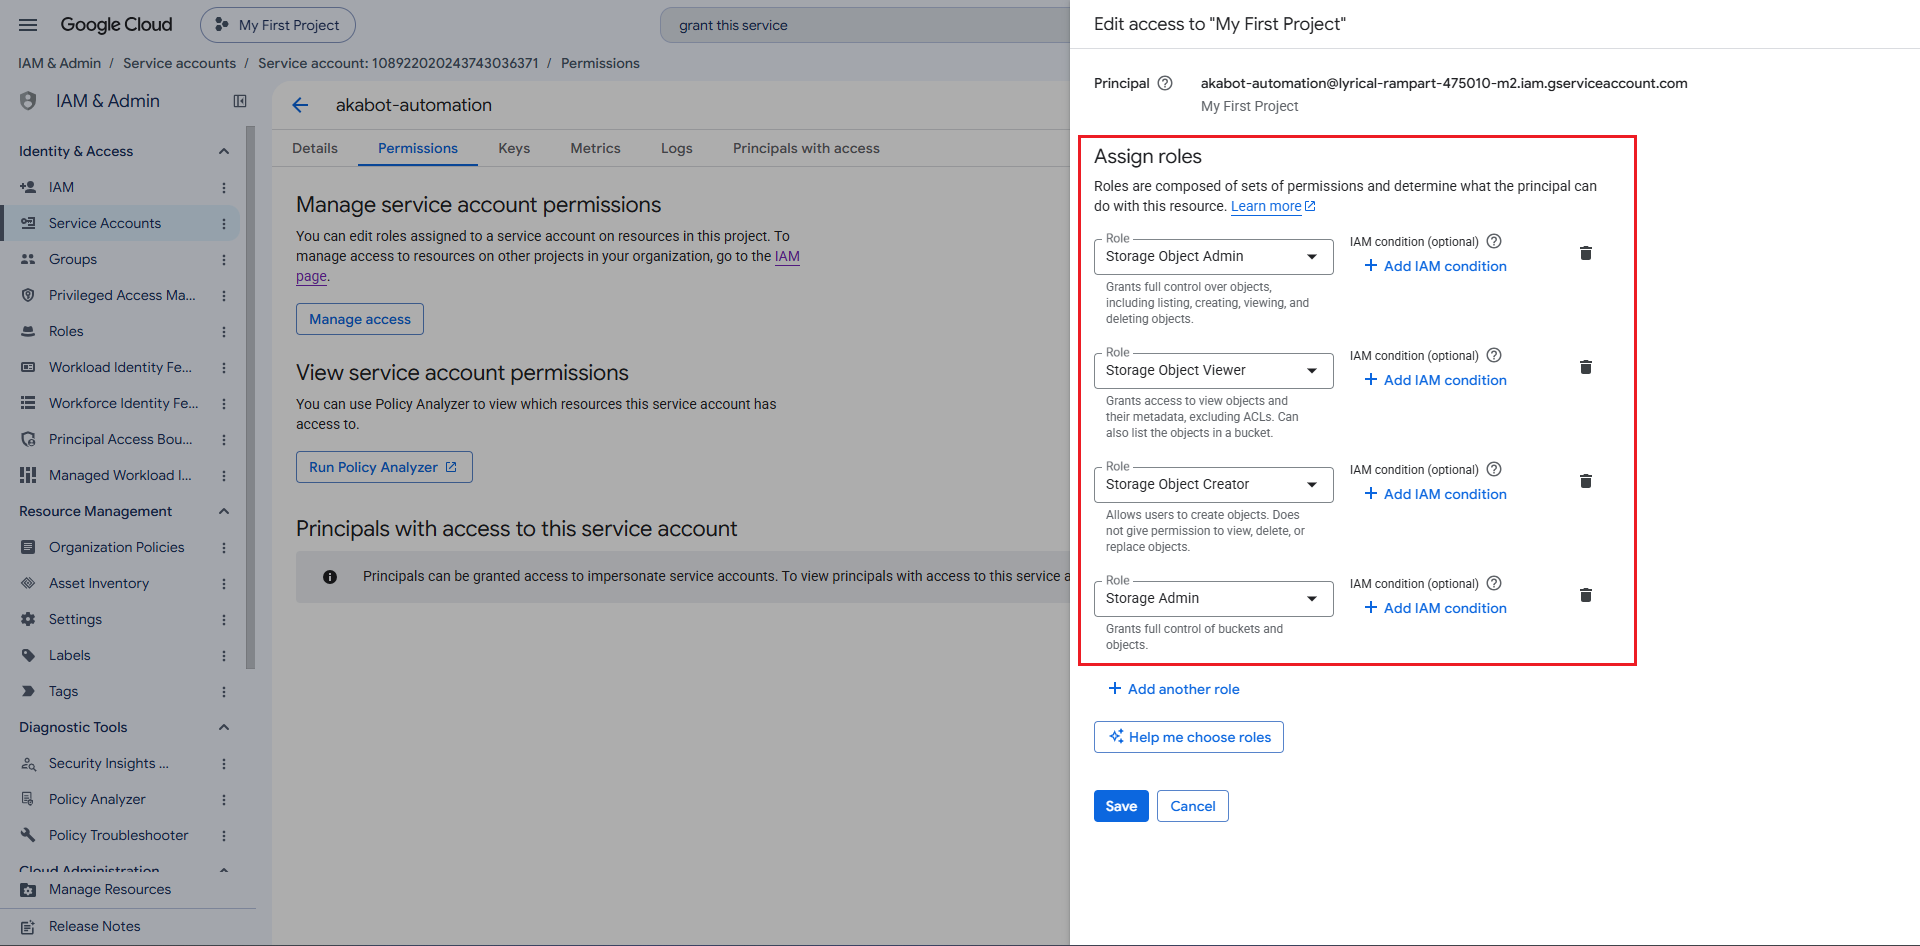
On the Service Accounts list page, click on your service account (e.g.,
akabot-automation) to open its details, then go to the Permissions tab and click Manage access. -
In the Edit access panel on the right, under Assign roles, click the Select a role dropdown.
-
Search for and select the role required for your automation use case. Common roles for akaBot Google Cloud Storage workflows include:
akaBot Use Case Recommended Role Read and write files in Google Cloud Storage Storage Object Admin Read files from Google Cloud Storage only Storage Object Viewer Upload files to a specific bucket Storage Object Creator Full access to Storage (buckets + objects) Storage Admin -
Click Save to apply the role to the service account.
Step 3 — Create and Download the JSON Key
The JSON key is the credential file that akaBot uses to authenticate as the Service Account.
- On the Service Accounts list page, find the service account you just created and click on its email address to open its details.
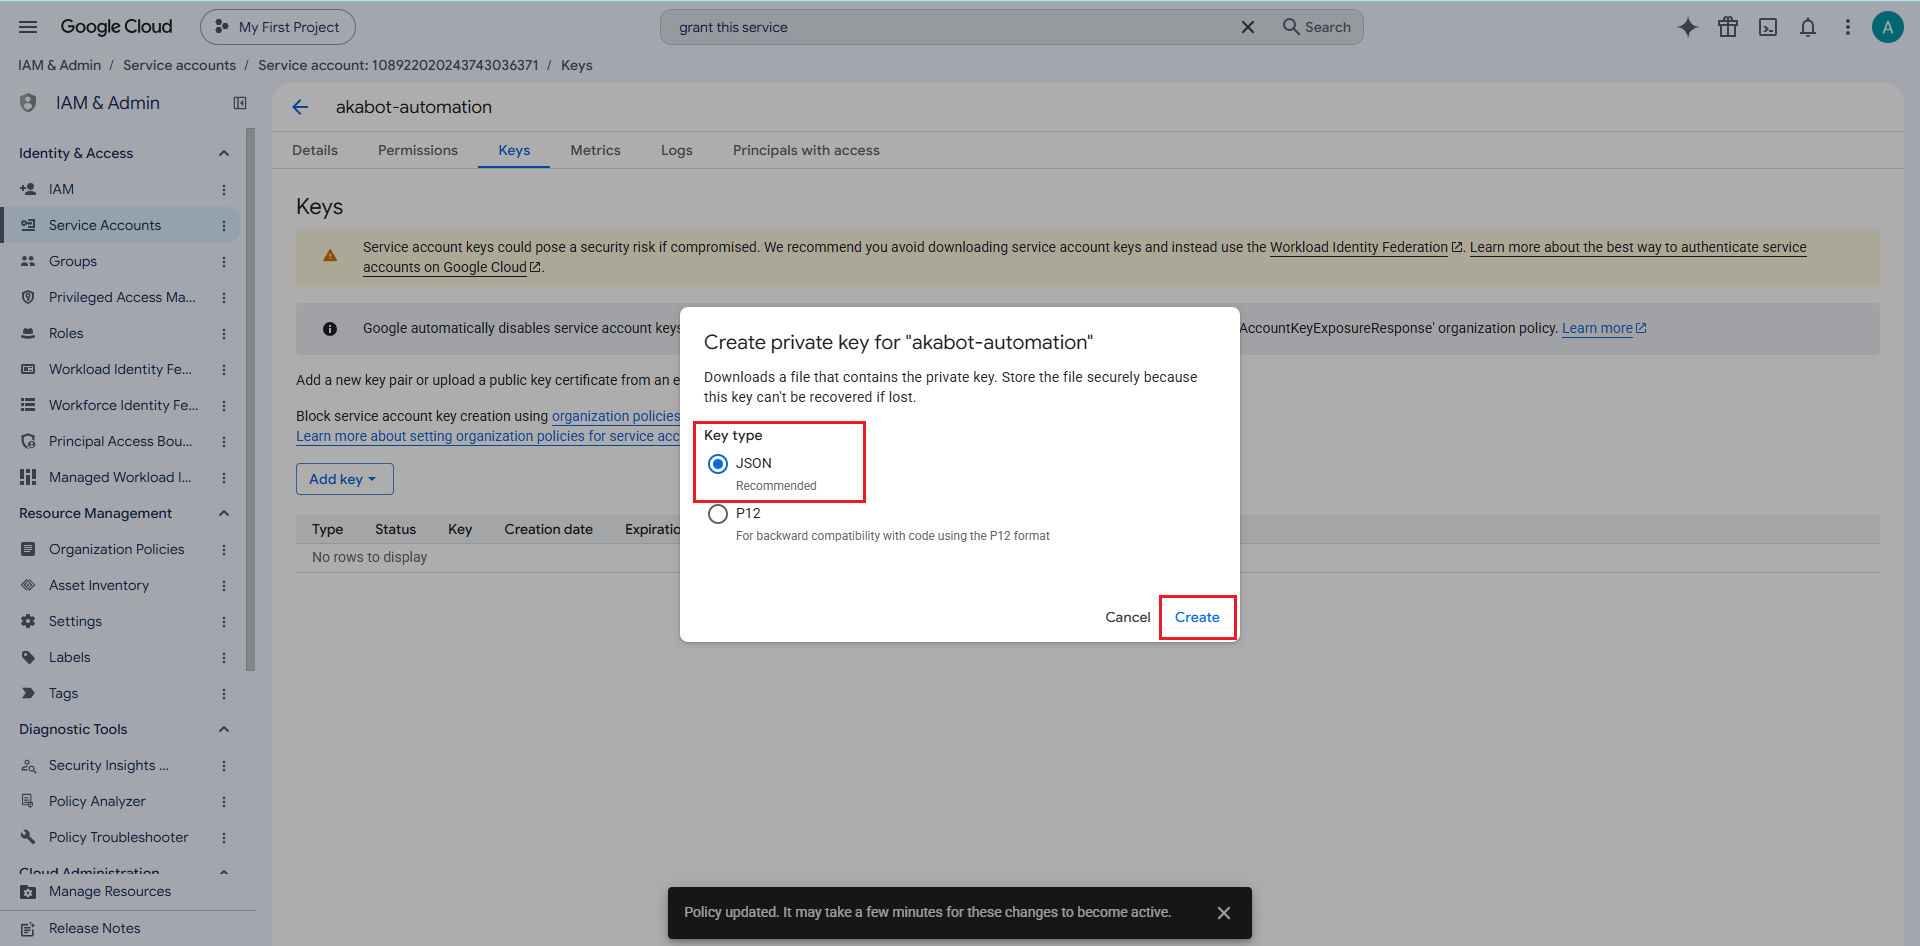
- Go to the Keys tab.
- Click Add Key > Create new key.
- In the dialog, select JSON as the key type.
- Click Create. The JSON key file will be automatically downloaded to your computer.
Security Warning: The JSON key file contains a private key that grants full access to any Google Cloud resource the service account has permission for. Store it securely and never commit it to source control (e.g., Git). Treat it with the same level of care as a password.
Example JSON structure:
{
  "type": "service_account",
  "project_id": "your-project-id",
  "private_key_id": "abc123...",
  "private_key": "-----BEGIN RSA PRIVATE KEY-----\n...\n-----END RSA PRIVATE KEY-----\n",
  "client_email": "akabot-automation@your-project.iam.gserviceaccount.com",
  "client_id": "123456789",
  "auth_uri": "https://accounts.google.com/o/oauth2/auth",
  "token_uri": "https://oauth2.googleapis.com/token"
}
Step 4 — Configure the Google Cloud Scope in akaBot Studio
Open akaBot Studio, add the Google Cloud Scope activity to your workflow, and set the Credentials Mode property:
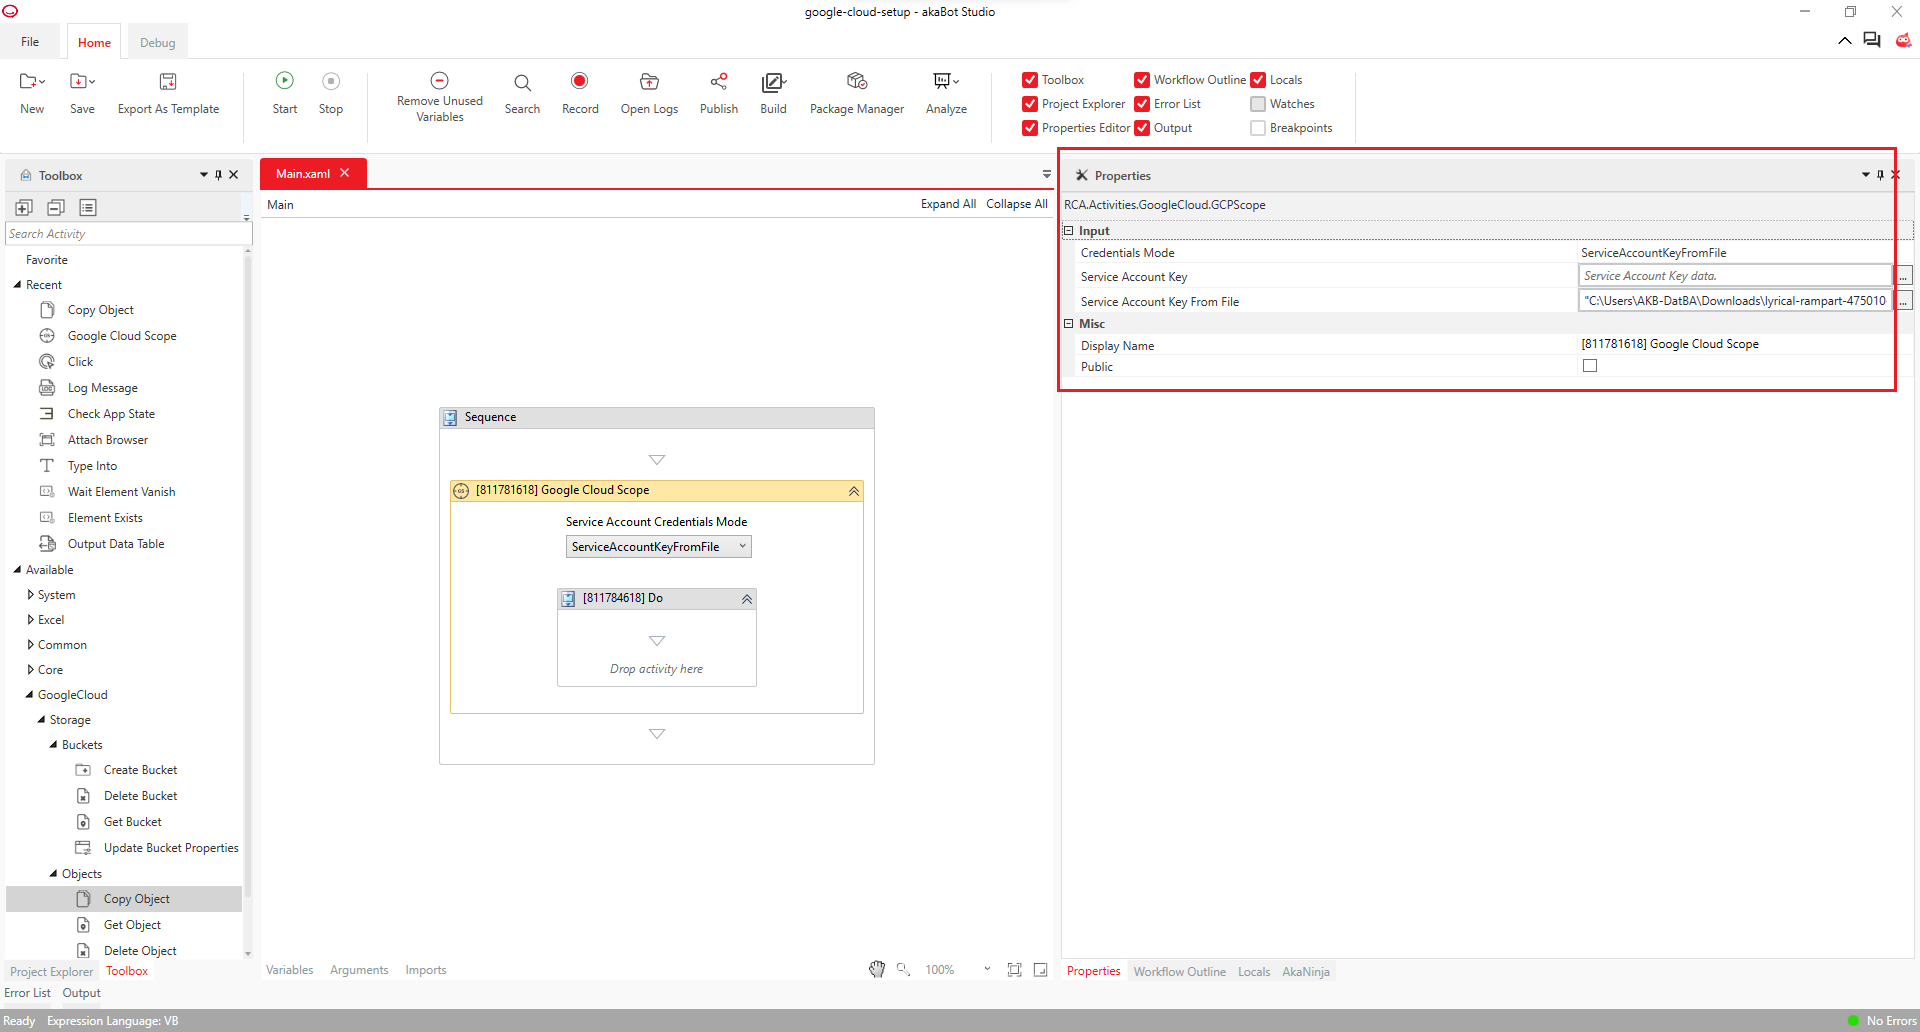
Mode 1: ServiceAccountKeyFromFile
Authenticates using the path to the downloaded JSON key file stored on the robot machine.
- In the activity body or Properties panel, set Credentials Mode to
ServiceAccountKeyFromFile. - In the Service Account Key From File field, provide the absolute path as a string expression:
"C:\akabot\credentials\gcp-key.json"
Mode 2: ServiceAccountKey
Authenticates using the raw JSON key content converted to a SecureString. This is ideal when retrieving the key from an akaBot Center Asset.
- Set Credentials Mode to
ServiceAccountKey. - In the Service Account Key field, pass a
SecureStringvariable containing the JSON content. - If you read the JSON content from an Asset into a
Stringvariable (e.g.,strJsonKey), convert it toSecureStringusing:new System.Net.NetworkCredential("", strJsonKey).SecurePassword
Mode 3: AutoDetect
Authenticates automatically using the machine's environment. No key path or key content needs to be configured in the activity.
- Set Credentials Mode to
AutoDetect. - Ensure either the
GOOGLE_APPLICATION_CREDENTIALSenvironment variable points to a valid JSON key file, or the robot runs on a GCP Compute Engine VM with an attached Service Account.
See Also
- Google Cloud Scope - Full property reference for the scope activity.