Selector Guide
A selector is an XML fragment that akaBot uses to uniquely identify a UI element at runtime across desktop, web, Java, and SAP applications. When you click Indicate on screen on any UI activity, akaBot Studio automatically inspects the target element and generates selectors describing its technical hierarchy and attributes.
This guide explains how selectors work in akaBot, how to configure search steps in the Selection Options window, and how to inspect, fix, and parametrize selectors using the Selector Editor (Selector Dialog).
Selector Types and Search Steps
When indicating an element, akaBot can generate multiple selector types. These correspond to the SearchSteps (TargetSearchSteps) property under the activity's Target:
| Selector Type | Flag in Code | How It Works | When to Use |
|---|---|---|---|
| Strict Selector | StrictSelector | Matches the element using exact technical attributes (e.g., tag, id, name, class, automationId), organized in a hierarchical XML structure. | Best when the application has a clean, stable structure with reliable attributes. Fastest and most precise method. |
| Fuzzy Selector | FuzzySelector | Compares element attributes using a similarity score against a configurable Accuracy slider (range 0.4 → 1.0, default: 0.5). | Best when element attributes contain slight variations or dynamic tokens. More resilient than strict matching. |
| Image Selector | Image | Identifies the element visually by matching a captured screenshot region against the screen, controlled by an Accuracy slider (range 0.5 → 1.0, default: 0.8). | Best when the element lacks accessible technical attributes, or lives in a virtualized, canvas, or remote desktop environment. |
| CV Selector | CV | Locates the element using Computer Vision algorithms based on visual appearance and layout. | Used for Citrix, Remote Desktop, or image-heavy interfaces where DOM/UIA trees are unavailable. |
| Semantic Selector | Semantic | Uses AI-powered natural language descriptions to ground and target elements contextually. | Best for dynamic web pages where attributes and layouts change frequently. |
Resilience Strategy: You can enable multiple selector types simultaneously (e.g., Strict + Fuzzy + Image). akaBot checks them in sequence at runtime, falling back to subsequent steps if the primary selector fails to resolve.
The Selection Options Window
When you click Indicate on screen in a UI activity, akaBot Studio minimizes and the floating Selection Options toolbar appears.
Hover over the target element until it is highlighted with a colored border, then click or press Right Control to select it.
The floating toolbar displays the following instruction:
Hover the element you want to indicate and click (or right control) to select it
If the element is not detected, try changing the UI framework (F4), enabling Computer Vision (F8), or using the Image region selection (F3).
To pause the indicator for few seconds, press F2.
Validating the selected selectors. To stop it, press Esc.
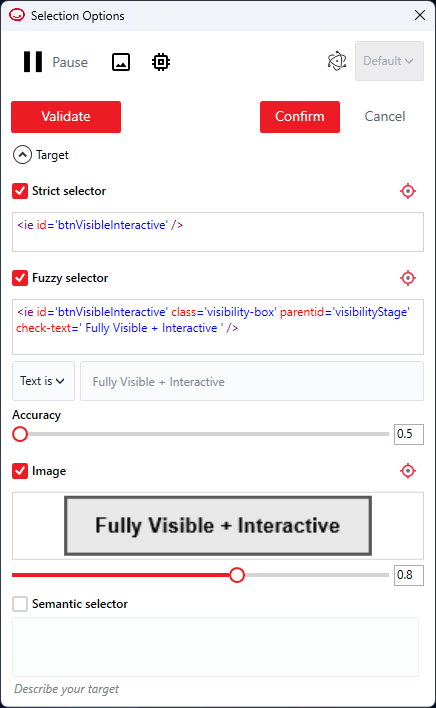
Hotkeys and Controls
| Key / Control | Function | Description |
|---|---|---|
| F4 | Change UI Framework | Cycles through available automation frameworks: Default (Native browser / UIA / SAP / Java), UIA (UI Automation), and MSAA (Microsoft Active Accessibility). |
| F8 | Computer Vision | Switches to Computer Vision (CV) inspection mode. |
| F3 | Image Region | Enables region-based image selection to capture a screenshot of the target element. |
| F2 | Pause Indicator | Pauses detection for a few seconds, allowing you to open dropdown menus, tooltips, or flyouts before indicating. |
| Esc | Stop / Cancel | Stops the validation process or cancels element indication without saving. |
| Right Ctrl / Click | Select Element | Selects the currently hovered element. |
| Confirm | Save Selection | Saves the generated selectors into the activity's Target and returns to akaBot Studio. |
| Accuracy Sliders | Threshold Control | Configures the matching sensitivity for Fuzzy selector (default: 0.5) and Image selector (default: 0.8). |
The Selector Editor (Selector Dialog)
To inspect, fine-tune, or edit a selector after indication:
- Select the activity in the workflow designer.
- In the Properties panel, expand Input > Target.
- Click the Ellipsis (...) button next to the Selector (or FuzzySelector) field.
- The Selector Dialog opens.
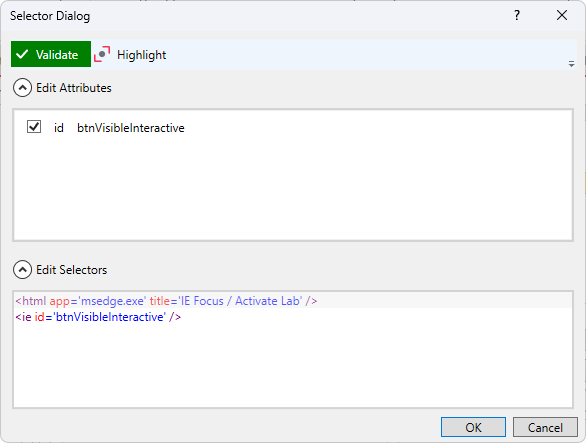
Toolbar and Sections
-
Validate (Status Button) - Checks whether the selector currently resolves to an open window/element on screen. The button color indicates the validation state:
- Green: Valid — element found on screen.
- Red: Invalid — element could not be found.
- Yellow / Orange: Unknown / Modified — the selector was edited and has not been re-validated.
- Gray: Validating in progress or selector is empty.
-
Highlight - Toggles visual highlighting (red border) on the detected element on screen. Only enabled when validation status is Valid (Green).
-
Edit Attributes (Expander) - Displays a checklist of all detected XML nodes and attributes for the element. Check or uncheck attributes to dynamically include or exclude them from the selector.
-
Edit Selectors (Expander) - A full XML text editor with syntax highlighting that allows direct editing of the raw selector string.
Using Variables and Arguments
In akaBot, you can make selectors dynamic by injecting variables or arguments directly into attribute values using double curly braces: {{variableName}} or {{argumentName}}.
Inside the Edit Selectors text editor, you can manage variables and arguments via keyboard shortcuts or the right-click context menu:
| Action | Shortcut | Description |
|---|---|---|
| Choose Variable | Ctrl + Space | Opens a popup to select an existing workflow variable. |
| Choose Argument | Ctrl + Shift + Space | Opens a popup to select an existing workflow argument. |
| Create Variable | Ctrl + K | Quickly creates a new variable and inserts {{newVar}} into the selector. |
| Create Argument | Ctrl + M | Quickly creates a new argument and inserts {{newArg}} into the selector. |
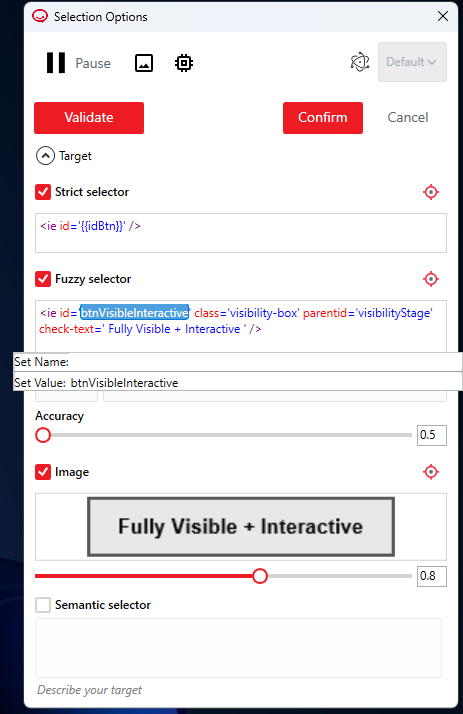
Fixing Unstable Selectors
A selector is unstable when it works on one execution but fails on another. This usually occurs when an attribute value is dynamic (e.g., dynamically generated session IDs or volatile CSS classes).
Tip — Use UI Explorer for Advanced Analysis: If an element's selector cannot be stabilized using the basic Selector Dialog, open UI Explorer to inspect the entire UI tree, examine ancestor/descendant tags, and discover alternative stable attributes. For a complete guide, see How to Use UI Explorer.
Step 1 — Uncheck Dynamic Attributes in Edit Attributes
- Open the Selector Dialog.
- Expand Edit Attributes.
- Uncheck volatile attributes:
- Dynamic IDs with random numbers (e.g.,
id='user_98412'). - Volatile classes (e.g.,
class='btn hover focused'). - Order index (
idx): Uncheckidxwhenever possible, as adding any new element to the page shifts the index.
- Dynamic IDs with random numbers (e.g.,
Step 2 — Keep Stable Attributes
Ensure the remaining attributes uniquely identify the target element:
aanameorname— The visible text or label.tag— The HTML/native control tag (e.g.,BUTTON,INPUT,A).automationId— Stable identifier in desktop applications.title— Window or tab title.
Step 3 — Use Wildcards or Variables
When an attribute contains both a static prefix/suffix and a dynamic component, edit the raw XML in Edit Selectors:
-
Asterisk (
*): Matches zero or more characters.- Before:
<webctrl id='order_report_20260910' tag='DIV' /> - After:
<webctrl id='order_report_*' tag='DIV' />
- Before:
-
Question Mark (
?): Matches exactly one character.- Before:
<webctrl name='step1' tag='BUTTON' /> - After:
<webctrl name='step?' tag='BUTTON' />
- Before:
-
Variables / Arguments (
{{var}}):<webctrl id='item_{{itemId}}' tag='INPUT' />
Step 4 — Validate and Highlight
- Click Validate to ensure the updated selector turns green.
- Click Highlight to visually verify that the red bounding box outlines the correct target element.
Target Properties Reference
UI activities in akaBot expose a Target object under Input > Target with the following properties:
| Property | Type | Description |
|---|---|---|
| Selector | InArgument<String> | The XML string for the strict selector. |
| FuzzySelector | InArgument<String> | The XML string for the fuzzy selector. |
| SearchSteps | TargetSearchSteps | Bitwise flags defining enabled search methods (StrictSelector, FuzzySelector, Image, CV, Semantic). |
| TimeoutMS | InArgument<Int32> | Maximum wait time in milliseconds for the element to be found (e.g., 30000). |
| WaitForReady | WaitForReady | Wait condition before performing action: None, Interactive, or Complete. |
| VisibilityCheck | VisibilityCheck | Verification level for element visibility: None, Interactive, or FullyVisible. |
| Element | InArgument<UIElement> | An existing UIElement variable (e.g., from Find Element or Element Exists). |
| SemanticDescriptor | InArgument<String> | Natural language description for semantic targeting. |
| CvElement / CvType | InArgument<String> / String | Descriptors for Computer Vision element targeting. |
See Also
- How to Use UI Explorer - How to inspect UI trees and construct robust selectors using UI Explorer.
- Troubleshooting Common Activities - How to diagnose and resolve runtime errors like ElementNotFoundException, Timeout, and Disabled Element.
- Semantic Selector Guide - How to use AI-driven semantic selectors.