Getting Started with Table Extraction
This document describes the complete workflow for using the Table Extraction activity: opening the wizard, indicating the table, configuring columns, setting up pagination, and configuring advanced parameters in the Properties panel.
1. Overview
Table Extraction is an activity that extracts tabular data from an application's UI (Web Browser, Windows Desktop, Java…) and stores the result in a DataTable.
Key capabilities:
- Extract single-page or multi-page tables (via a Next/Pagination button).
- Configure the data type of each column (
Text,Number,Boolean). - Limit extraction by number of rows or number of pages.
2. Add the Activity to a Workflow
To add the activity, follow this workflow:
akaBot Studio > Toolbox (Search: Table Extraction) > Drag & Drop into workflow > Click Open Table Extraction.
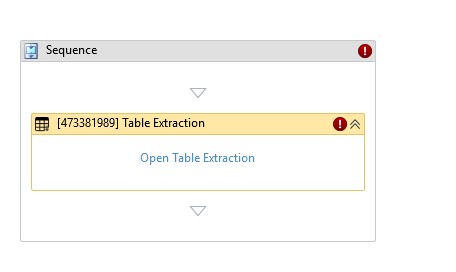
[!IMPORTANT] TargetElement is a required argument. If no table has been indicated, the activity will raise a validation error at runtime.
3. Open the Table Extract Tool (Wizard)
To open the configuration wizard (Table Extract Tool):
- Click the "Open Table Extraction" button on the activity body.
The wizard opens as a Table Extraction Wizard positioned at the Top corner of the screen so it does not obscure the target application. At this point:
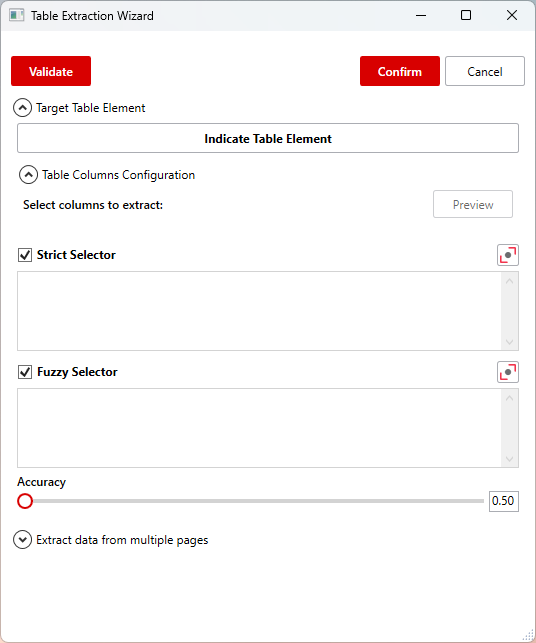
- akaBot Studio is minimized to the Taskbar.
- You must switch to the target application (browser, desktop software…) before clicking Indicate.
4. Step 1 – Indicate the Table Element
4.1. Click "Indicate Table Element"
In the wizard, click the "Indicate Table Element" button.
- The wizard minimizes to free up the screen.
- The cursor enters Inspect mode — hovering over elements highlights them.
4.2. Select the Table Element
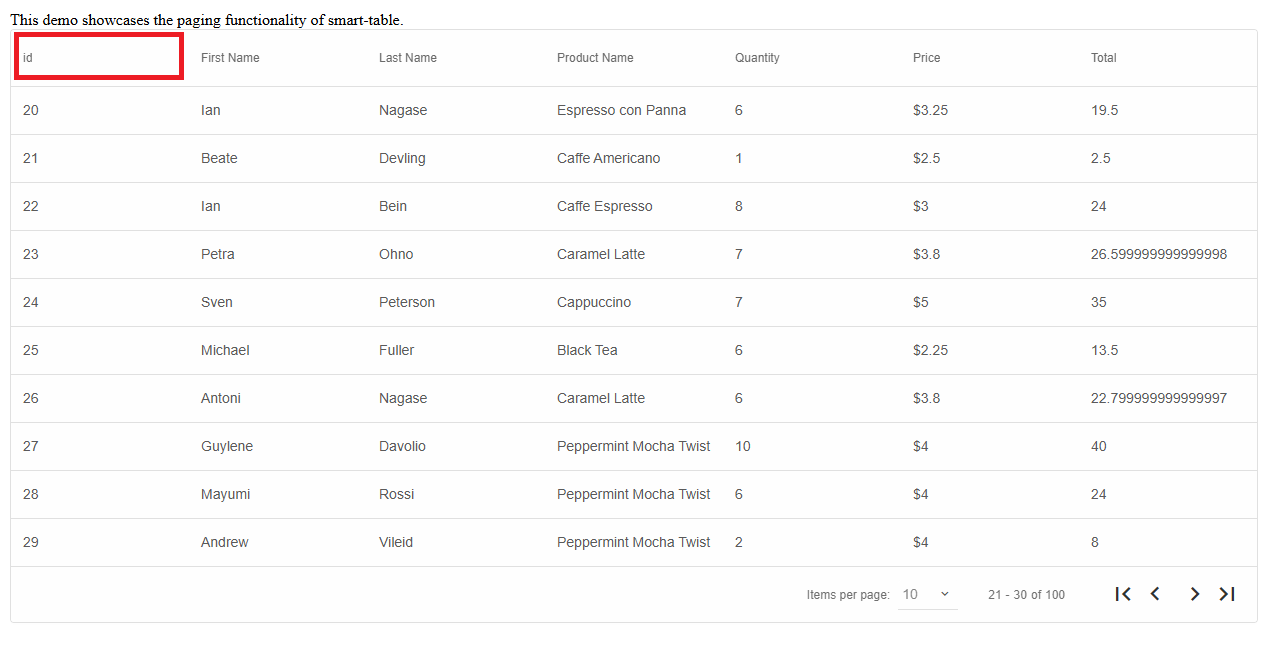
Move the cursor to the table element in the target application and click:
- Web: Click on a table that contains tabular data or a header of table.
- Windows Desktop / Java: Click on a grid or table control.
5. Step 2 – Review & Configure Columns
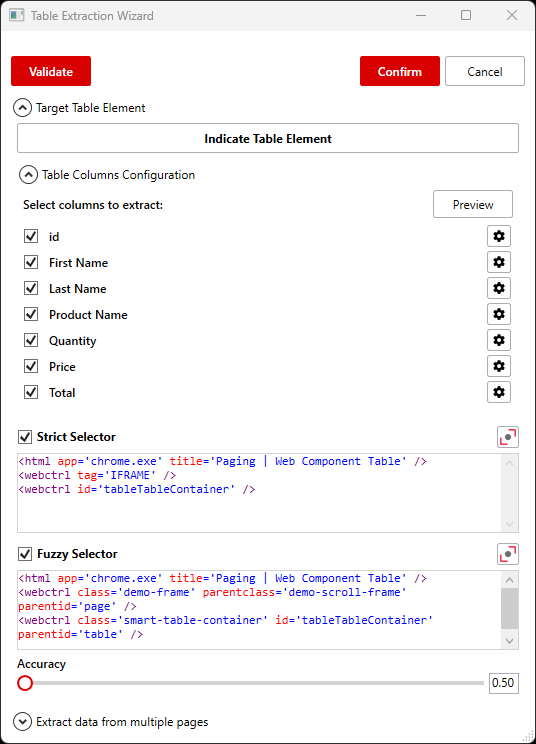
After a successful Indicate, the wizard displays a list of detected columns from the table:
| Field | Description |
|---|---|
| IsSelected | Checkbox to include or exclude the column from the output DataTable. |
| Column Name | Name read from the table header (first row). Can be renamed. |
| Settings (⚙) | Settings button to configure table columns (data type, preview data). |
5.1. Select / Unselect a Column
- Uncheck a column's checkbox → the column is Unselected from the output DataTable
- Check to keep the column.
5.2. Configure DataType
Click the Settings (⚙) icon next to a column to open the detailed configuration panel:
DataType = Text (default)
- No additional settings required.
- Values are stored as
string.
DataType = Number
| Parameter | Default | Description |
|---|---|---|
Decimal Separator | . | Character used as the decimal point (e.g., . or ,). |
Thousands Separator | , | Character used as the thousands delimiter (e.g., , or .). |
Allow Null | false | If enabled, values that fail to parse are stored as null. |
Default Value | "" | Fallback value when parsing fails (if Allow Null is off). |
DataType = Boolean
| Parameter | Default | Description |
|---|---|---|
True Values | true,yes,1,oke | Comma-separated list of values to interpret as true. |
False Values | false,no,0 | Comma-separated list of values to interpret as false. |
Allow Null | false | Allow null when the value does not match any entry. |
Default Value | "" | Fallback value when parsing fails. |
Parse failure behavior:
| Allow Null | Default Value | Result |
|---|---|---|
| false | (empty) | Throws an exception |
| false | 0 | Uses 0 |
| true | null | Stores DBNull |
| true | 0 | Uses 0 |
[!TIP] Click the "Preview" button in the wizard to view all extracted data as a table before confirming.
6. Step 3 – Configure the Next Button (Pagination)
The Next Button section (collapsible) configures the "Next page" button so the activity can automatically page through a multi-page table and merge all results.
6.1. Click "Indicate Next Link"
Click "Indicate Next Link" in the wizard.
- The wizard minimizes. Click the pagination button in the target application (e.g.,
>,Next,»). - The system generates:
- A Strict Selector for the button.
- A Fuzzy Selector for the button.
- An Image Selector (a screenshot of the button stored as base64).
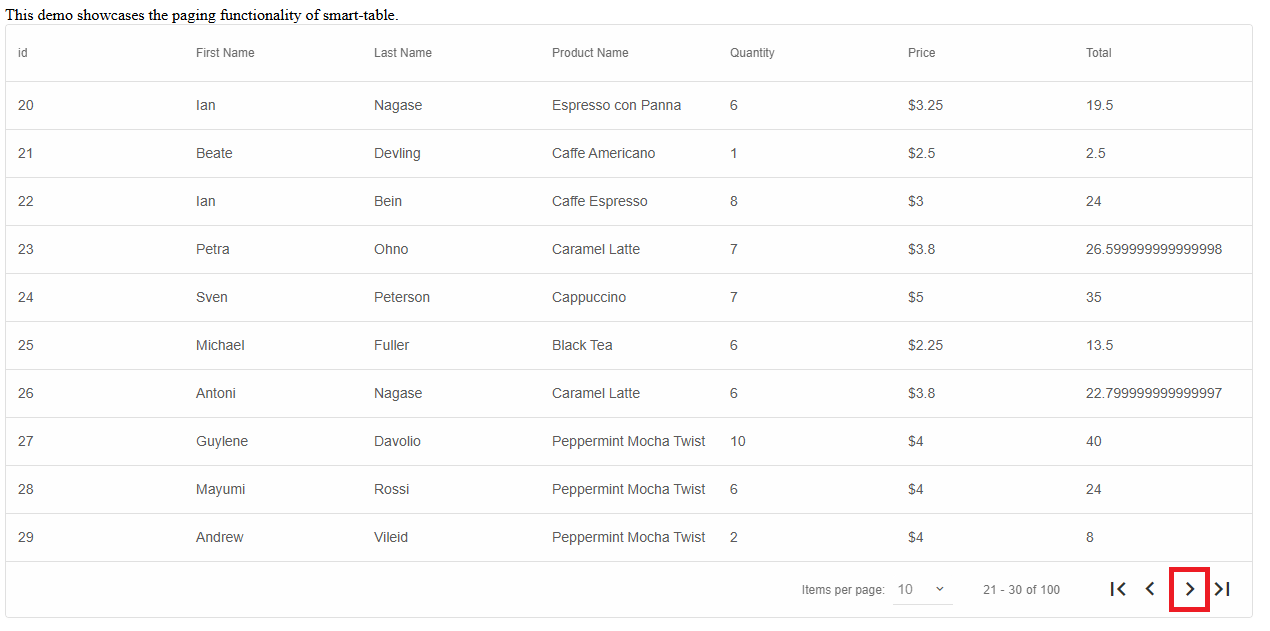
Each selector type has a checkbox to enable/disable it and an Accuracy slider (0.0 → 1.0, default 0.5).
[!TIP] If the pagination button has dynamic attributes that change on every page (e.g., dynamic IDs), you can manually edit the generated Strict or Fuzzy selector in the Properties panel after closing the wizard, and replace the dynamic parts with a wildcard (
*).
6.2. Pagination Stop Conditions
The activity automatically stops paginating when any of the following conditions is met:
- The Next button is not found (
ElementNotFoundException) → normal stop. - The Next button is in a disabled state (
disabledattribute, class containsdisabled,aria-disabled=true, oraastate=unavailable). - The data on the new page is identical to the previous page (prevents infinite loops).
- The configured row or page limit has been reached (see Properties below).
7. Confirm & Close the Wizard
Once configuration is complete:
- Confirm: Saves all settings (selectors, column settings, extract metadata) back into the activity. The wizard closes.
- Cancel: Discards all changes and exits the wizard. Existing configuration is unaffected.
[!WARNING] Clicking Cancel will discard all changes made since the wizard was opened. Always click Confirm to save.
8. Properties Panel Reference
After closing the wizard, open the activity's Properties panel to configure additional runtime parameters.
8.1. Input — Required
| Property | Type | Description |
|---|---|---|
TargetElement | Target | [Required] Selector for the table element. Auto-populated by the wizard. |
8.2. Input — Optional
| Property | Type | Default | Description |
|---|---|---|---|
NextButtonTarget | Target | (empty) | Selector for the pagination button. Leave empty for single-page tables. |
LimitExtractionTo | ExtractionLimitType | NoLimit | Extraction limit mode: NoLimit, MaxRows, or MaxPages. |
NumberOfItems | Int32 | 1000 (rows) / 200 (pages) | Maximum rows or pages to extract. Required when LimitExtractionTo ≠ NoLimit. |
DelayBefore | Int32 (ms) | 200 | Wait time before execution begins (ms). Must be ≥ 0. |
DelayAfter | Int32 (ms) | 300 | Wait time after execution completes (ms). Must be ≥ 0. |
DelayBetweenPages | Int32 (ms) | 0 | Wait time between page clicks when paginating. Must be ≥ 0. |
TimeoutMS | Int32 (ms) | 30000 | Overall timeout for the entire activity. Must be ≥ 3000 ms. |
ContinueOnError | Boolean | false | If true, errors are silently logged and execution continues. |
8.3. Input / Output
| Property | Type | Description |
|---|---|---|
DestinationDataTable | DataTable | The DataTable to receive results. If a pre-existing DataTable is passed in, new rows are merged into it. |
8.4. Input — Auto-Generated
| Property | Description |
|---|---|
ExtractMetadata | XML metadata describing the extraction structure (column names, attributes, CSS selectors…). Auto-generated by the wizard. |
TableSettings | XML table configuration (column types, data types, names, selection state). Auto-generated by the wizard. |
[!CAUTION] It is highly recommended not to manually edit
ExtractMetadataorTableSettingsunless you are resolving a specific table structure mismatch (see the Troubleshooting section below). Incorrect changes can break the extraction logic.
9. Default Values & Validation Rules
Validation Errors (Build / Runtime)
| Condition | Error |
|---|---|
TargetElement not configured | Required validation error |
LimitExtractionTo ≠ NoLimit but NumberOfItems is null | "Please specify the number of items when the extraction limit type is set to {type}" |
NumberOfItems ≤ 0 | "Value must be greater than 0" |
TimeoutMS < 3000 | "TimeoutMS must be ≥ 3000" |
DelayBefore < 0 | "DelayBefore must be ≥ 0" |
DelayAfter < 0 | "DelayAfter must be ≥ 0" |
DelayBetweenPages < 0 | "DelayBetweenPages must be ≥ 0" |
Internal Defaults (When Not Set)
| Property | Internal Default |
|---|---|
DelayBefore | 200 ms |
DelayAfter | 300 ms |
DelayBetweenPages | 0 ms |
TimeoutMS | 30000 ms (Constants.TimeoutMS) |
LimitExtractionTo | NoLimit |
NumberOfItems | 1000 (MaxRows mode) / 200 (MaxPages mode) |
Design-Time vs Runtime Table Structure Mismatch
Problem
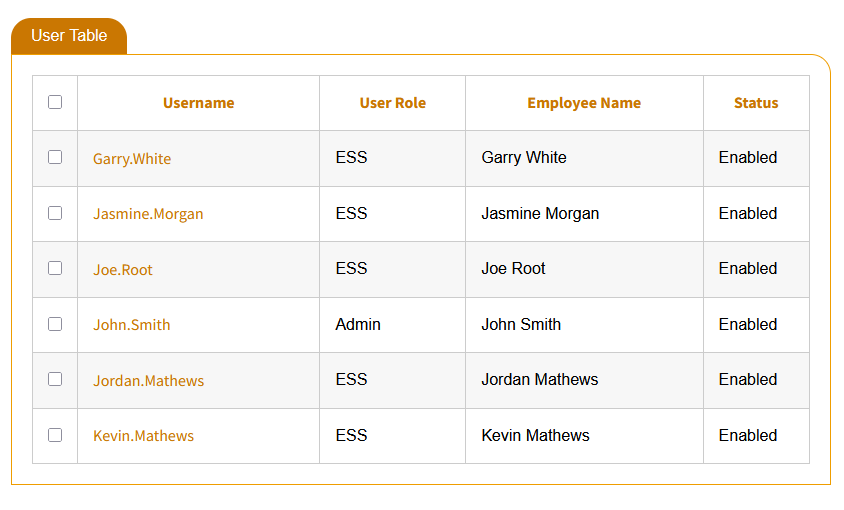
The Table Extraction activity relies on the underlying XML metadata generated during the initial setup. If the target application alters its layout—such as reordering, renaming, or inserting new columns—the pre-configured selectors and metadata will no longer align with the live DOM structure.
Simply put, a mismatch occurs when the table structure changes between when the activity was configured (design time) and when the automation actually runs (runtime).
Expected Structure (Design Time):
Actual Structure (Runtime):
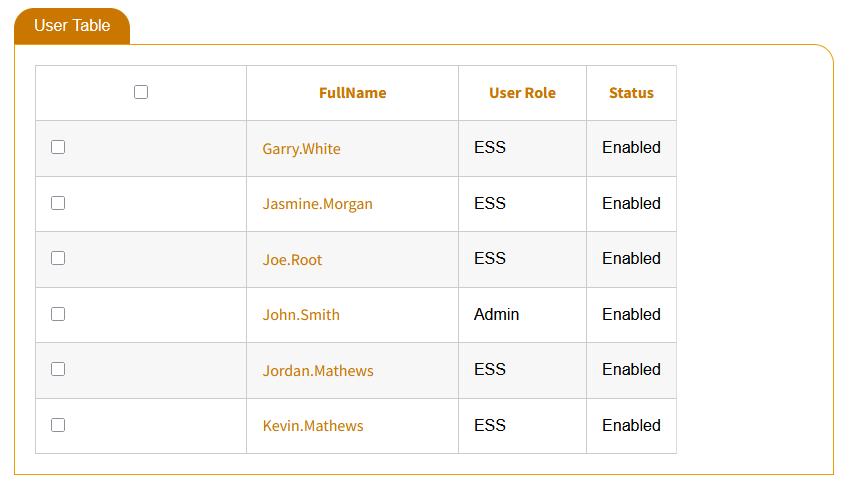
This discrepancy breaks the extraction mapping, leading to incomplete DataTables or runtime exceptions.
Fix — Clear the Column Definitions from TableSettings
The safest workaround is to remove all <Column> child nodes from the TableSettings XML. This forces the activity to accept whatever column structure the live table provides at runtime, without trying to match against stale design-time definitions.
Step-by-step:
- In the activity's Properties panel, locate the
TableSettingsproperty. - Click the expression editor button (
...) to open the raw XML value. - Find the
<Table ...>root element. It will look similar to:
<Table>
  <Column Name='id' ReferenceIdx='0' DataType='Number' DecimalSeparator='.' ThousandsSeparator=',' AllowNull='false' DefaultValue='' />
  <Column Name='First Name' ReferenceIdx='1' DataType='Text' />
  <Column Name='Last Name' ReferenceIdx='2' DataType='Text' />
  <Column Name='Product Name' ReferenceIdx='3' DataType='Text' />
  <Column Name='Quantity' ReferenceIdx='4' DataType='Number' DecimalSeparator='.' ThousandsSeparator=',' AllowNull='false' DefaultValue='' />
  <Column Name='Price' ReferenceIdx='5' DataType='Number' DecimalSeparator='.' ThousandsSeparator=',' AllowNull='false' DefaultValue='' />
  <Column Name='Total' ReferenceIdx='6' DataType='Number' DecimalSeparator='.' ThousandsSeparator=',' AllowNull='false' DefaultValue='' />
</Table>
- Delete all
<Column>...</Column>child nodes, leaving only the<Table>root element:
<Table>
</Table>
- Save the change and run the automation again.
10. Next Steps
After successfully extracting the table, the data is stored in memory as a DataTable variable. You can use standard data manipulation activities to process it, or write it directly to a file:
- Use Write Range (Excel) to export the DataTable to an Excel spreadsheet.
- Use Write CSV File to export the DataTable to a CSV file.