Workflow
Workflow represents the association between a Package and an Agent Group. Each time a package is linked to an Agent Group, it is automatically distributed to all the Agent machines that belong to that Agent Group.
The Workflows page enables you to deploy an uploaded package to Agent Groups, manage previously created associations and keep all your workflows up to date. This helps you distribute packages on the Agent machines and execute works faster from the Tasks page. To access the Workflows page, you click the Workflow tab at the left menu. After clicking, the system shows the Workflow page listing all existed Workflow as below:
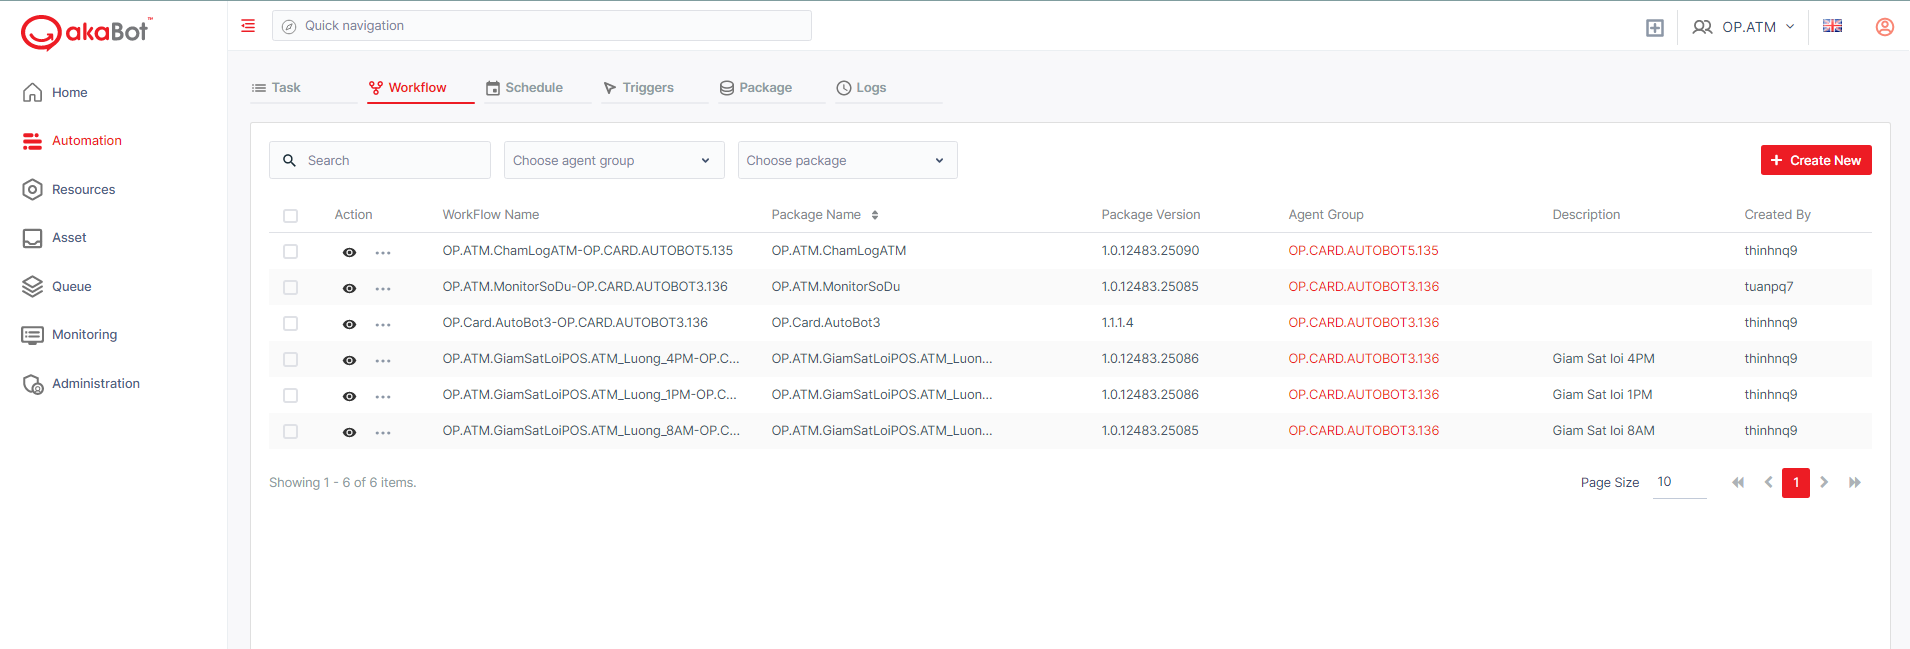
| No | Column/Label | Description |
|---|---|---|
| 1 | Action | Available actions to manage the Log of said Workflow. Includes: * VIEW: allows you to be redirected to the Task Detail page. * EDIT: allows you to edit the details of each Workflow * DELETE: allows you to remove selected Workflow from Center. * START JOB: Quickly create a new Task related to this workflow. * ADD SCHEDULE: Quickly add a schedule related to this workflow By selecting the Checkbox corresponding to each Workflow, the delete option will appear beside the Filter option and allow you to delete the Workflow ! Selecting the Checkbox next to Action will select all Workflow in display and allow you to bulk delete selected them |
| 2 | Workflow Name | The name of the Workflow. For organization purposes, it is best to create Workflow Name with the format: Package Name_Agent Group Name. |
| 3 | Package Name | The name of the Package that was published to akaBot Center |
| 4 | Package Version | The version of the package that was published to akaBot Center. The package version will be decided when you choose the publish option in akaBot Studio. |
| 5 | Agent Group | Agent Group which the workflows will be deployed in |
| 6 | Description | The current version of Package’s published description |
| 7 | Created by | The user who creates this Workflow. |
View a Workflow
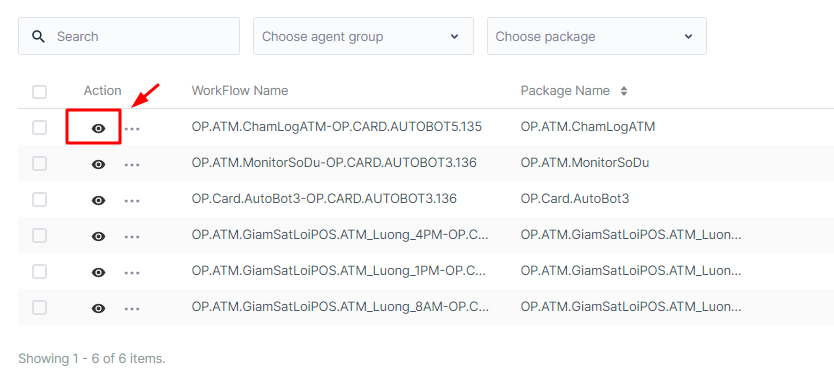
To view a workflow, you can click the eye button.
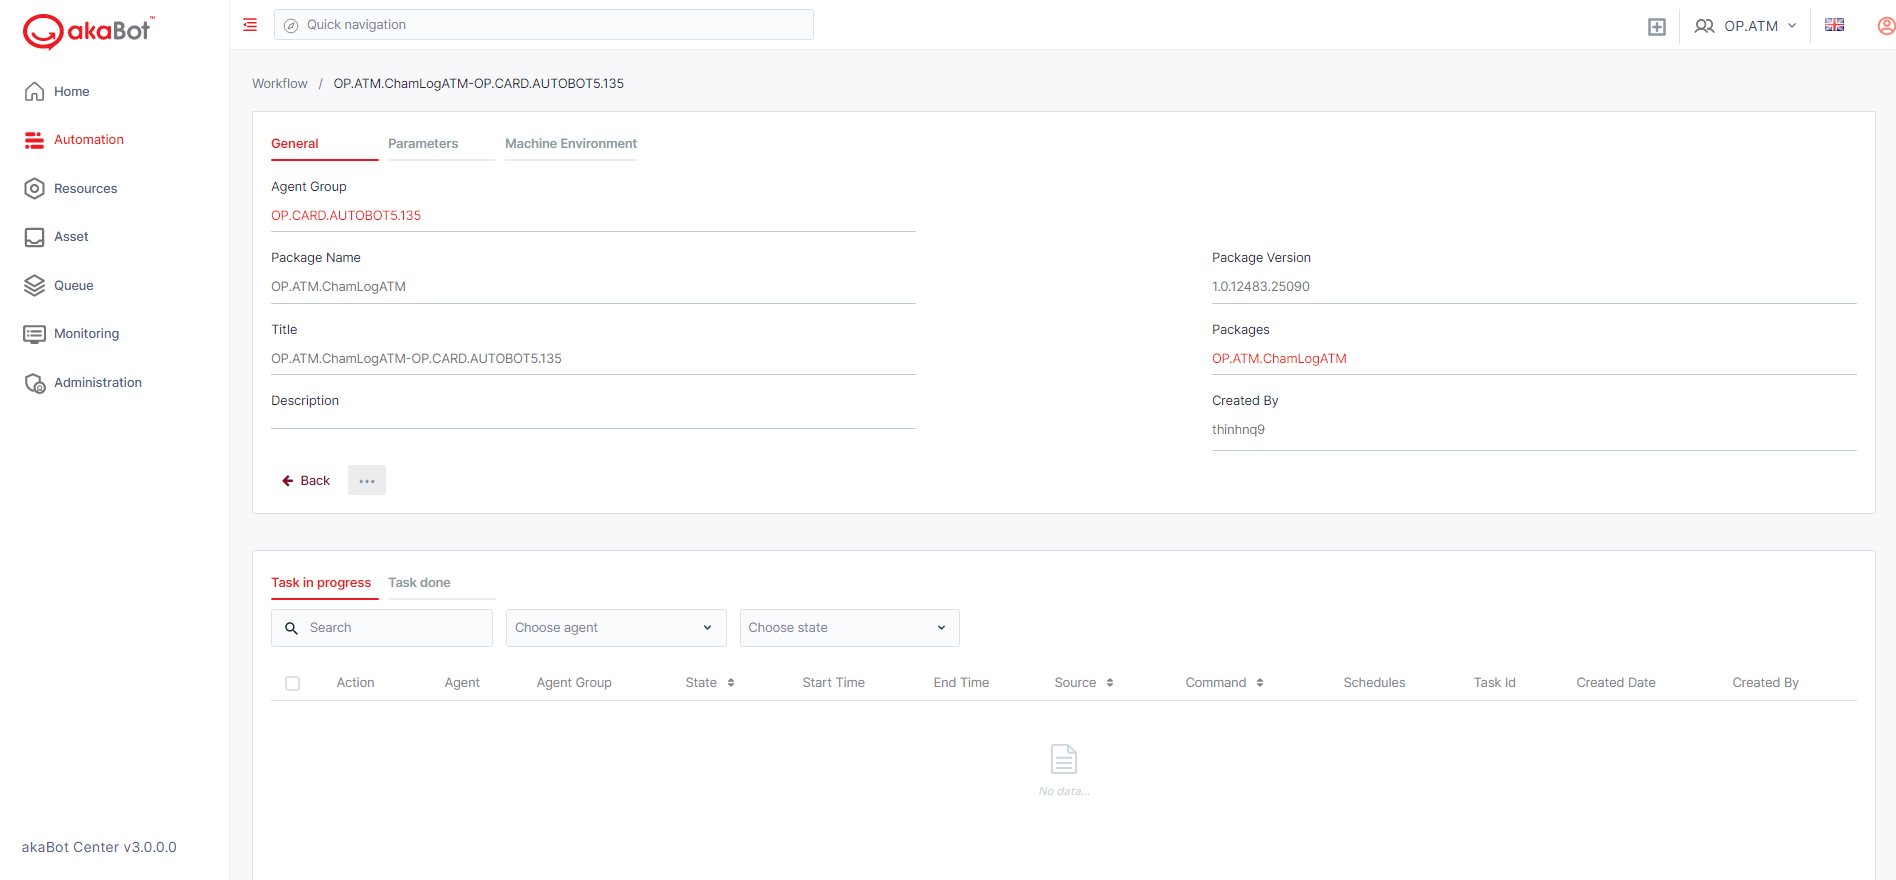
Besides all the general information displayed on the Workflow Listing page, the Workflow Details page also included Parameters and Machine Environment information generated when creating/editing the Workflow.
Furthermore, you can see the update history as well as a list of Tasks executed by said Workflow. Details regarding Tasks shall be explained in the Tasks section.
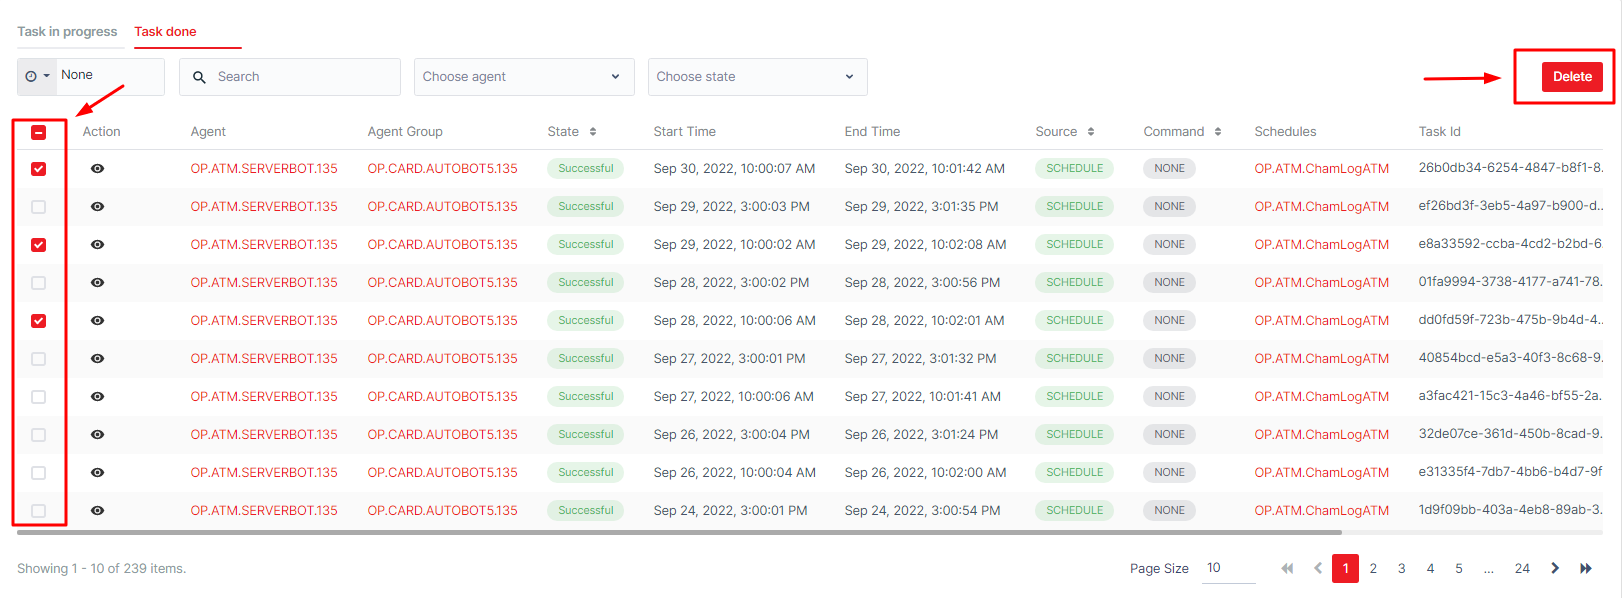
Here, you can search the Task list by Time, Name, State, Agent of the tasks.
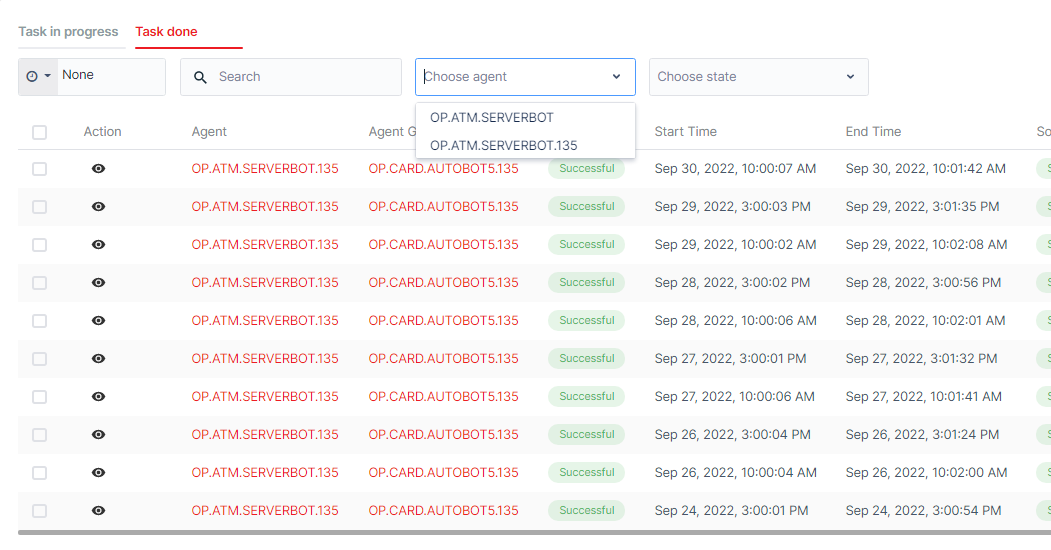
Users can also delete executed instances of this Workflow by selecting the Checkbox at the beginning of each Task. The Delete button will show up.
Search a Workflow
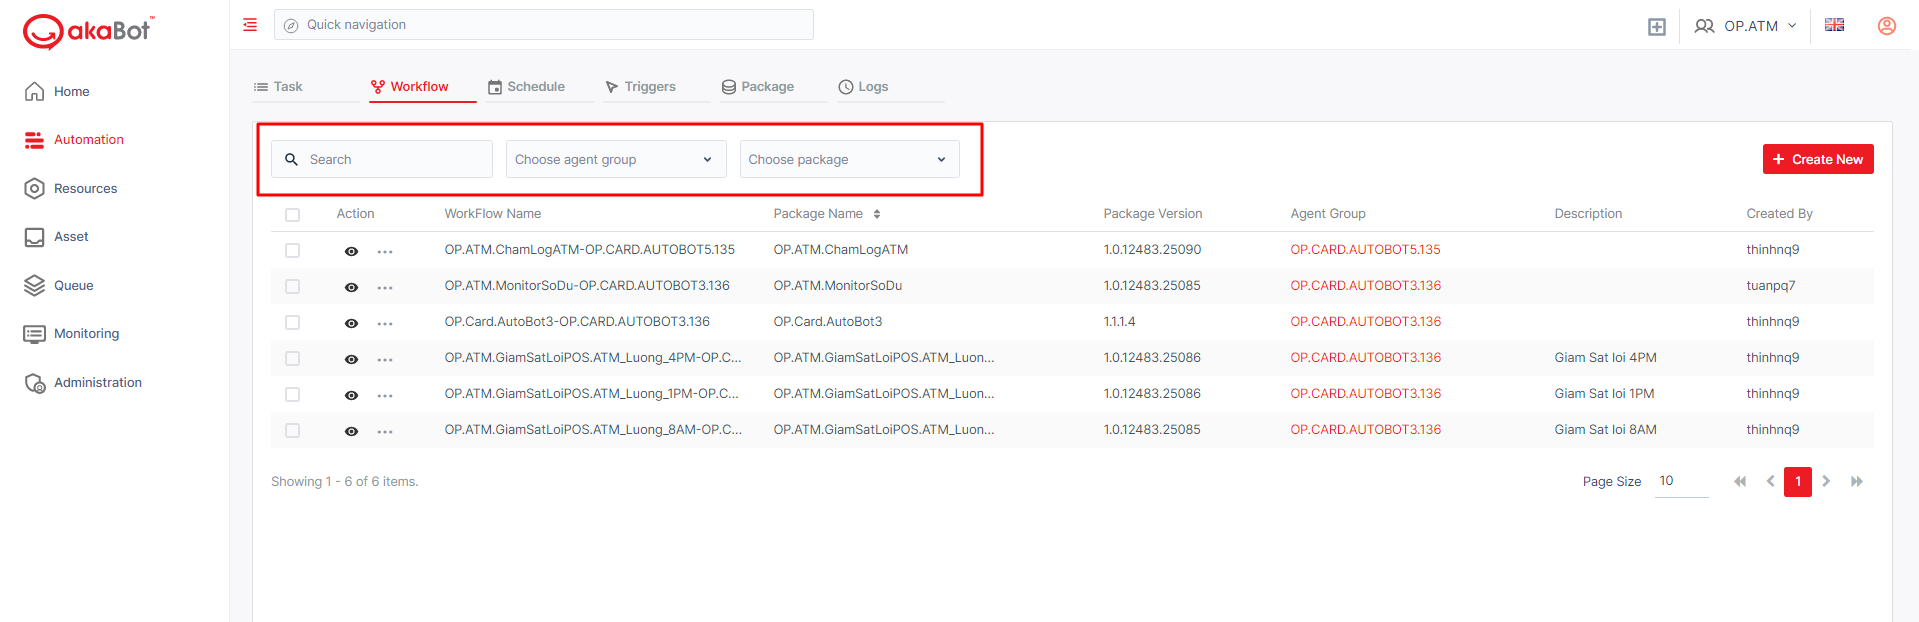
| No | Column /Label | Description | Type | Maximum | Input Requirement |
|---|---|---|---|---|---|
| 1 | Search box | Enter the name of the workflow you want to search | String | No limit | |
| 2 | Agent Group | Select the agent group that the workflow you want to search is attached to | Input searching | No limit | |
| 3 | Package | Select the package that the workflow you want to search is attached to | Input searching | No limit |
Create a Workflow
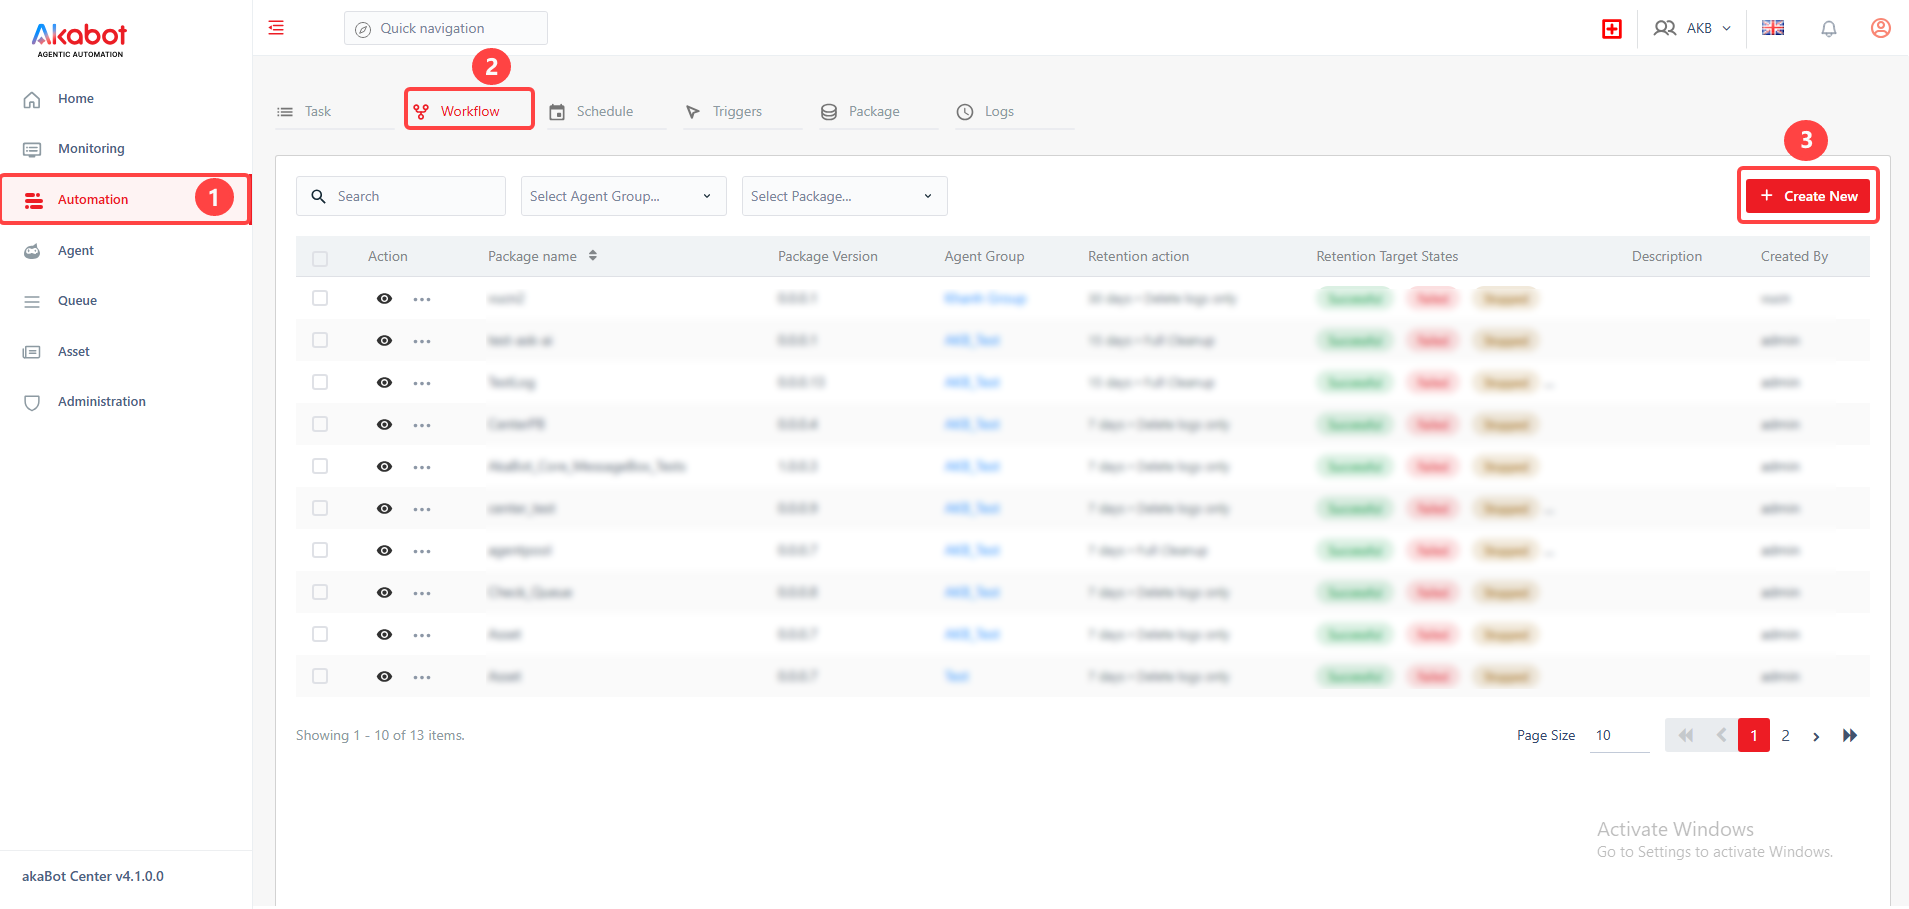
To create a workflow, you click the “Create New” button at the top of the page.
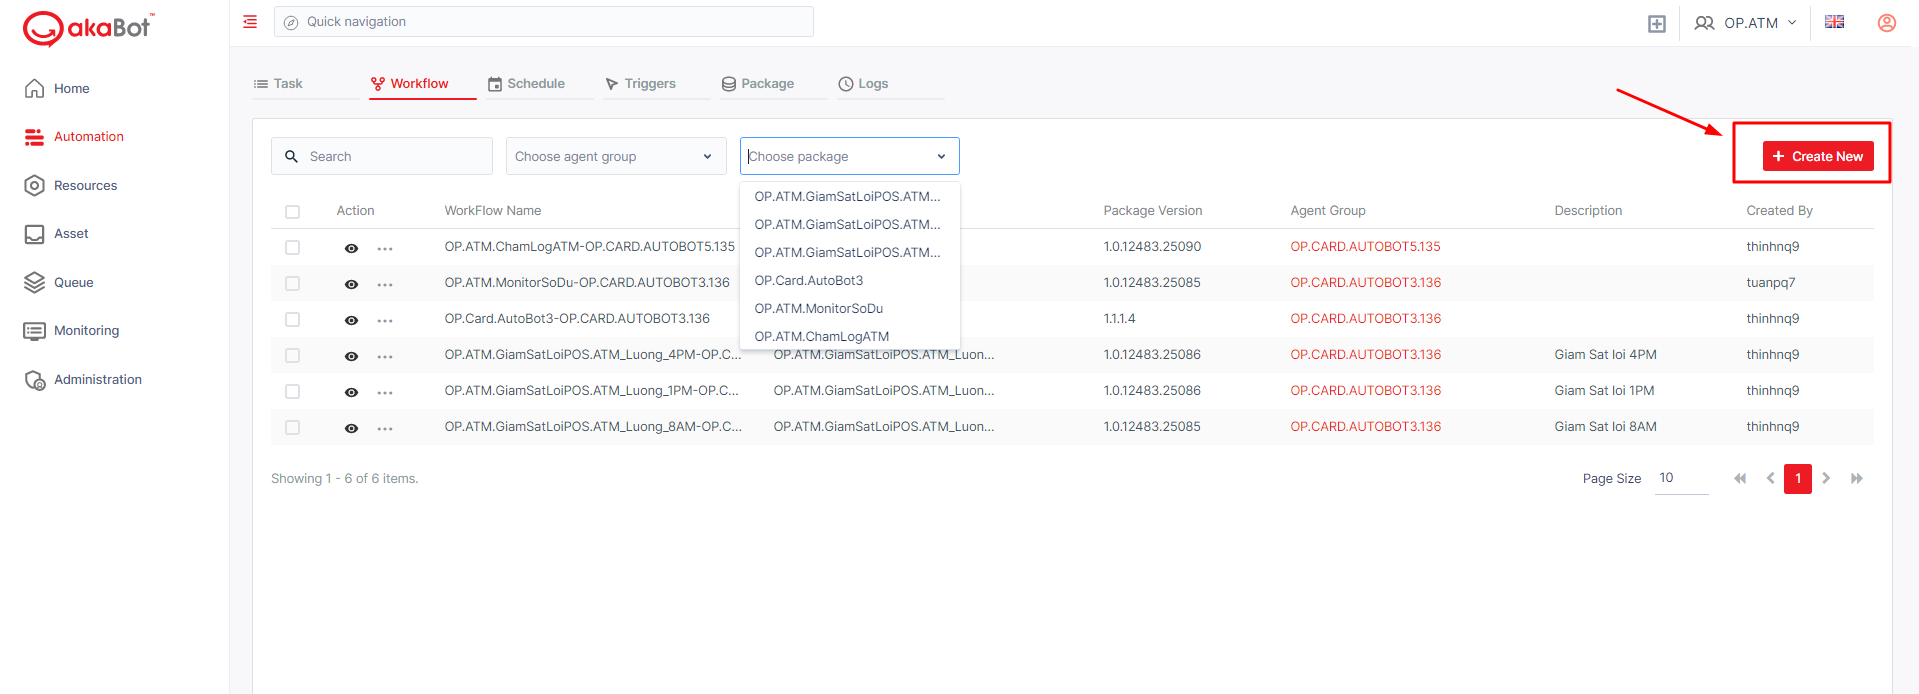
After clicking, the system shows a form allowing you to create the workflow.
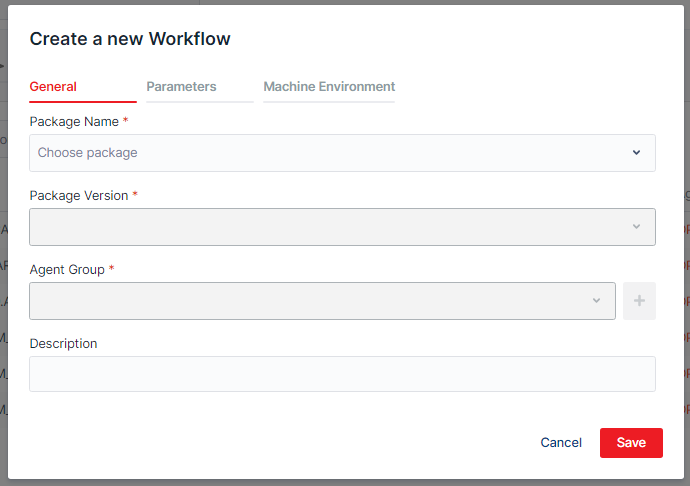
| No | Column /Label | Description | Type | Maximum | Is Mandatory? | Input Requirement |
|---|---|---|---|---|---|---|
| 1 | Package Name | Select the package you want for the workflow you are creating | Input searching | No limit | Yes | |
| 2 | Package Version | Depends on the package that you chose above Select the version of the package you chose | Dropdown list | Yes | ||
| 3 | Agent Group | Depends on the package version that you chose Select the agent group that you want to attach the workflow that you are creating to | Input searching | No limit | Yes | |
| 4 | Description | Enter the description of the workflow you are creating/editing | String | 255 char | No |
Once filled in all the General information, you can add further Parameters and Machine Environment variables to the Workflow. You can add multiple variables, but you can only add one by one.
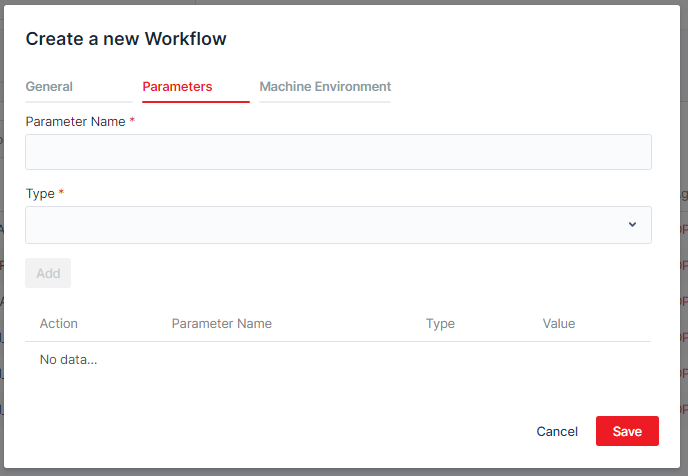
| No | Column /Label | Description | Type | Maximum | Is Mandatory ? | Input Requirement |
|---|---|---|---|---|---|---|
| Parameter Name | Enter the name of the parameter | String | 255 char | Yes | ||
| Type | Select the type of the parameter | Drop down list | Yes | |||
| Value | Depends on the type that you chose Enter/select the value of the parameter | |||||
| If you chose string | String | 500 char | Yes | |||
| If you chose bool | Boolean, SingleChoice | Yes | ||||
| If you chose integer | Int32 | 500 char | Yes |
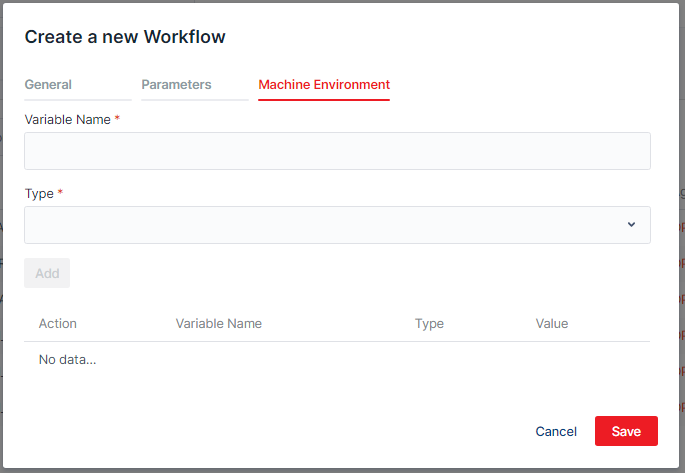
| No | Column /Label | Description | Type | Maximum | Is Mandatory? | Input Requirement |
|---|---|---|---|---|---|---|
| 1 | Variable Name | Enter the name of the variable | String | 255 char | Yes | |
| 2 | Type | Select the type of the variable | Dropdown list | Yes | ||
| 3 | Value | Depends on type that you chose Enter/select the value of the variable | Yes | |||
| If you chose string | String | 500 char | Yes | |||
| If you chose bool | Boolean, SingleChoice | Yes | ||||
| If you chose integer | Int32 | 500 char | Yes |
Edit a Workflow
To edit a workflow, you click the Three dots button, then click Edit.
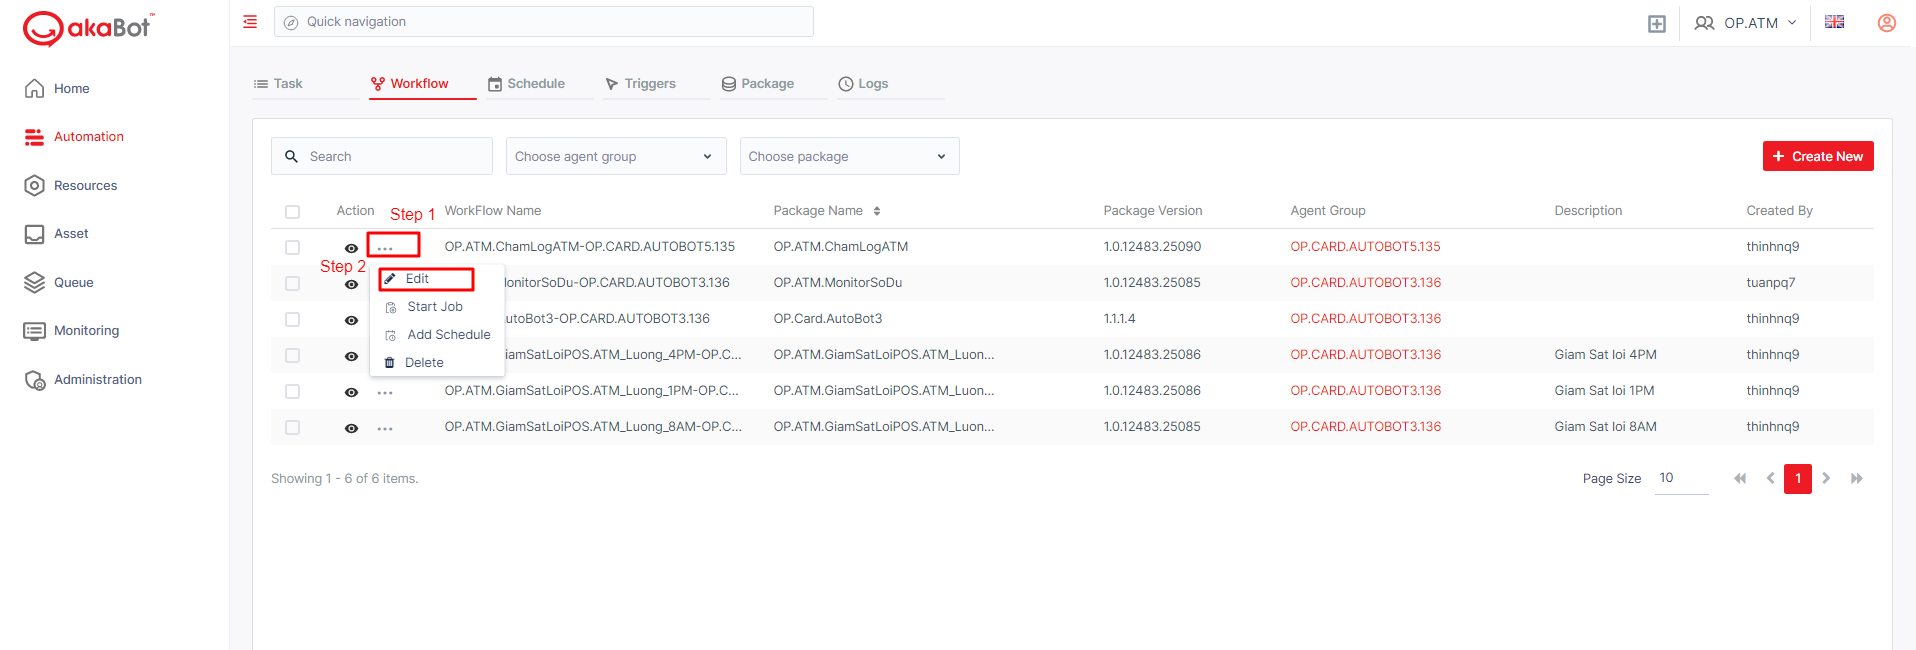
After clicking, the system shows a form allowing you to edit the info of the workflow.
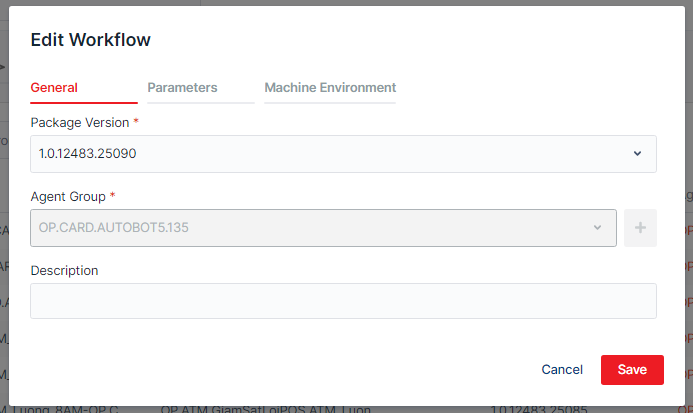
| No | Column /Label | Description | Type | Maximum | Is Mandatory? | Input Requirement |
|---|---|---|---|---|---|---|
| 1 | Package Version | Depends on the package that you chose above Select the version of the package you chose | Dropdown list | Yes | ||
| 2 | Agent Group | Depends on the package version that you chose Select the agent group that you want to attach the workflow that you are creating to | Can not edit | |||
| 3 | Description | Enter the description of the workflow you are creating/editing | Can not edit |
Once edit package version, you can edit further Parameters and Machine Environment variables to the Workflow. You can add multiple variables, but you can only add one by one (same as above).
Delete a Workflow
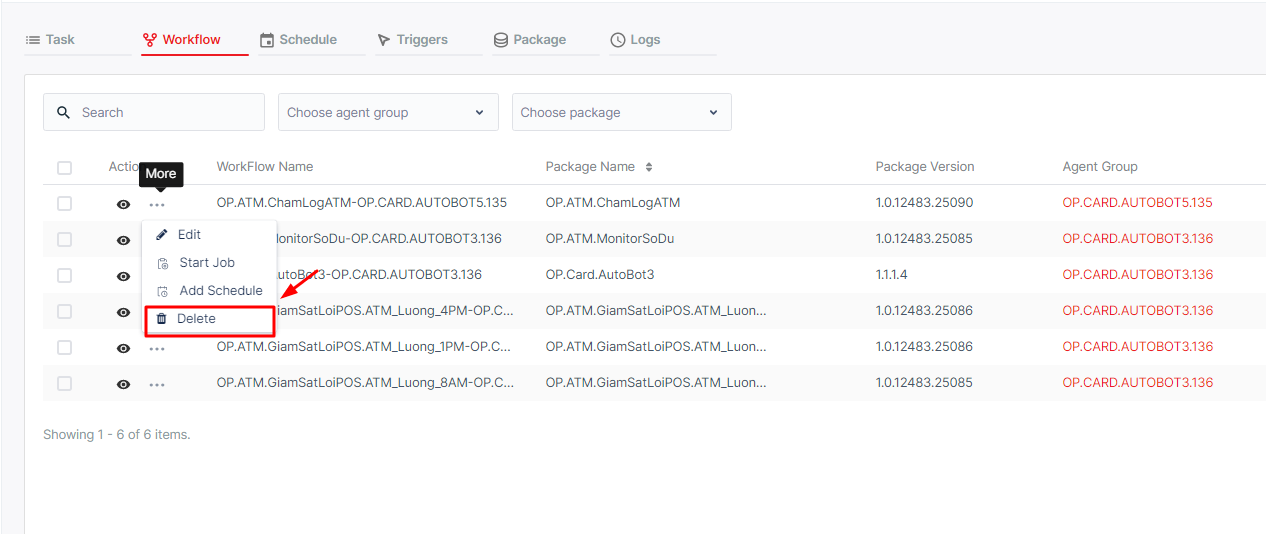
To delete, you click the Three dots button, then click Delete.
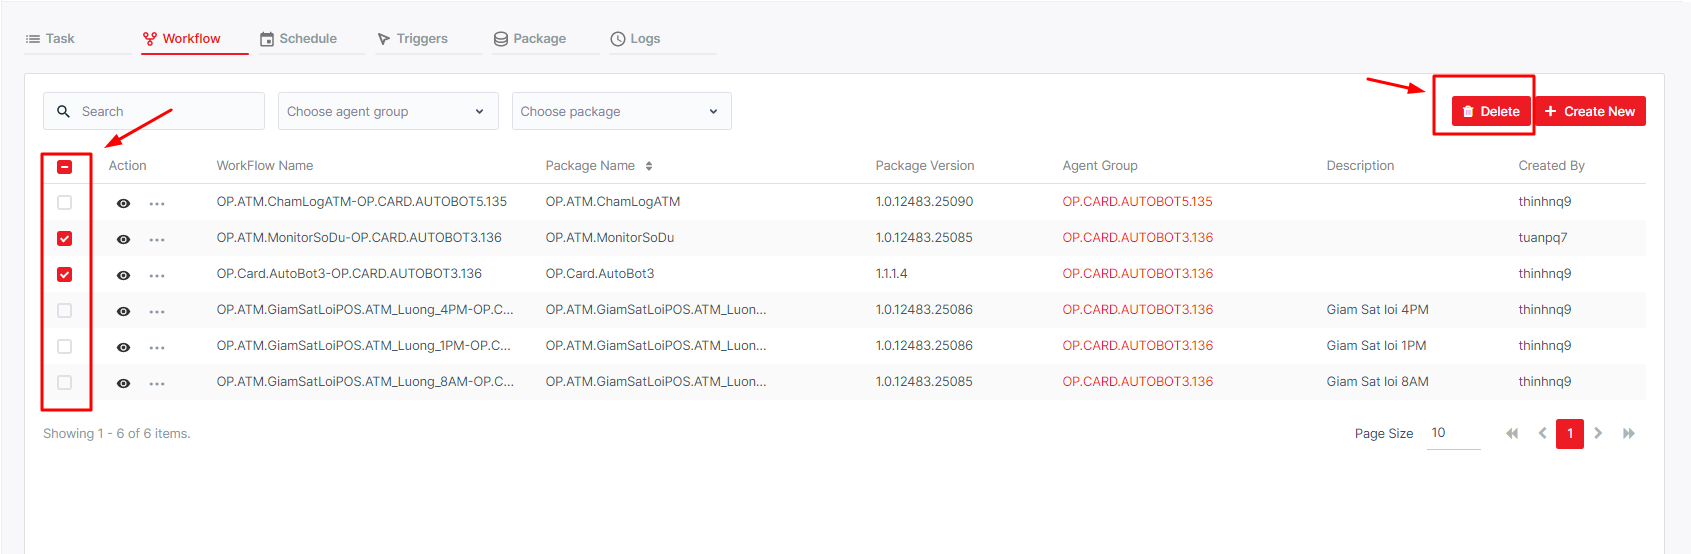
Alternatively, you can select the checkbox before each Workflow and the Delete button will show up next to the Filter button. Tick the Checkbox next to Action will allow the user to select all displayed Agent for bulk delete.
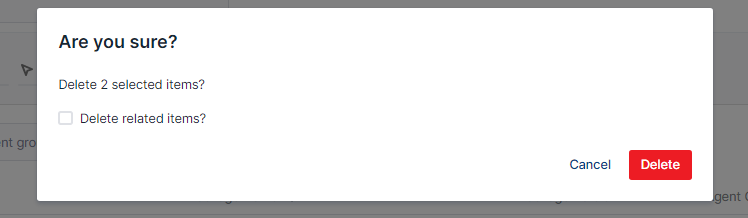
After clicking, a system will show a confirmation message for you to confirm.
Workflow Retention Policy
The Workflow Retention Policy is a feature in akaBot Center that controls how long workflow execution history — including logs and task records — is kept before being automatically deleted.
Without a retention policy, execution history accumulates indefinitely. Over time this can slow down the Workflows page and increase storage usage. By configuring a policy, administrators can automate the cleanup of outdated execution data on a schedule.
By default, older workflows created before this feature was introduced keep their logs permanently. However, for any new workflows created or when updating an existing workflow, configuring a custom retention policy is mandatory.
Retention Policy Parameters
The Retention Policy configuration panel contains the following parameters:
| No | Column/Label | Description | Type | Default Value | Is Mandatory? | Constraints / Requirements |
|---|---|---|---|---|---|---|
| 1 | Retention Policy Selection | Choose whether to keep all records indefinitely or set custom cleanup rules. | Toggle Options | Keep permanently | Yes (during update) | • Only available when updating an older workflow without a policy. • During workflow creation, this option is hidden and custom retention is mandatory. |
| 2 | Retention period (days) | The duration (in days) that execution data will be kept in the database before deletion. | Numeric Input | 30 days | Yes | • Min: 7• Max: 180• Must be a positive integer. Invalid values show an error message and disable the Save button. |
| 3 | Apply to task states | Select which execution outcomes will trigger the cleanup. | Checkboxes | None (requires selection) | Yes | Available options: • Successful• Failed• Stopped• Pending• Stopping• Terminating |
| 4 | Cleanup scope | Defines the extent of the deletion when the retention threshold is reached. | Radio Buttons | Delete logs only | Yes | Options: • Delete logs only: Deletes execution logs, but keeps the task. • Full Cleanup: Deletes both execution logs and the task entirely. |
Configure Retention Policy during Workflow Creation
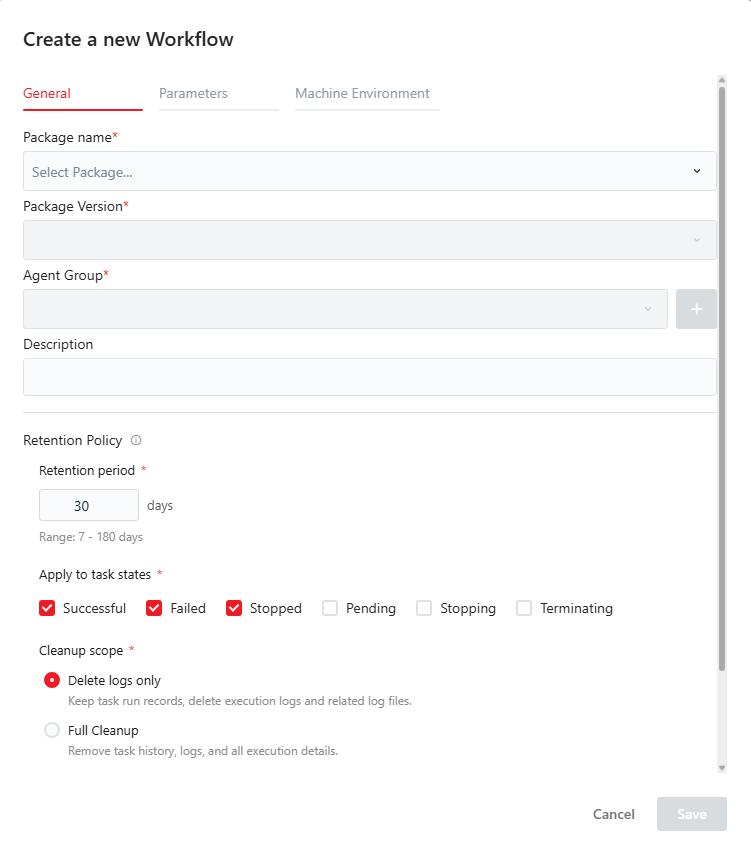
When creating a brand-new workflow association (linking a NuGet Package to an Agent Group) by clicking the "Create New" button at the top of the Workflows page, configuring the Retention Policy is mandatory.
-
Fill out the general mandatory fields: Package Name, Package Version, and Agent Group.
-
Scroll to the bottom of the dialog to find the Retention Policy section.
-
Specify the Retention period (must be an integer between 7 and 180 days).
-
Check one or more execution states under Apply to task states.
-
Choose the Cleanup scope (either Delete logs only or Full Cleanup).
-
Click Save to deploy the workflow with the active policy.
Configure Retention Policy during Workflow Update
Workflow with Configured Retention Policy
For workflows that already have a custom retention policy active:
-
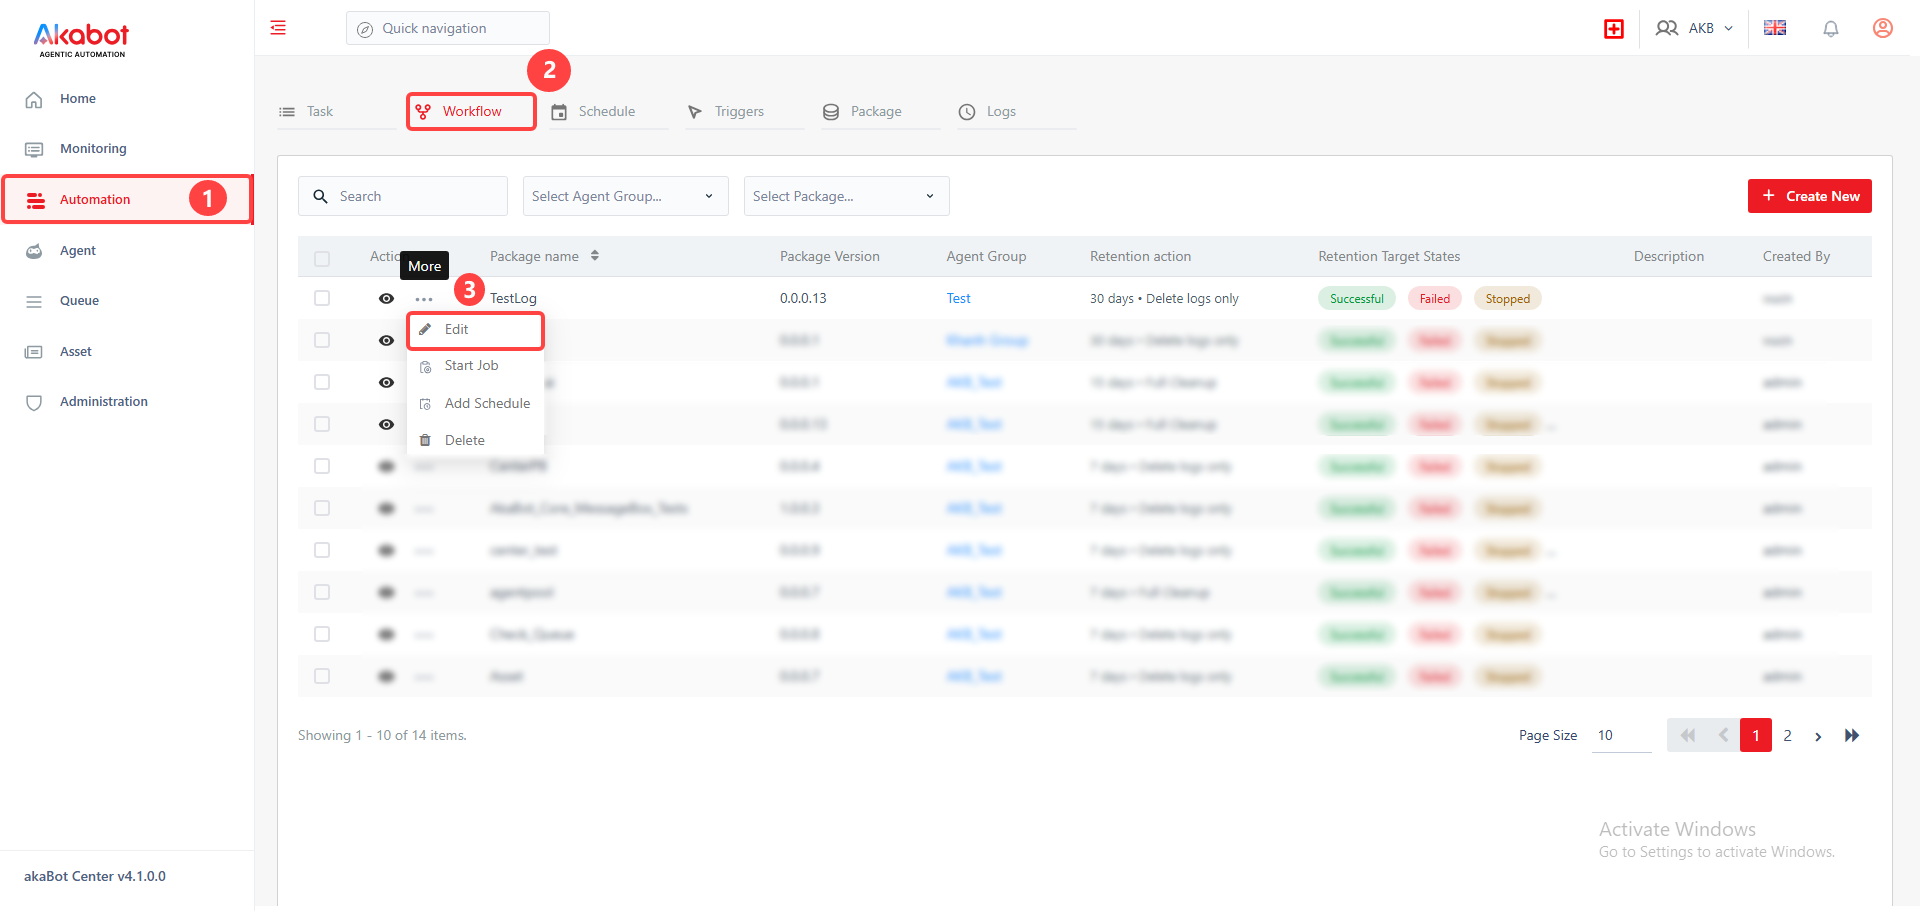
Click the Three dots button next to the workflow on the listing page and select Edit.
-
Scroll down to the Retention Policy section of the Edit Workflow dialog. The fields will display the currently active values.
-
Modify the Retention period, Apply to task states, and Cleanup scope as needed.
-
Click Save to apply the modifications.
Workflow with Permanent Retention (No Active Policy)
For workflows created prior to implementing retention settings:
-
Click the Three dots button next to the workflow and select Edit.
-
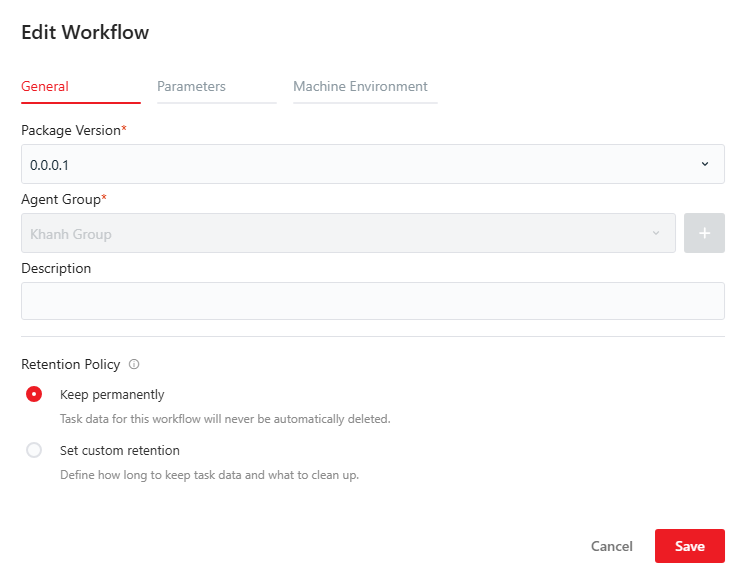
Scroll down to the Retention Policy section. You will see two options: Keep permanently (active by default) and Set custom retention.
-
To configure a custom policy, select Set custom retention.
-
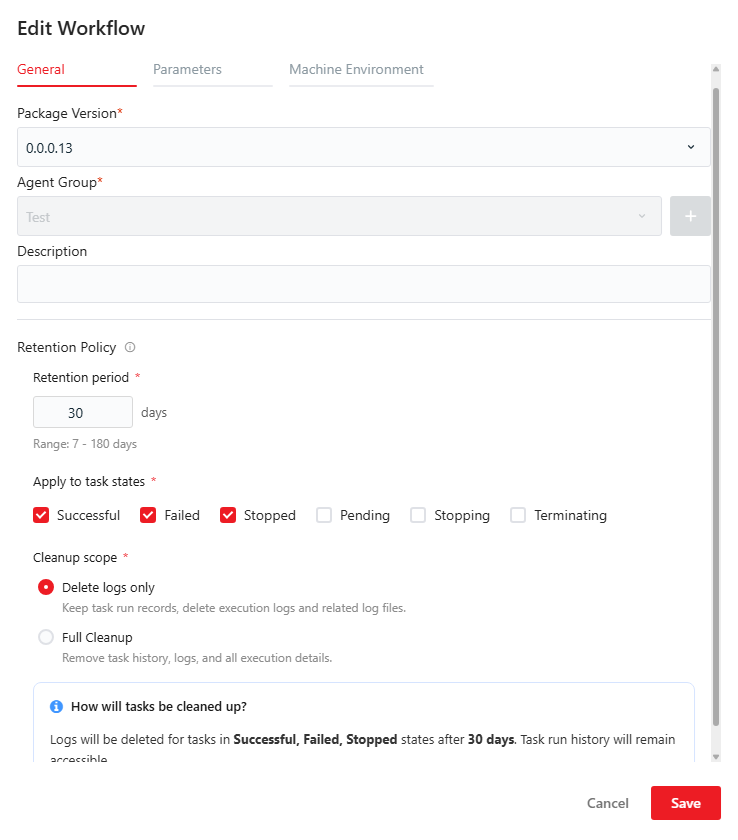
The configuration fields will appear with default placeholders (e.g., 30 days, Delete logs only).
-
Set your desired retention period, states, and scope.
-
Click Save to save the new policy.
View Retention Policy on the Workflow Details Page
To view the retention policy configured for a workflow:
- On the Workflow Listing page, click the eye (View) icon next to the desired workflow.
- The workflow details page has two tabs containing retention policy information:
General Tab
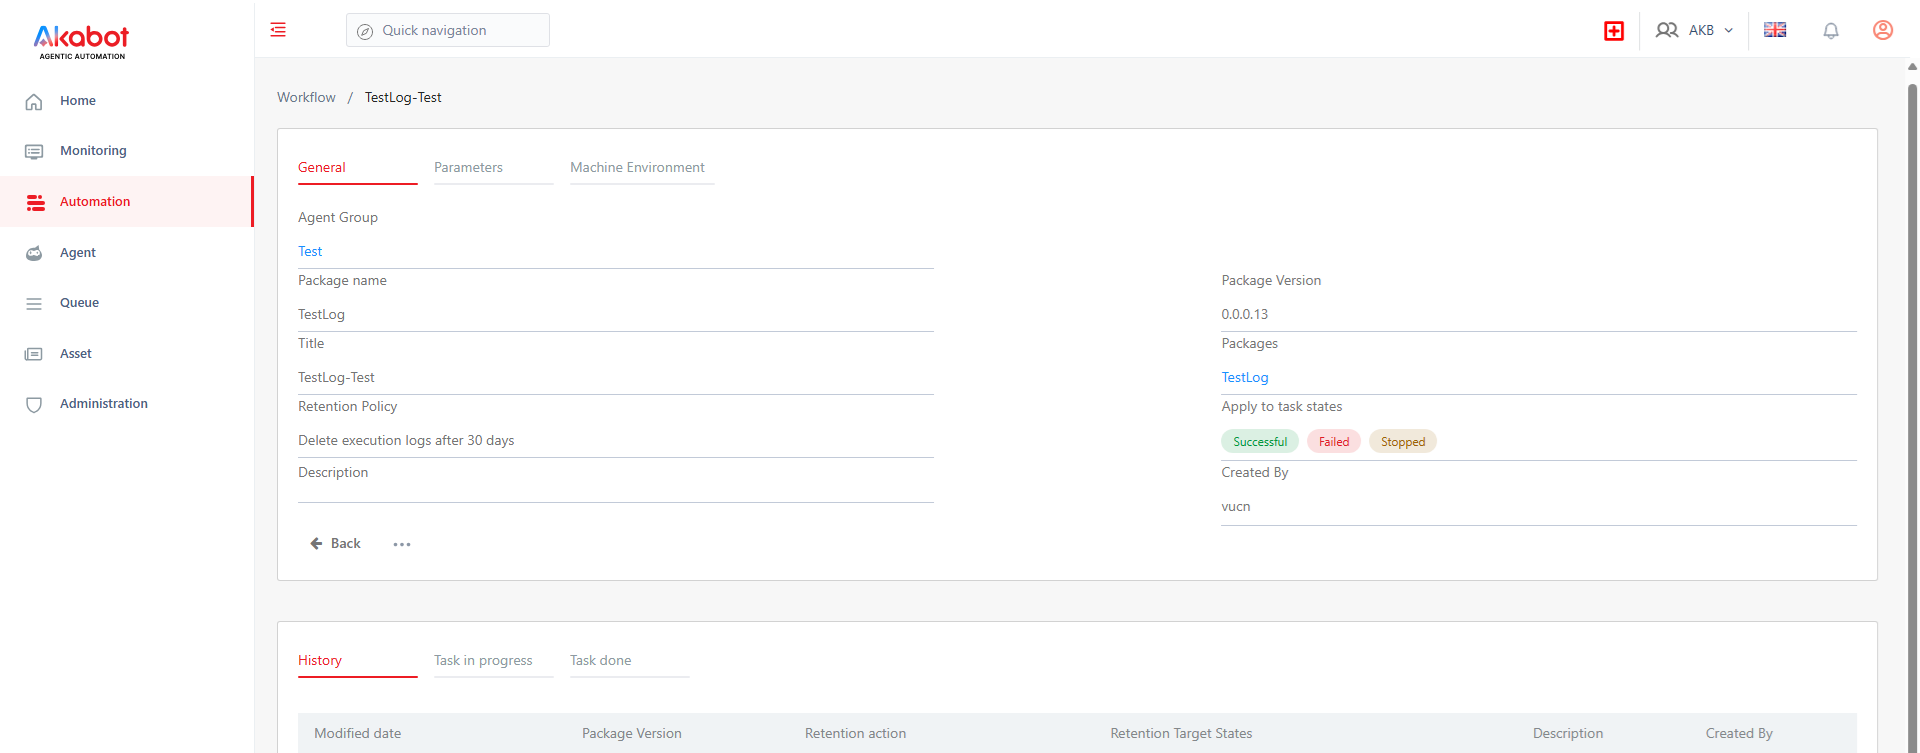
Under the General tab of the details page, the current active retention policy is displayed:
- Retention Policy: Displays the chosen cleanup action and duration (e.g.,
Delete execution logs after 30 days). If the workflow is an older legacy workflow that hasn't been updated with a custom policy, it displaysKeep permanently. - Apply to task states: Lists the execution states that trigger cleanup (e.g.,
Successful,Failed). This field is hidden if the policy is set toKeep permanently.
History Tab
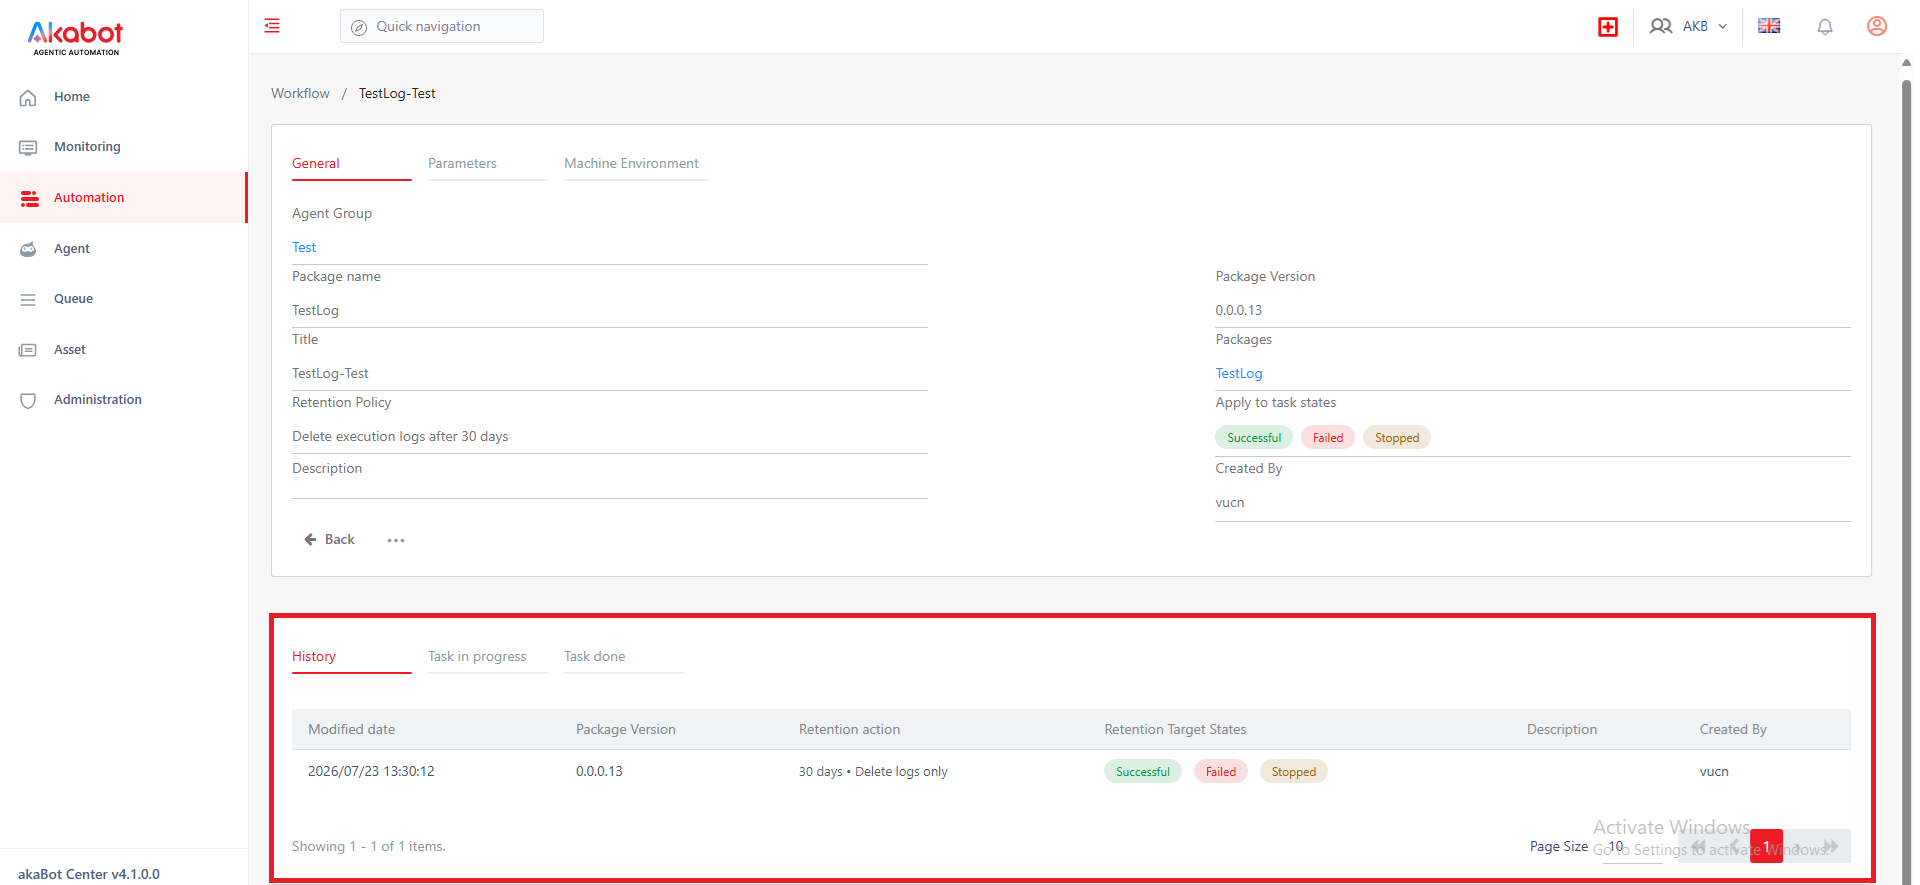
The History tab (Update History) records a chronological log of all changes made to the workflow, including modifications to its retention policy. Each time the workflow is edited, a new log entry is created.
The history log contains the following columns related to the retention policy:
| No | Column/Label | Description |
|---|---|---|
| 1 | Modified date | The date and time when the modification was saved. |
| 2 | Package Version | The package version active when the modification occurred. |
| 3 | Retention action | Displays the cleanup period and cleanup scope (e.g., 15 days • Full Cleanup or Keep permanently). |
| 4 | Retention Target States | Lists the task states configured for cleanup (e.g., Successful, Failed, Stopped). |
| 5 | Description | Any change comment entered by the user. |
| 6 | Created By | The username of the account that made the modification. |
System Configuration (application.yml)
For system administrators, the global behavior of the background retention execution and defaults for new workflows are configured in the Center's application.yml configuration file under the retention.workflow path.
Important: After modifying
application.yml, you must restart the akaBot Center service for the changes to take effect. Configuration changes are only read at startup and will not apply to a running instance.
Here is the default YAML configuration structure:
retention:
  workflow:
    enable: true
    cron: "0 0 2 * * ?"
    job-batch-size: 100
    log-batch-size: 200
    max-cleanup-iterations: 1000
    max-log-cleanup-iterations: 10000
    max-excluded-jobs: 900
    default-days: 30
    default-states: "SUCCESSFUL,FAULTED,STOPPED"
    default-log-only: true
Below is a detailed description of each system configuration key:
| Parameter | Type | Default Value | Description |
|---|---|---|---|
| enable | Boolean | true | Globally enables or disables the automatic background workflow retention cleanup job. |
| cron | String | "0 0 2 * * ?" | Cron expression defining the execution schedule for the background cleanup job (e.g., daily at 2:00 AM). |
| job-batch-size | Integer | 100 | Limits the number of task records processed and deleted in a single batch. |
| log-batch-size | Integer | 200 | Limits the number of execution logs processed and deleted in a single batch. |
| max-cleanup-iterations | Integer | 1000 | The maximum loop iterations allowed for database cleanup to prevent lock contention. |
| max-log-cleanup-iterations | Integer | 10000 | The maximum loop iterations allowed for Elasticsearch/database log cleanup to prevent timeouts. |
| max-excluded-jobs | Integer | 900 | The maximum count of task records that can be excluded from deletion rules. |
| default-days | Integer | 30 | The default retention period (in days) displayed when creating a workflow. |
| default-states | String | "SUCCESSFUL,FAULTED,STOPPED" | Comma-separated default task execution states checked during workflow creation. |
| default-log-only | Boolean | true | The default cleanup scope during workflow creation (true = Delete logs only, false = Full Cleanup). |