Clean Data
The Clean Data screen allows administrators to manage data retention policies and purge historical operational data (such as completed tasks, execution logs, processed queue items, and audit trails). Over time, automated robot executions generate significant volumes of transactional records; configuring regular data cleanup prevents database storage exhaustion, optimizes query responsiveness, and ensures compliance with organizational data retention regulations.
To access the Clean Data screen, navigate to Administration in the left navigation sidebar and select the Clean Data tab from the top navigation bar.
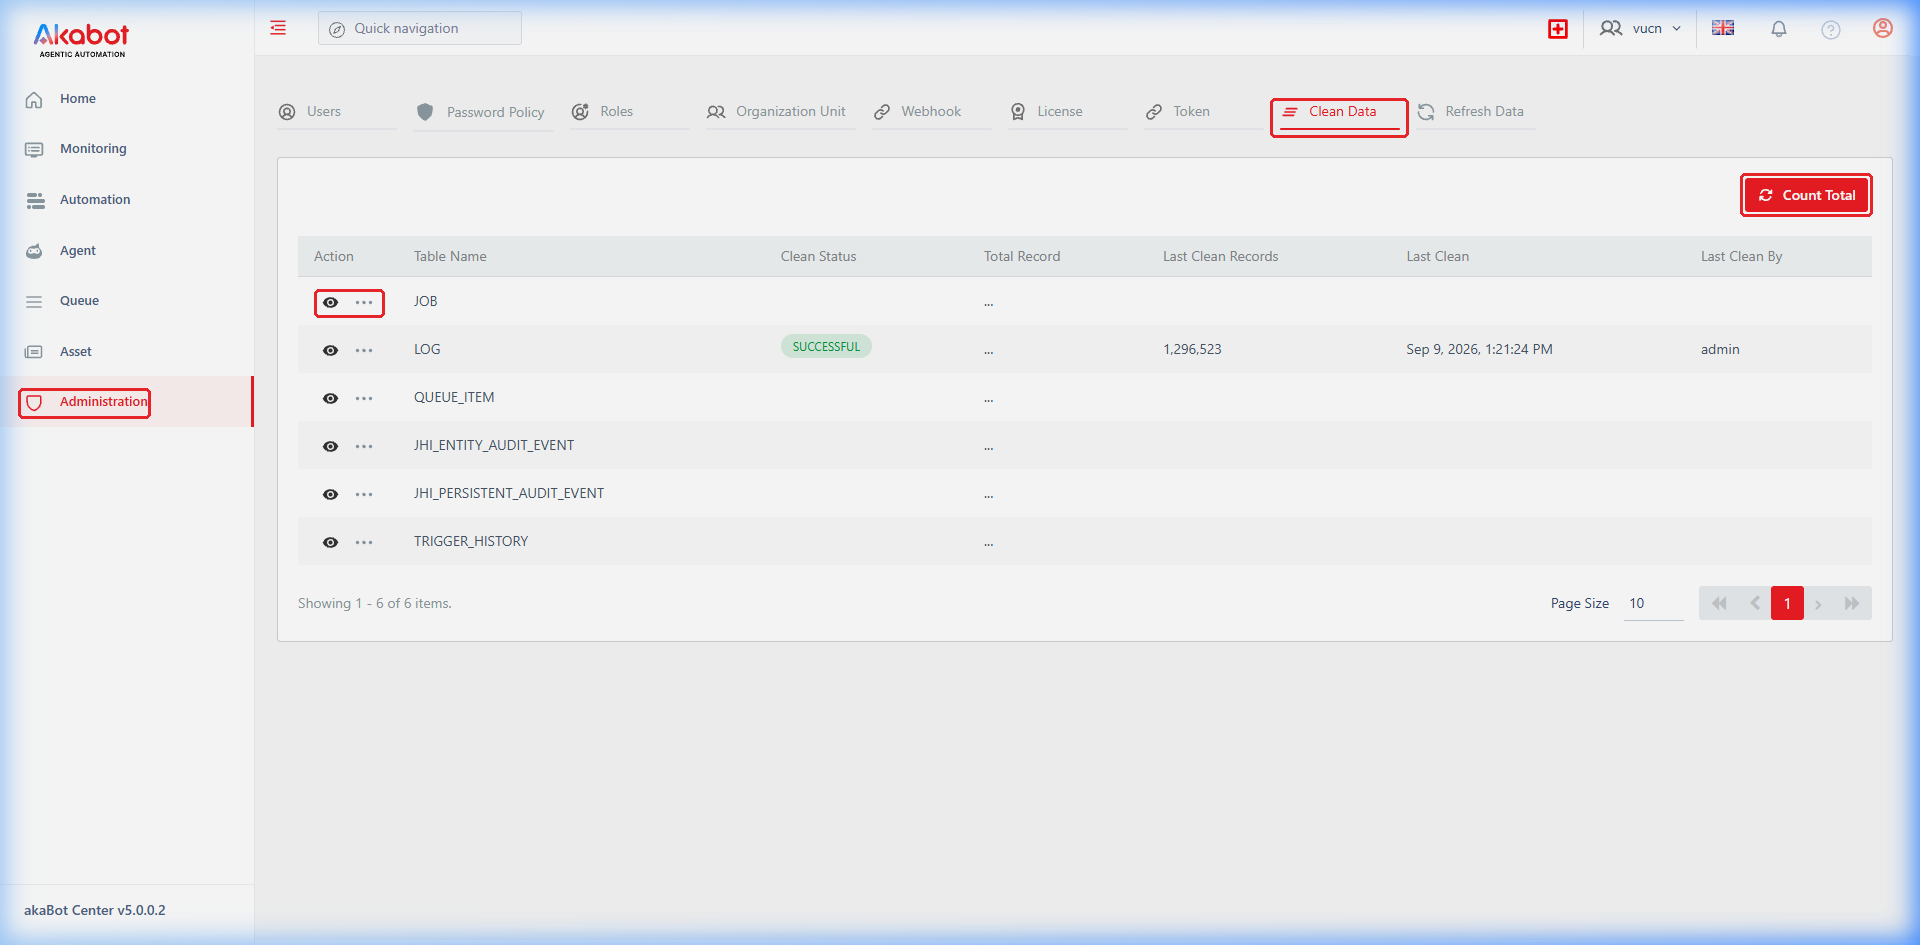
Clean Data Dashboard Overview
The main listing screen provides an overview of all database tables eligible for data cleanup, their current status, total record volume, and historical cleanup performance metrics.
| No | Column | Description |
|---|---|---|
| 1 | Action | Action controls available for each table: • View (Eye Icon): Navigates to the table's Clean Data Detail page, displaying past execution history and performance logs. • More Options ( ...): Opens a dropdown menu with the Clean action to trigger manual or scheduled cleanup. |
| 2 | Table Name | The technical name of the system database table subject to data cleanup. |
| 3 | Clean Status | Current execution status of the clean job: • SUCCESSFUL: The most recent cleanup completed without errors. • SCHEDULED: An automated recurring schedule is active for this table. • CLEANING... (RUNNING): Cleanup is actively executing in the background. • PENDING: Cleanup job has been submitted and is waiting for execution. • FAULTED: The cleanup job encountered an error during execution. |
| 4 | Total Record | The total number of records currently existing in the table. Click Count Total to refresh this figure. |
| 5 | Last Clean Records | The number of rows purged during the most recent cleanup operation. |
| 6 | Last Clean | Date and timestamp when the last cleanup operation occurred. |
| 7 | Last Clean By | The username of the administrator who triggered the cleanup (or system for scheduled runs). |
Count Total Button:
Querying row counts on multi-million row tables can place heavy load on the database engine. By default, the Total Record column displays placeholder dots (...). Clicking the Count Total button at the top-right triggers asynchronous record counts across all eligible tables.
a. Supported Data Tables for Cleaning
akaBot Center supports selective data purging for six high-volume system tables:
| Table Identifier | Data Content | Operational Impact of Cleaning |
|---|---|---|
JOB | Historical task execution instances, workflow parameters, and process state transitions. | Removes completed, stopped, or faulted task records. Active and pending tasks are never deleted. |
LOG | Granular execution logs streamed by akaBot Agents during workflow runs (Debug, Info, Warn, Error). | Purges historical robot log messages to free significant database storage space. |
QUEUE_ITEM | Transactions processed through akaBot Queues, including item content, specific data, and processing timestamps. | Removes historical queue transactions that have already completed, failed, or expired. |
JHI_ENTITY_AUDIT_EVENT | System audit trails tracking create, update, and delete actions on Center entities (Users, Tasks, etc.). | Purges entity audit logs older than your compliance retention requirement. |
JHI_PERSISTENT_AUDIT_EVENT | Security and authentication audit logs (user login successes, failures, and session events). | Retains authentication audit history up to the designated retention cutoff. |
TRIGGER_HISTORY | Historical fire events and execution timestamps generated by scheduled and condition-based triggers. | Clears obsolete trigger dispatch history while preserving active trigger definitions. |
b. Perform Manual Data Cleanup
Administrators can execute an on-demand cleanup at any time to purge obsolete data up to a specified retention cutoff.
Step-by-Step Instructions:
-
On the Clean Data screen, locate the target table (e.g.,
LOGorJOB). -
Click the More Options (
...) button in the Action column and select Clean (or open the table detail view and click the Clean button).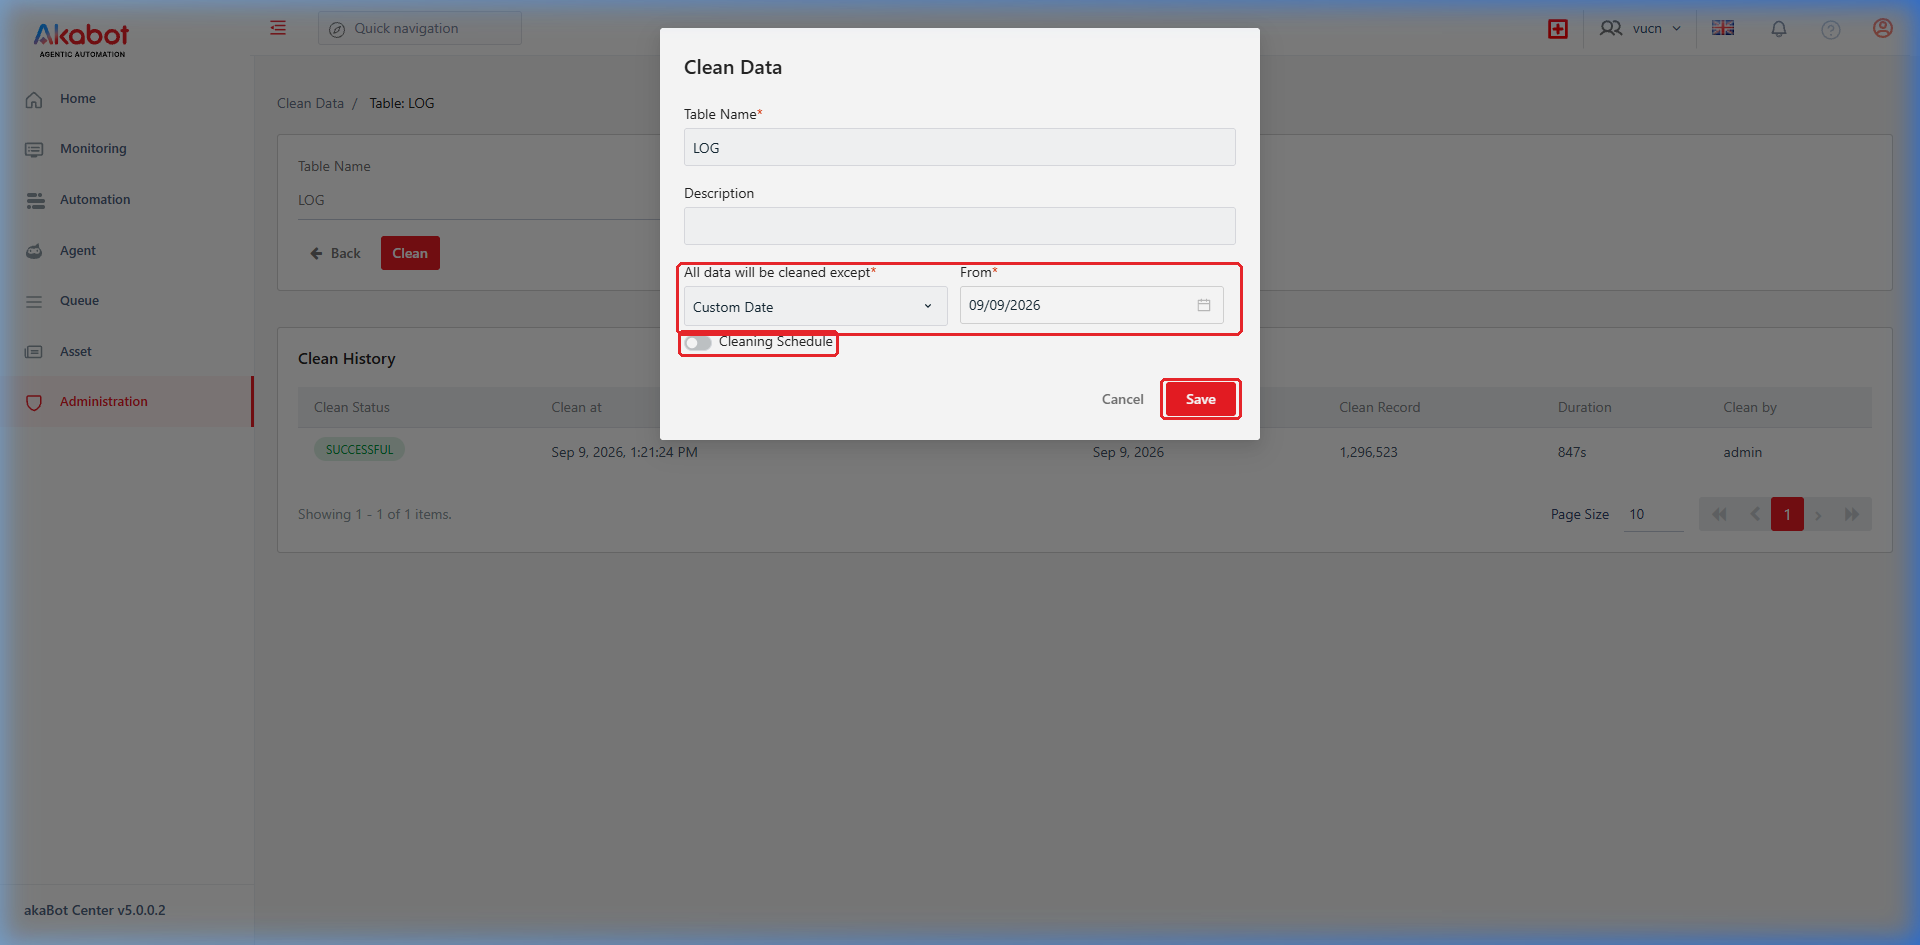
-
In the Clean Data modal dialog, configure the following fields:
| Field / Label | Description | Type | Mandatory? | Options / Default Value |
|---|---|---|---|---|
| Table Name | Displays the selected database table name. | Read-only Text | Yes | Pre-populated (e.g., LOG). |
| Description | Optional note explaining the reason for this cleanup run. | Text Input | No | Maximum 512 characters. |
| All data will be cleaned except | The data retention rule determining which records are kept. All records older than this cutoff will be deleted. | Dropdown Select | Yes | • Last 3 days • Last 7 days • Last 30 days • Last 90 days • Last 6 months (180 days) • Last 12 months (360 days) • Custom Date |
| From Date | Specifies the exact cutoff date when Custom Date is chosen. Records created prior to this date are deleted. | Date Picker | Conditional (Required if Custom Date) | Calendar date picker (dates in the future are disabled). |
| Cleaning Schedule | Toggle switch to enable automated recurring execution. | Toggle Switch | No | Default: Off (single on-demand execution). |
- Click the Save button to confirm and initiate the process.
- The cleanup task runs asynchronously in the background. The table status badge will transition from PENDING ➔ CLEANING... ➔ SUCCESSFUL.
[!TIP] Batch Deletion Mechanism:
akaBot Center purges records in controlled batches rather than executing a single bulk delete query. This prevents database table locking, avoids transaction timeout errors, and ensures ongoing robot task executions continue without disruption.
c. Configure Automated Cleaning Schedules
To keep database storage within healthy limits without manual intervention, administrators can configure recurring cleanup schedules.
Step-by-Step Instructions:
-
Open the Clean Data modal for your desired table by clicking More Options (
...) ➔ Clean. -
Select your desired retention policy under All data will be cleaned except (e.g., Last 30 days).
-
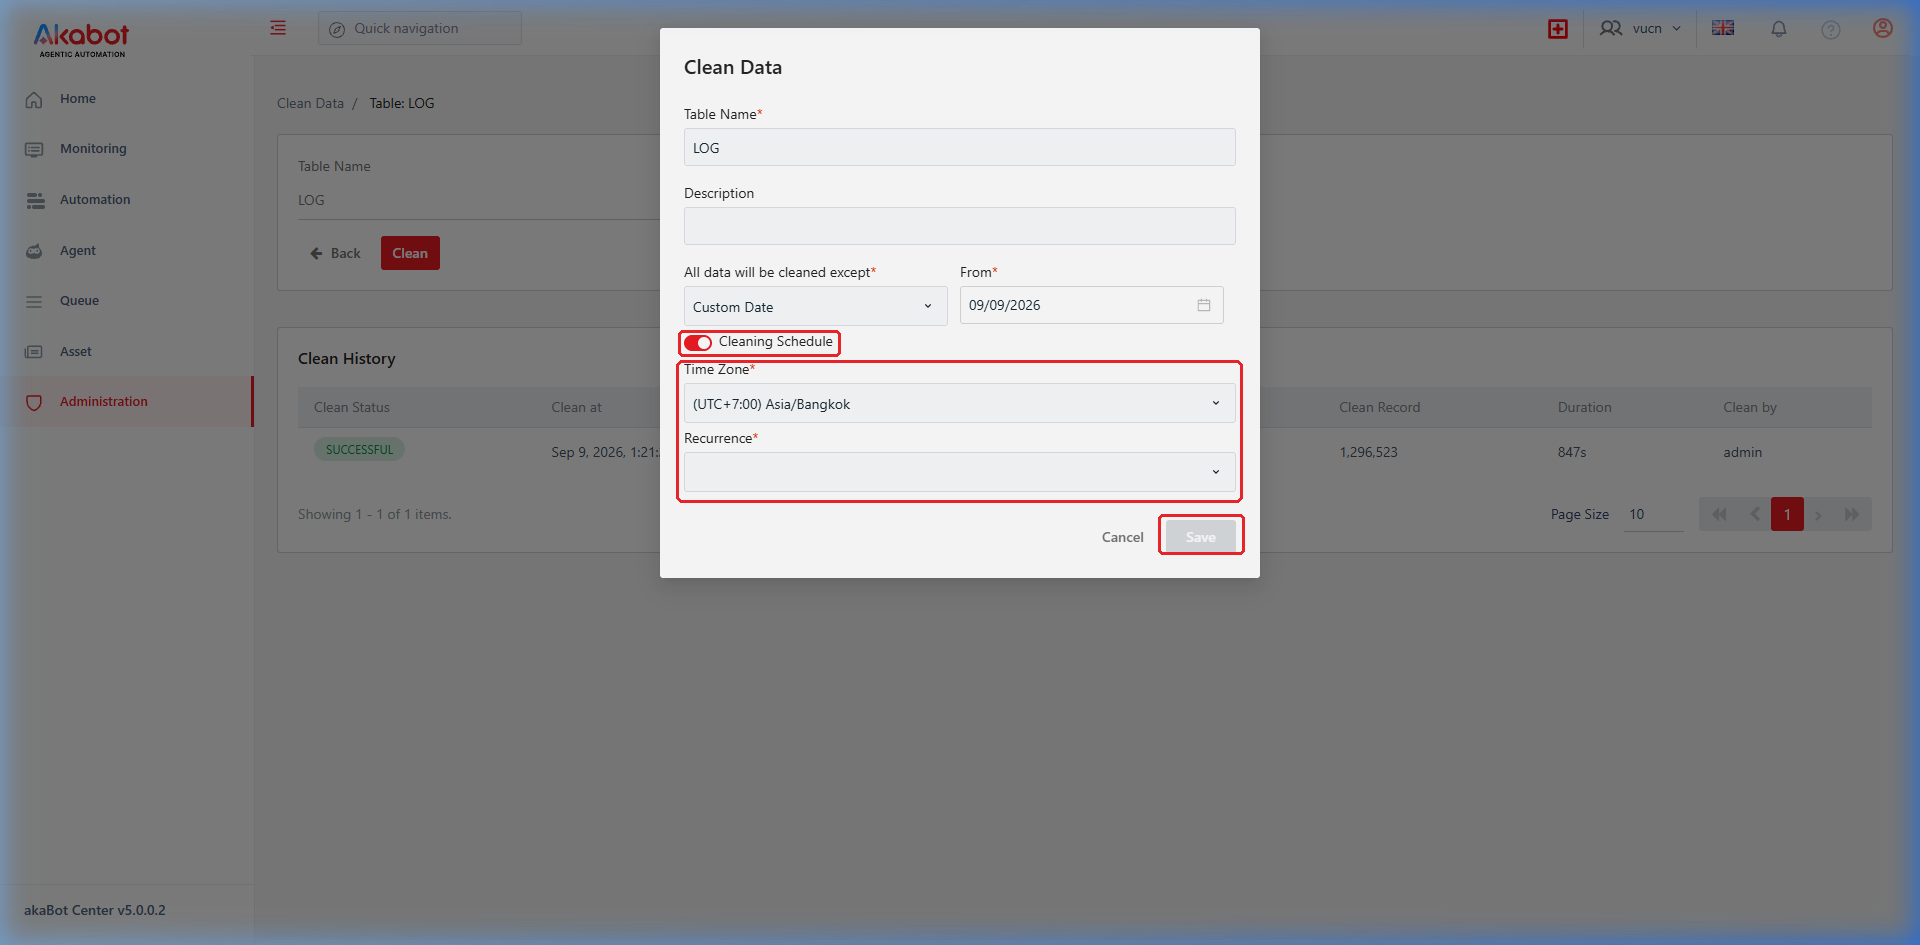
Toggle the Cleaning Schedule switch to On. The modal will expand to show the recurrence scheduler fields.
-
Configure the scheduling properties:
| Field / Label | Description | Type | Mandatory? | Options / Details |
|---|---|---|---|---|
| Time Zone | The time zone applied to schedule execution. | Dropdown Select | Yes | Select appropriate server or local timezone (e.g., Asia/Bangkok (UTC+07:00)). |
| Recurrence | The execution frequency pattern. | Dropdown Select | Yes | Available trigger types: • Once: Single future execution. • Minutes: Every N minutes. • Hourly: Every N hours. • Daily: Daily at a specified time. • Weekly: Selected days of the week. • Monthly: Selected day of the month. • Advanced: Custom Quartz Cron expression. |
| Timing Parameters | Time-of-day and interval settings based on the selected recurrence type. | Form Controls | Yes | Varies by recurrence (e.g., Start time, hour, minute). |
- Click the Save button to confirm and save the schedule.
- The table status badge will display SCHEDULED. The built-in Quartz scheduler will automatically execute the cleanup job at the designated intervals.
d. View Clean Data History & Execution Logs
Every clean operation (whether triggered manually or via automated schedule) is recorded in an audit trail.
Step-by-Step Instructions:
- On the Clean Data list screen, click the View (Eye Icon) button in the Action column next to the desired table.
- The Clean Data Detail page opens, presenting table information and the Clean History log table.
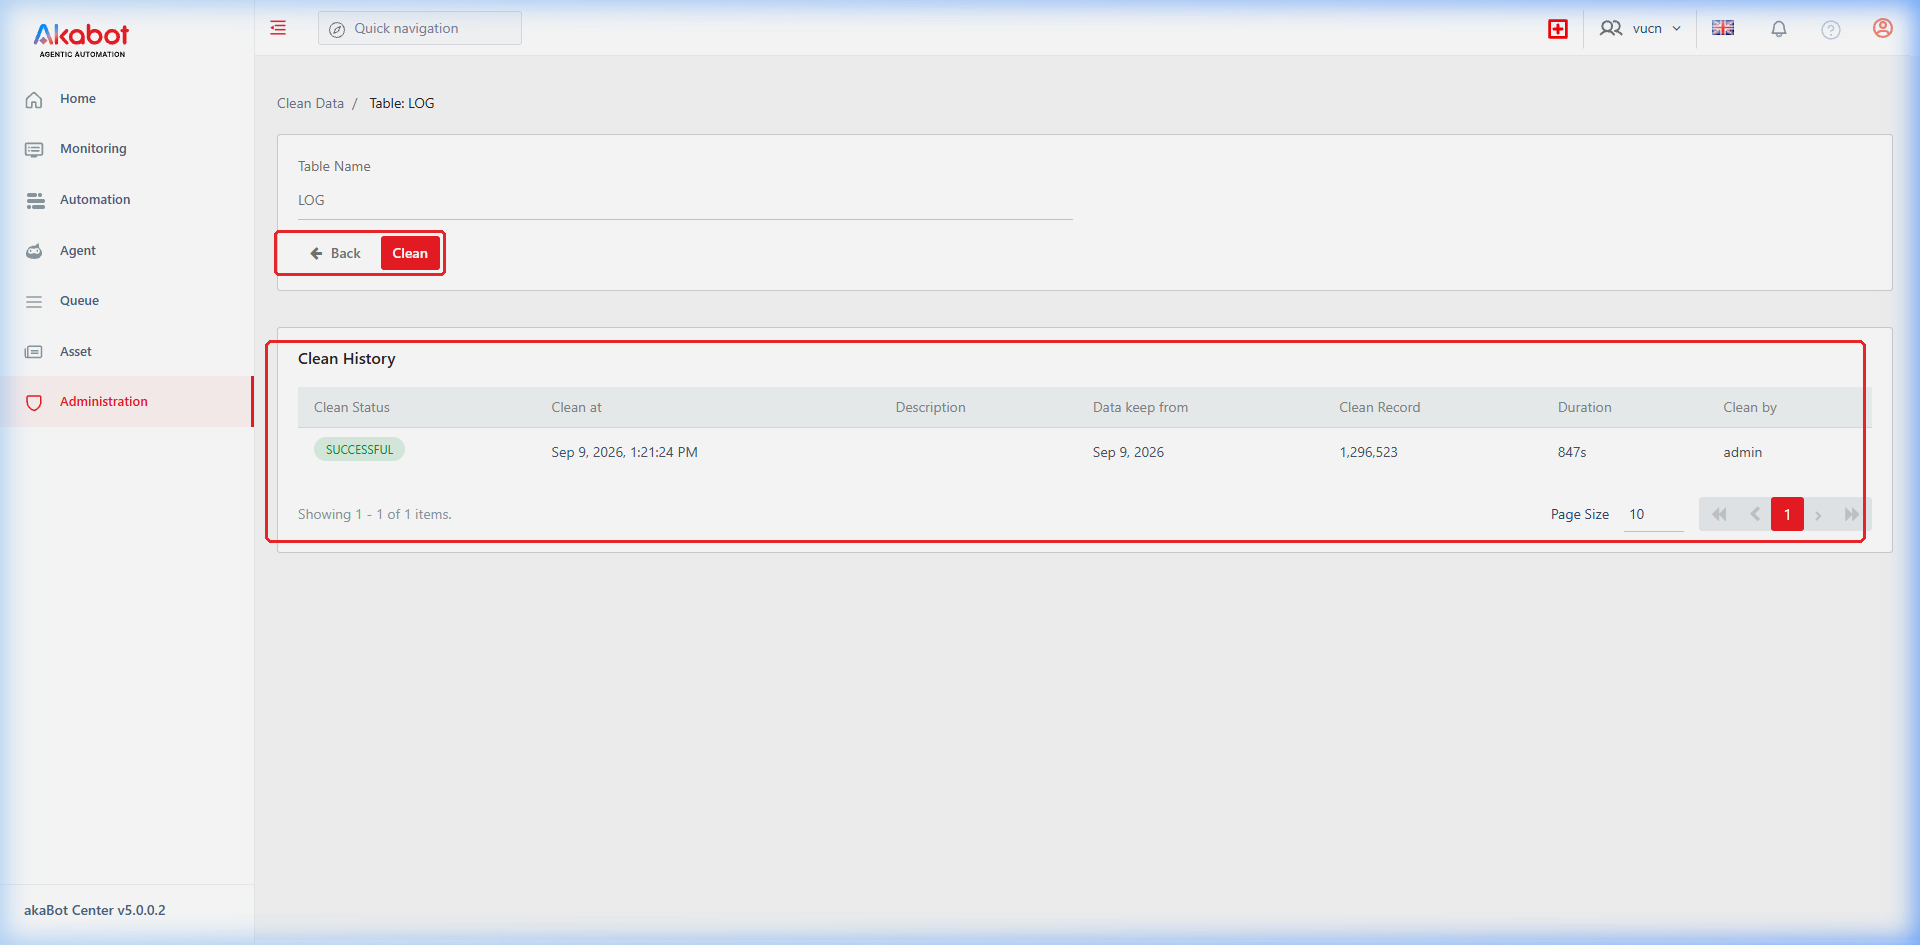
Clean History Columns:
| No | Column | Description |
|---|---|---|
| 1 | Status | The execution outcome of the cleanup task: SUCCESSFUL, FAULTED, CLEANING..., or PENDING. |
| 2 | Clean at | Timestamp when the cleanup operation was executed. |
| 3 | Description | Note entered when the clean task or schedule was established. |
| 4 | Data keep from | The retention boundary enforced during that run (e.g., Last 30 days or specific custom date). |
| 5 | Clean Record | Total count of rows deleted during that specific execution run. |
| 6 | Duration | Total time taken to complete the cleanup operation (e.g., 12s). |
| 7 | Clean by | Username who triggered the cleanup, or the schedule owner. |
- To execute another cleanup directly from the detail screen, click the red Clean button next to the Back button.
- To return to the main list, click the Back button.