License Activation Cloud
1. User Account Activation
1.1. Receiving Account Registration Emails
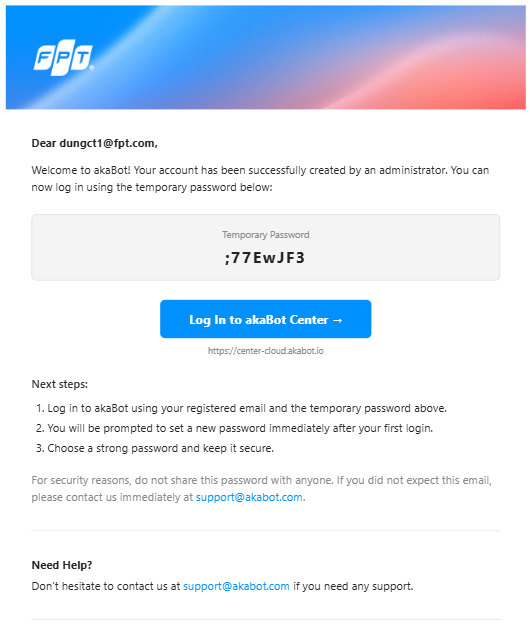
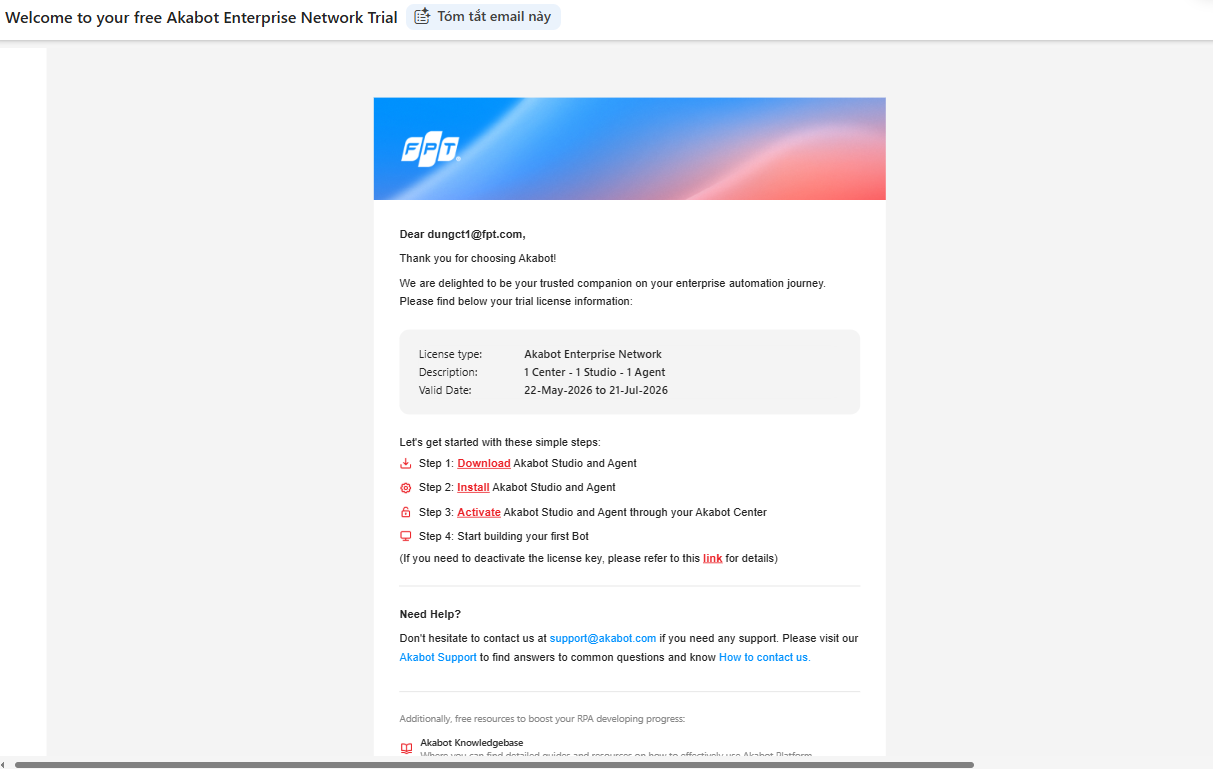
Once your trial (Trial) or official enterprise account is successfully provisioned on the system, you will receive two (2) official notification emails from akaBot:
- First Email: Subject "Welcome to akaBot - Your account is ready!" – Provides your login credentials along with a temporary password.
- Second Email: Subject "Welcome to your free akaBot Enterprise Network Trial" – Details your trial license quota and the subscription period.
[!NOTE] If you cannot locate these emails in your inbox, please check your Spam/Junk folder or contact your system Administrator to request a resend.
1.2. First-time Login and Password Reset
To secure your enterprise account, please perform the following steps during your initial login:
- Click the akaBot Center portal URL provided in the welcome email.
- Enter your Registered Email and the Temporary Password, then click Sign In.
- Upon your first login, the system will automatically prompt you to change your password for security compliance. Please enter your new password and click Set Password & Sign In.
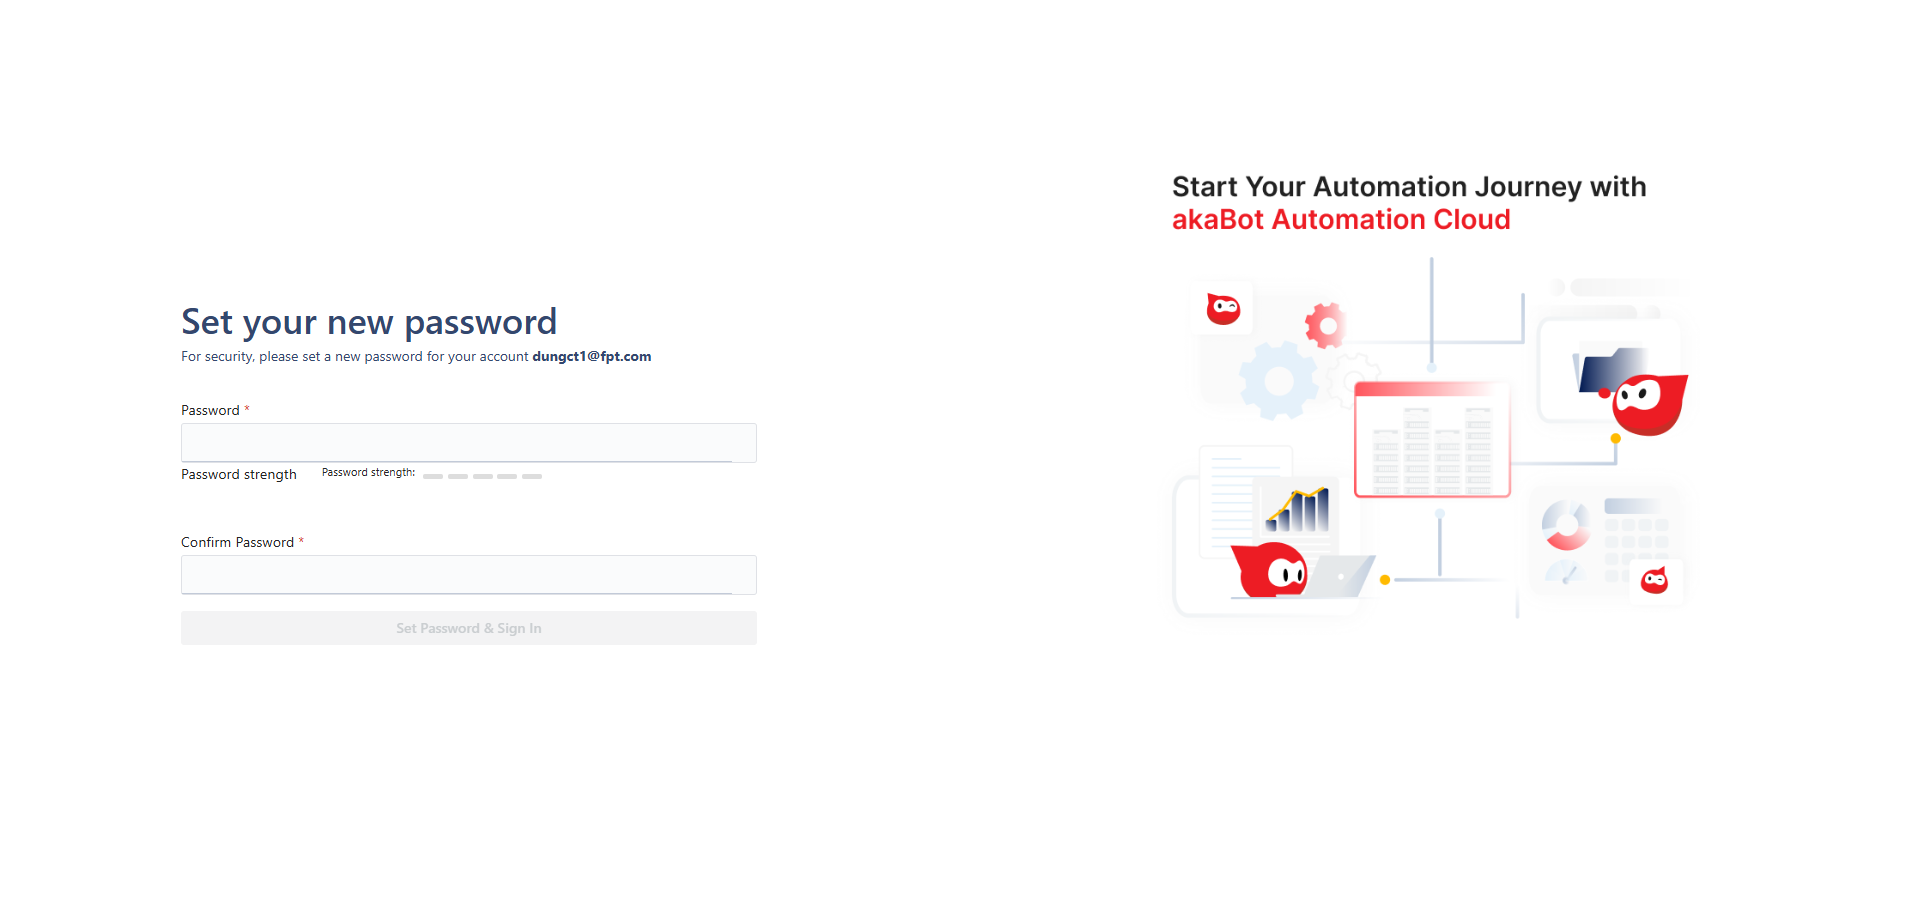
[!IMPORTANT] Password Security Requirements: Your new password must meet the system's security policy requirements (including uppercase letters, lowercase letters, numbers, and special characters). Please store this password securely and do not share it with anyone.
1.3. Completing the Initial Login
After successfully resetting your password, the system will automatically redirect you to the main dashboard (Home / Dashboard) of akaBot Center.
2. Activate akaBot Studio
2.1. Verifying License Quota on akaBot Center
To view and manage your assigned license resources, please follow the steps below:
-
Access the License Management Page: On the left navigation pane (sidebar) of your akaBot Center dashboard, navigate to:
Administration ➔ License
-
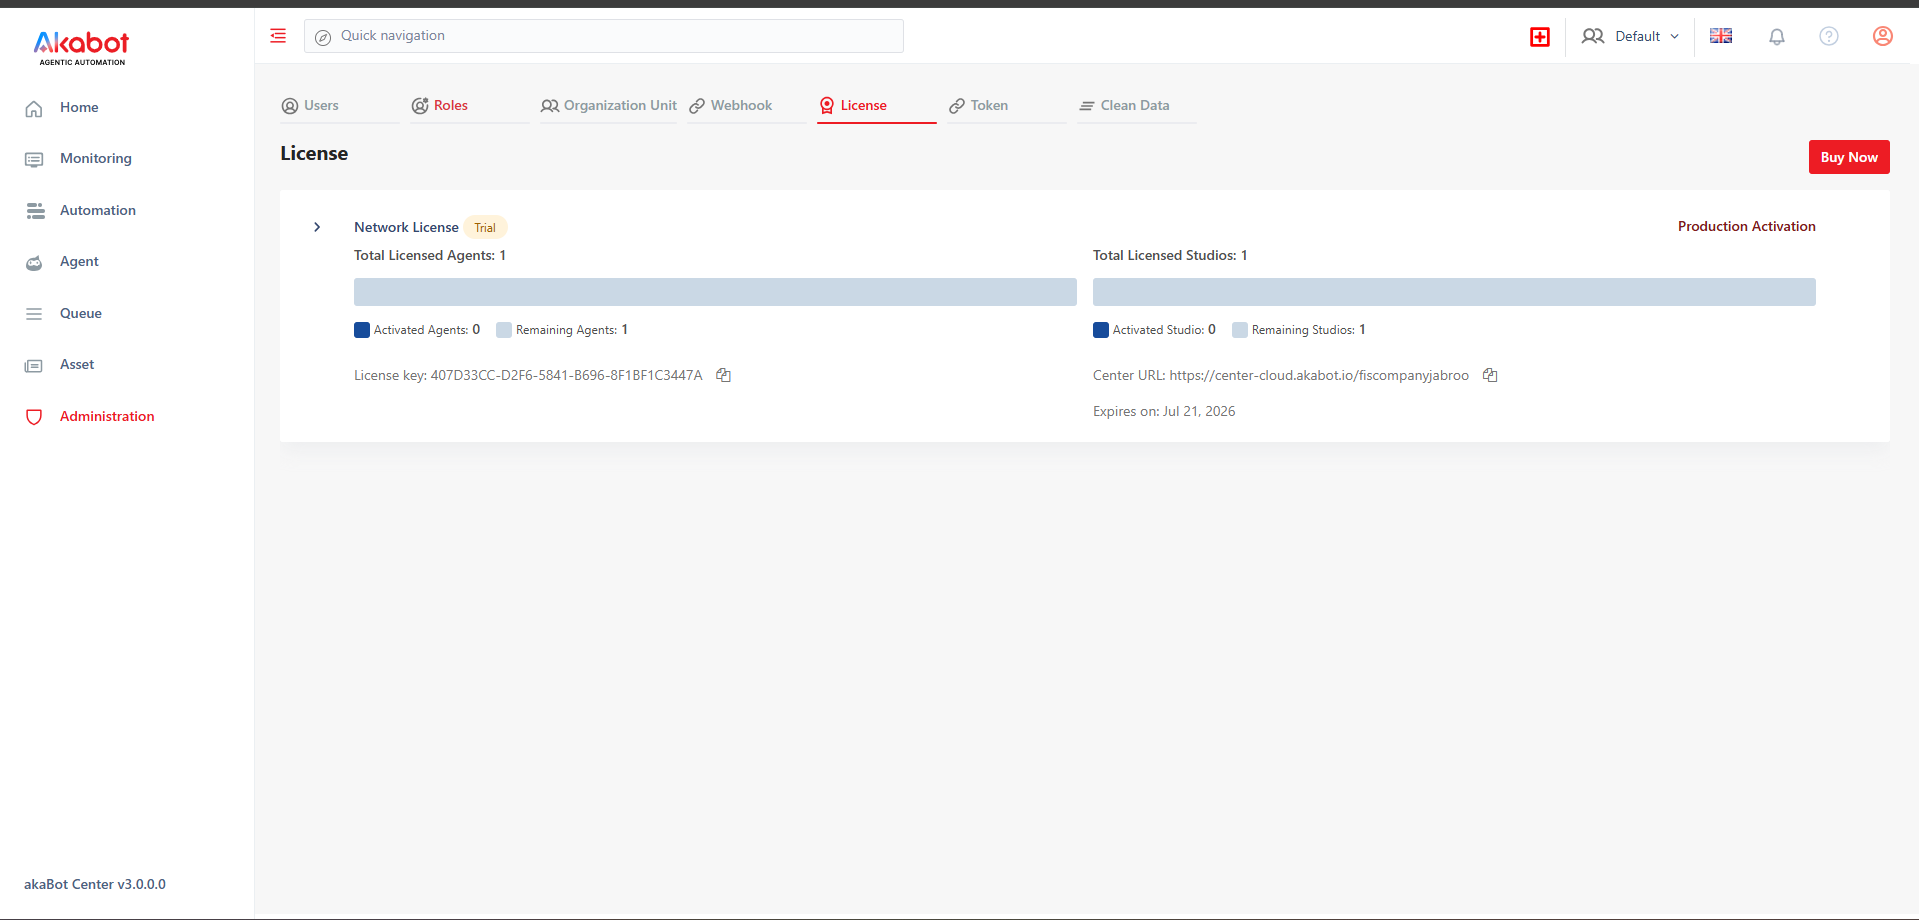
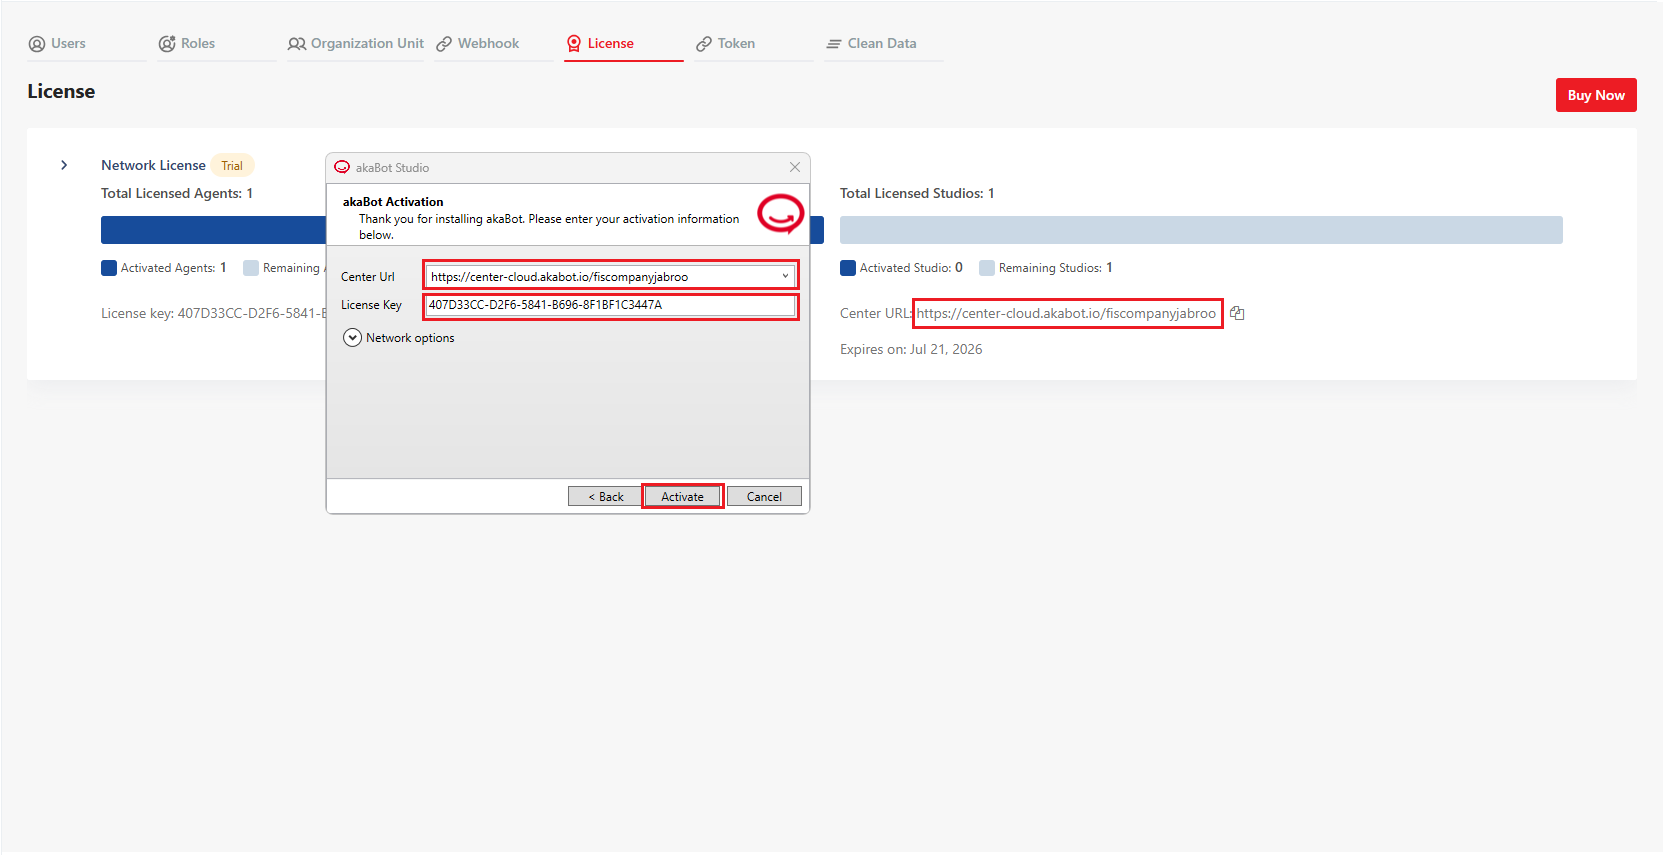
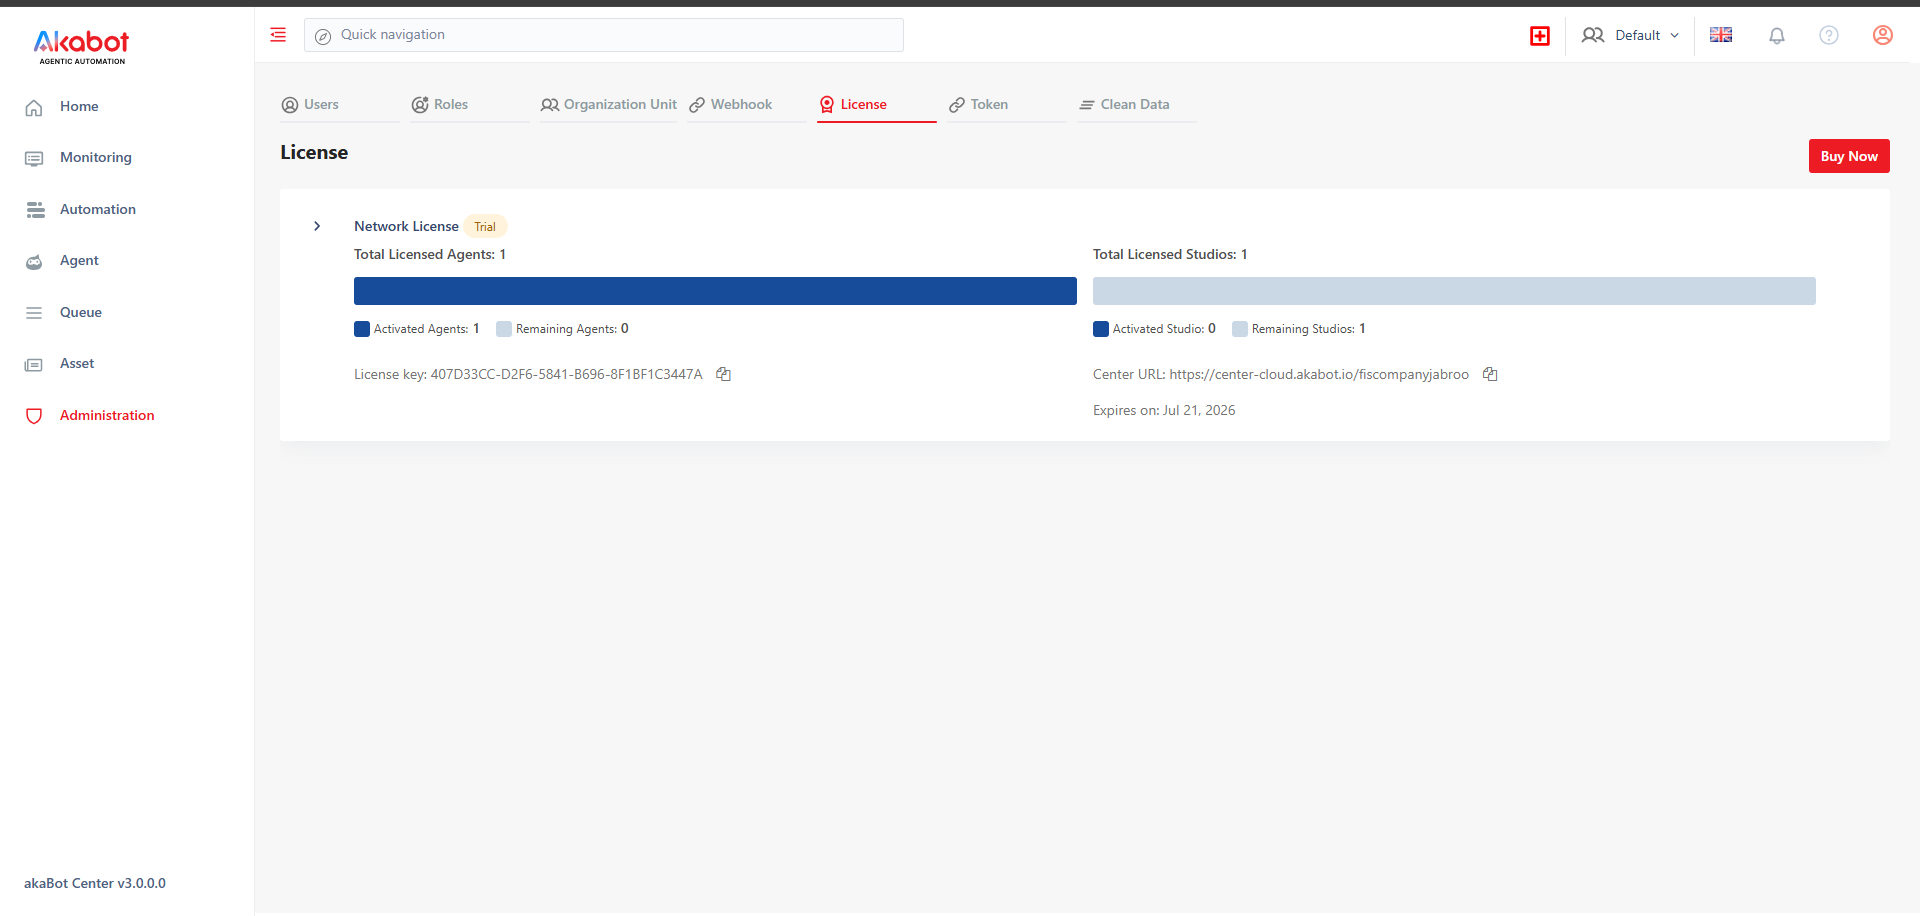
Key Information on the Network License Screen: This screen displays detailed metrics about your license assets and active consumption:
- akaBot Agent (Robot Execution Engine) License Info:
- Total Licensed Agents: The maximum number of Agents permitted for your organization.
- Activated Agents: The number of Agents currently activated and connected to the system.
- Remaining Agents: The number of unused Agent slots available for activation.
- akaBot Studio (Process Designer) License Info:
- Total Licensed Studios: The maximum number of Studio installations permitted.
- Activated Studio: The number of Studio seats currently activated and active.
- Remaining Studios: The number of unused Studio slots available.
- Connection & Activation Parameters (Critical for downstream configuration steps):
- License Key: The unique enterprise license key used for product activation.
- Center URL: The direct connection endpoint to your dedicated akaBot Center portal.
- akaBot Agent (Robot Execution Engine) License Info:
[!NOTE] Trial License Notes:
- The default trial package includes 01 Agent and 01 Studio for evaluation purposes.
- To upgrade or request additional licenses for production deployment, click the Buy Now button on the interface or contact your akaBot Account Executive directly.
2.2. License Activation Steps for akaBot Studio
To activate the license on the target workstation running akaBot Studio, follow the steps below:
- Step 1: Launch the installed akaBot Studio desktop client.
- Step 2: Select the option to activate via akaBot Center and click Next.
- Step 3: Enter the identical activation credentials:
- Center URL: Your unique akaBot Center address.
- License Key: Your enterprise license key.
- Network Options: Input appropriate Proxy credentials if prompted by your network environment.
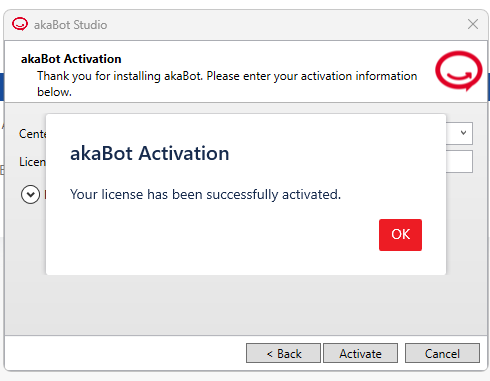
- Step 4: Click Activate to complete activation.
- Activation Successful: The Studio workspace will open, presenting the process design canvas.
- Activation Failed: Please verify that your workstation can communicate with the internet.
3. Activate & Connect akaBot Agent
[!IMPORTANT] Setting up akaBot Agent with akaBot Center Cloud requires two separate, mandatory steps:
- License Activation (section 3.1 below) — unlocks the akaBot Agent software using your License Key.
- Register & Connect (section 3.2 below) — links this specific Agent installation to an Agent record on akaBot Center using an Agent Key, so it can receive and execute automation tasks.
Completing only Step 1 will activate the software but the Agent will not appear as connected/available on akaBot Center. Both steps must be completed.
3.1. Activate akaBot Agent
To activate the license on the target machine running akaBot Agent, please execute the following steps:
- Step 1: Launch the installed akaBot Agent application on the machine.
- Step 2: On the initial startup setup screen, select the option to activate via akaBot Center and click Next.
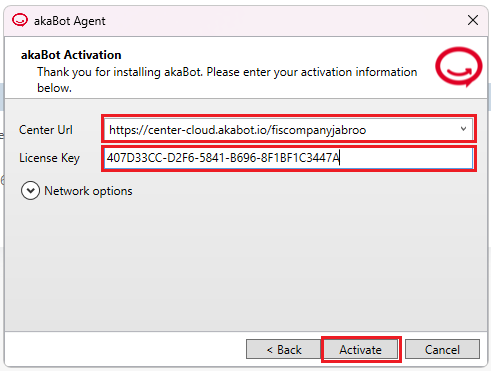
- Step 3: Enter the required activation parameters:
- Center URL: Your unique akaBot Center address (copied from the Center URL field on the License dashboard).
- License Key: Your enterprise license key (copied from the License Key field).
- Network Options: If your corporate network routes traffic through an internet Proxy, expand this section and input your Proxy server configurations.
- Step 4: Click Activate to finalize the process.
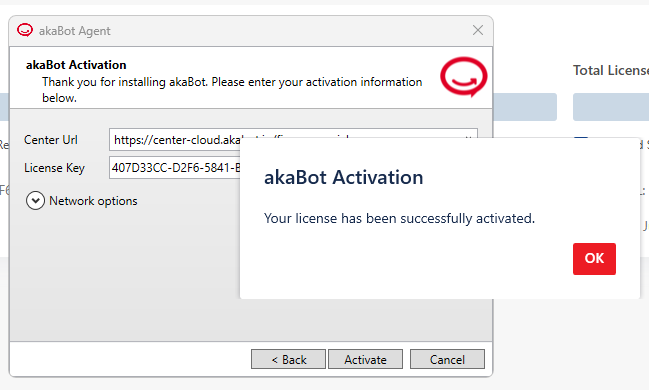
- Activation Successful: A confirmation popup will appear, and the Agent will transition to a ready state.
- Activation Failed: Verify your internet connection or contact your network Administrator to check firewall and Proxy rules.
3.2. Connect akaBot Agent with akaBot Center
3.2.1. Registering and Configuring the Agent on akaBot Center (For Administrators)
-
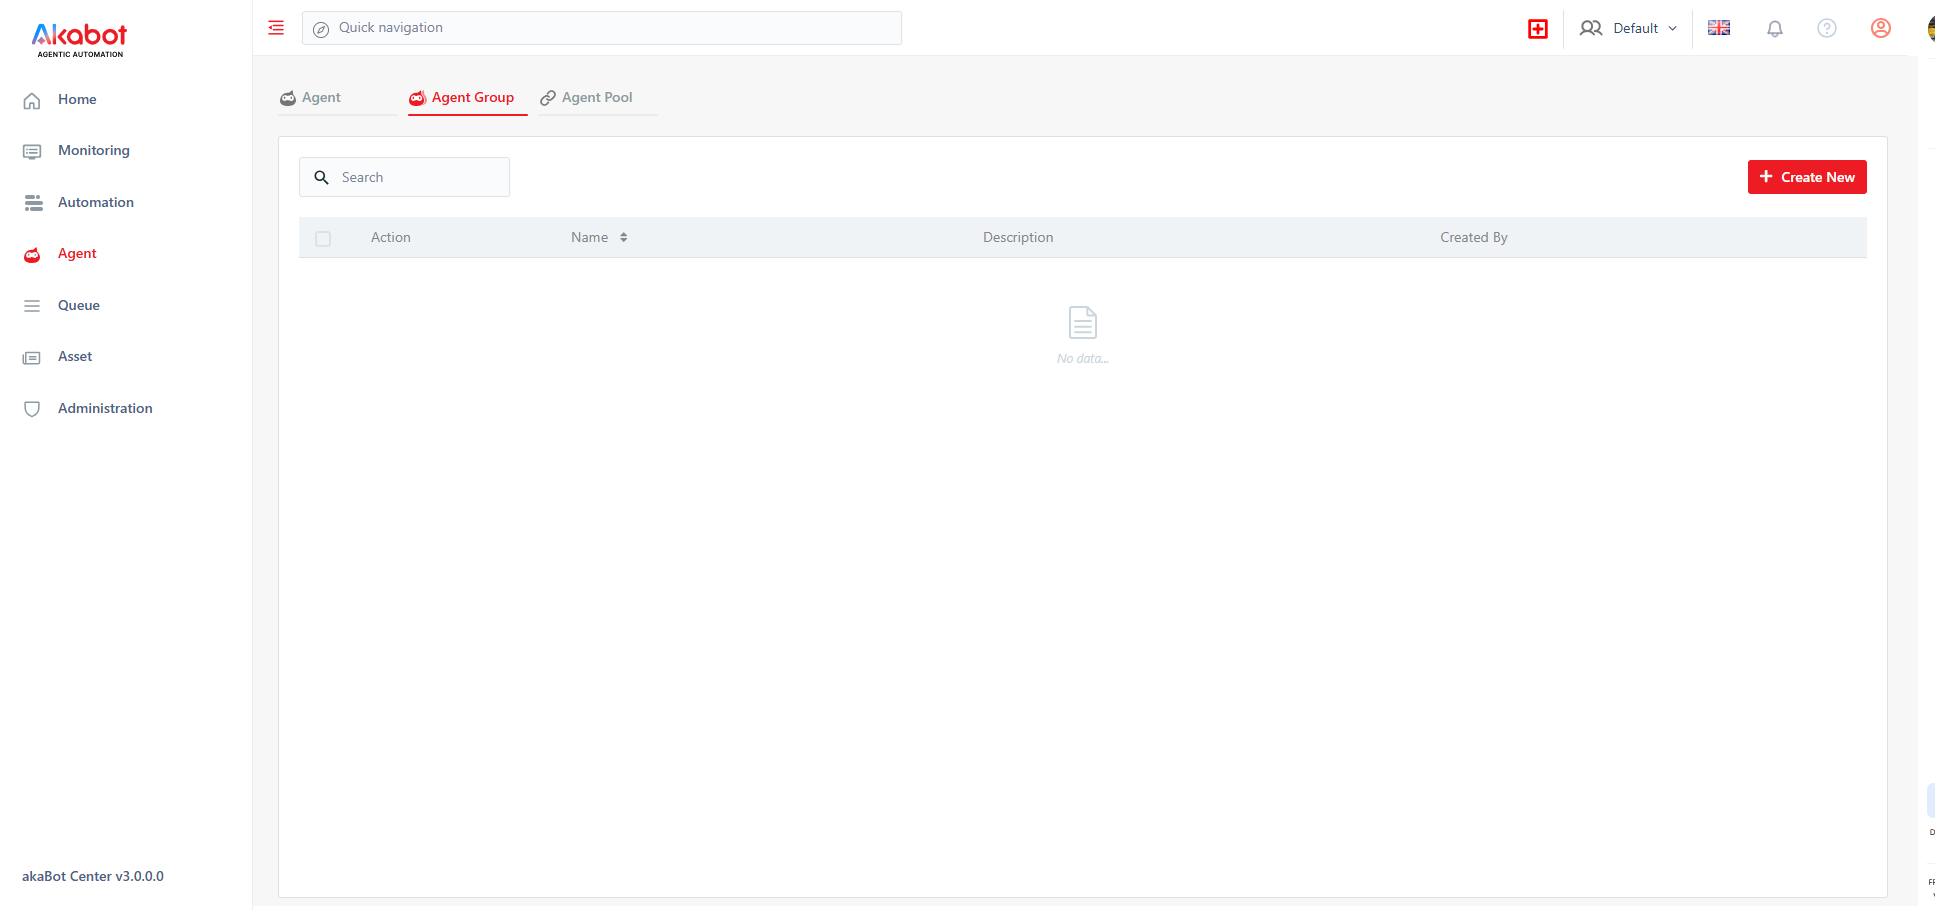
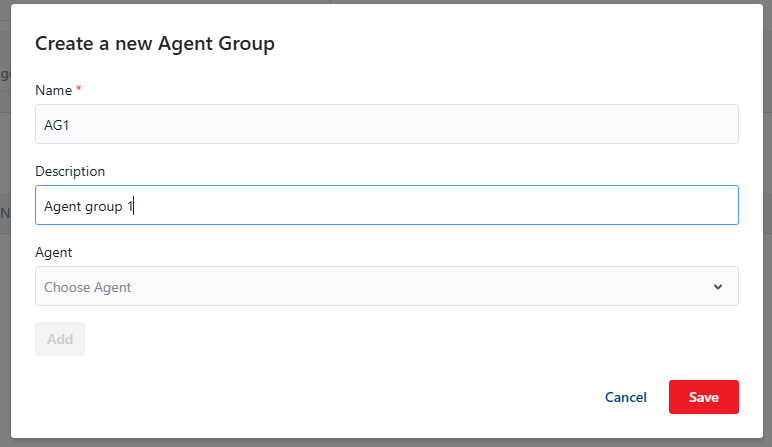
Creating an Agent Group:
- Navigate to the Agents tab on the left sidebar, then select Agent Groups.
- Click the Create New button in the upper-right corner.
- Enter a descriptive name for the group and click Save (e.g., "Agent Group 1").
-
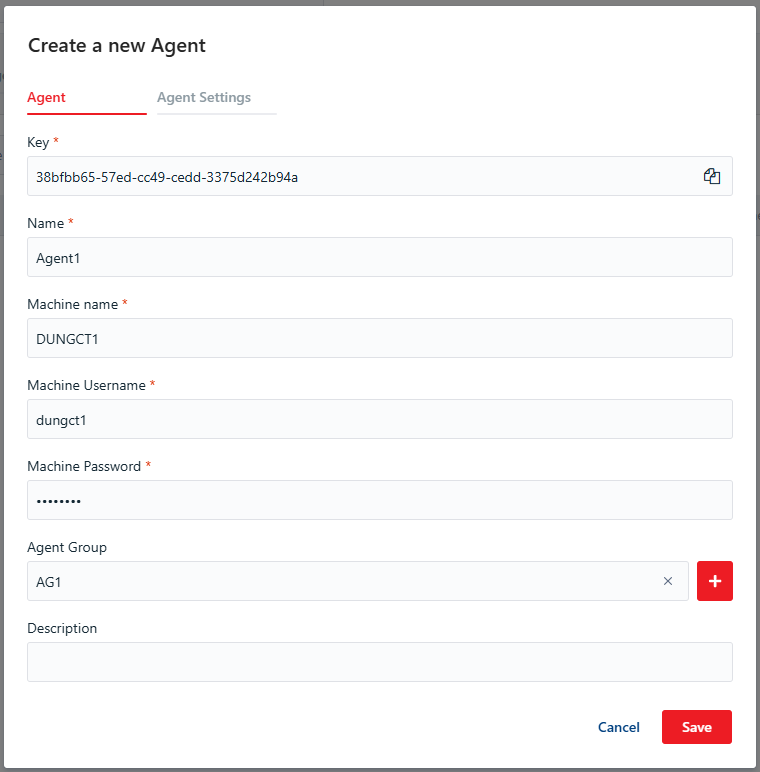
Registering the Agent Machine on akaBot Center:
- Switch to the Agents tab (adjacent to the Agent Groups tab).
- Click Create New in the upper-right corner.
- Populate the configuration fields using the detailed guide below:
| No. | Parameter / Label | Description | Data Type | Limits | Required? | Input Guidance |
|---|---|---|---|---|---|---|
| 1 | Key | The unique identifier generated for the Agent. This key connects your Center portal with the desktop Agent client. | String | 50 chars | Yes | Auto-generated by the system upon creation. |
| 2 | Name | A recognizable display name representing this specific Agent. | String | 50 chars | Yes | User-defined (e.g., Agent_Accounting). |
| 3 | Machine Name | The exact hostname of the physical machine running the Agent. | String | 50 chars | Yes | Input the exact computer name (retrieve directly from the Machine name field in the akaBot Agent Settings). |
| 4 | Machine Username | The OS-level login username of the workstation running the Agent. | String | 50 chars | No | Mandatory when running automated processes (Unattended Bot). Enter the Windows account username directly — this is not available in the akaBot Agent client and must be obtained from the workstation itself. |
| 5 | Machine Password | The OS-level login password of the workstation running the Agent. | String | 255 chars | No | Mandatory when running automated processes (Unattended Bot). |
| 6 | Type | The runtime environment designation of the Agent. | Dropdown | - | Yes | Select from: DEVELOPMENT, ASSISTANT, STAGING, or PRODUCTION. |
| 7 | Description | A brief explanation summarizing the role or scope of this Agent. | String | 500 chars | No | Optional notes for administration reference. |
[!TIP] Locating your Machine Name easily: You can find and copy this parameter directly from your akaBot Agent client UI:
- Open the akaBot Agent desktop client, click the Settings (gear icon) in the upper-right corner.
- Select the Center tab. Under the Central Configuration pane, your machine's preloaded Machine name is displayed. Simply copy this value to paste it into the akaBot Center creation form.
Machine Username is not shown anywhere in the akaBot Agent client — it is entered directly on akaBot Center as the OS-level login username of the workstation, and is only required when the Agent will run Unattended Bot processes. It does not need to match anything on the Agent side and is not part of the Agent-to-Center connection handshake.
-
Assigning Agent to Group:
- In the creation form, tick the checkbox of the appropriate Agent Group you created earlier to link this Agent.
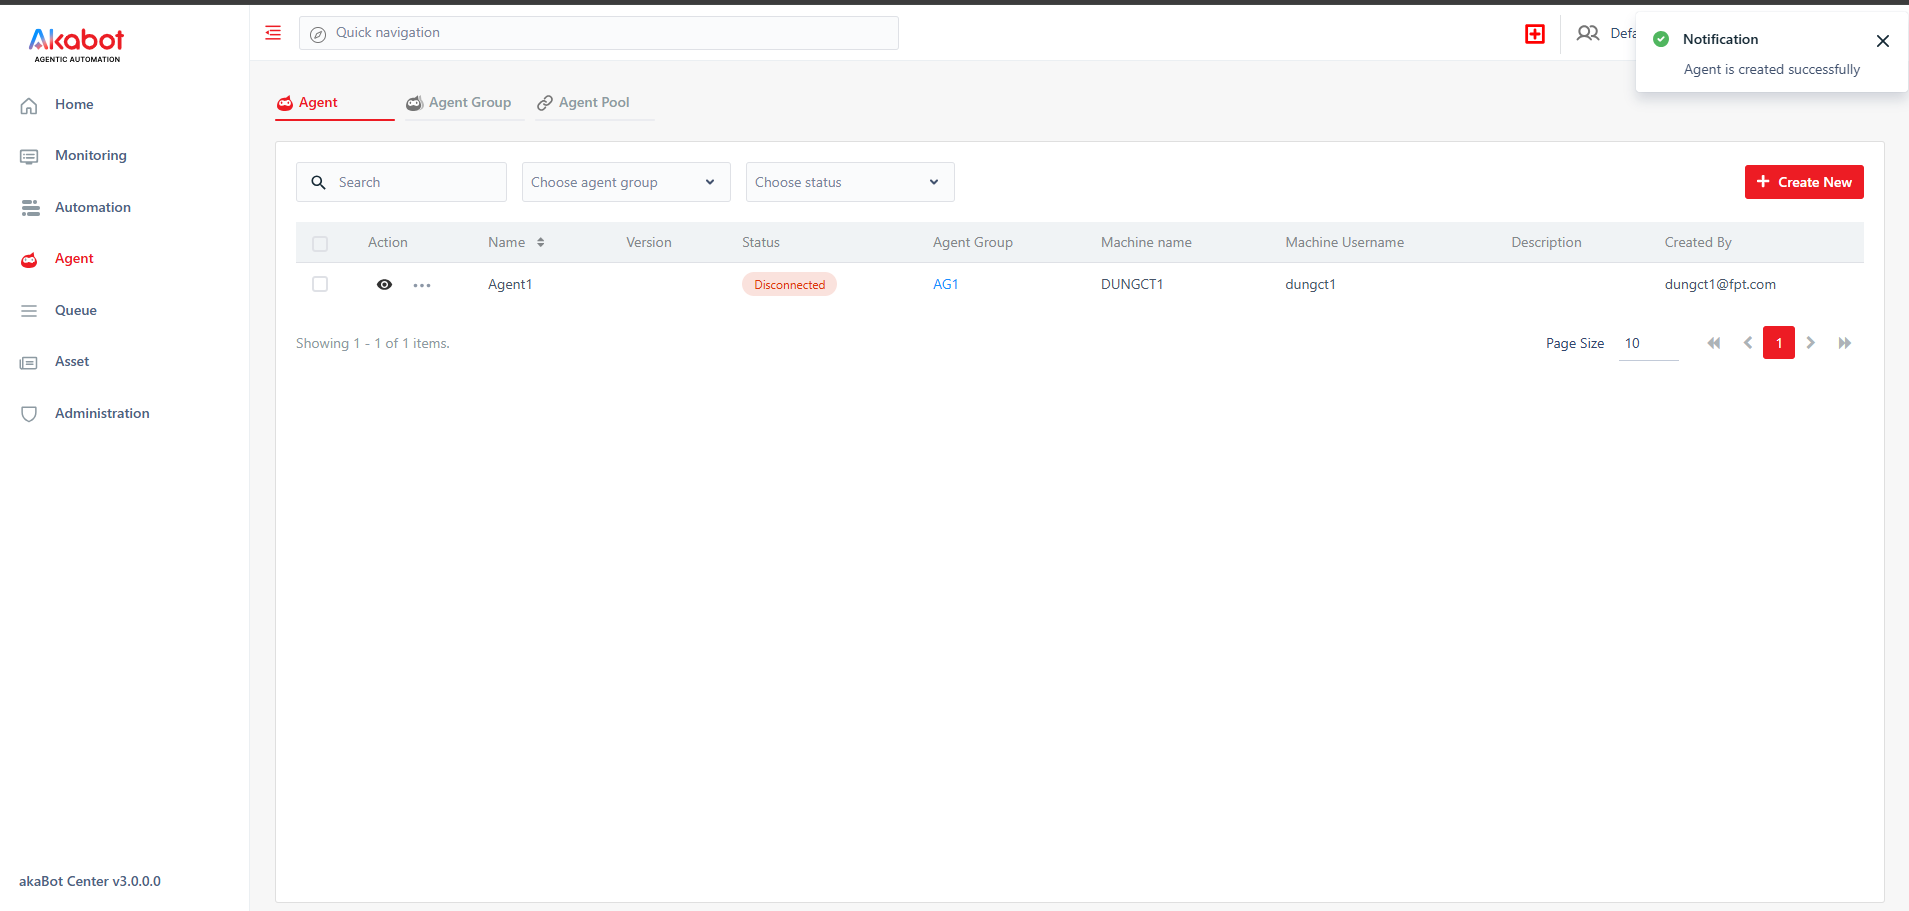
- Click Save to complete the registration.
-
Viewing Agent Details and Copying the Agent Key: Once saved, click the View icon (eye icon) next to your newly created Agent to access its detail screen and copy the Agent Key — required for the connection step below.
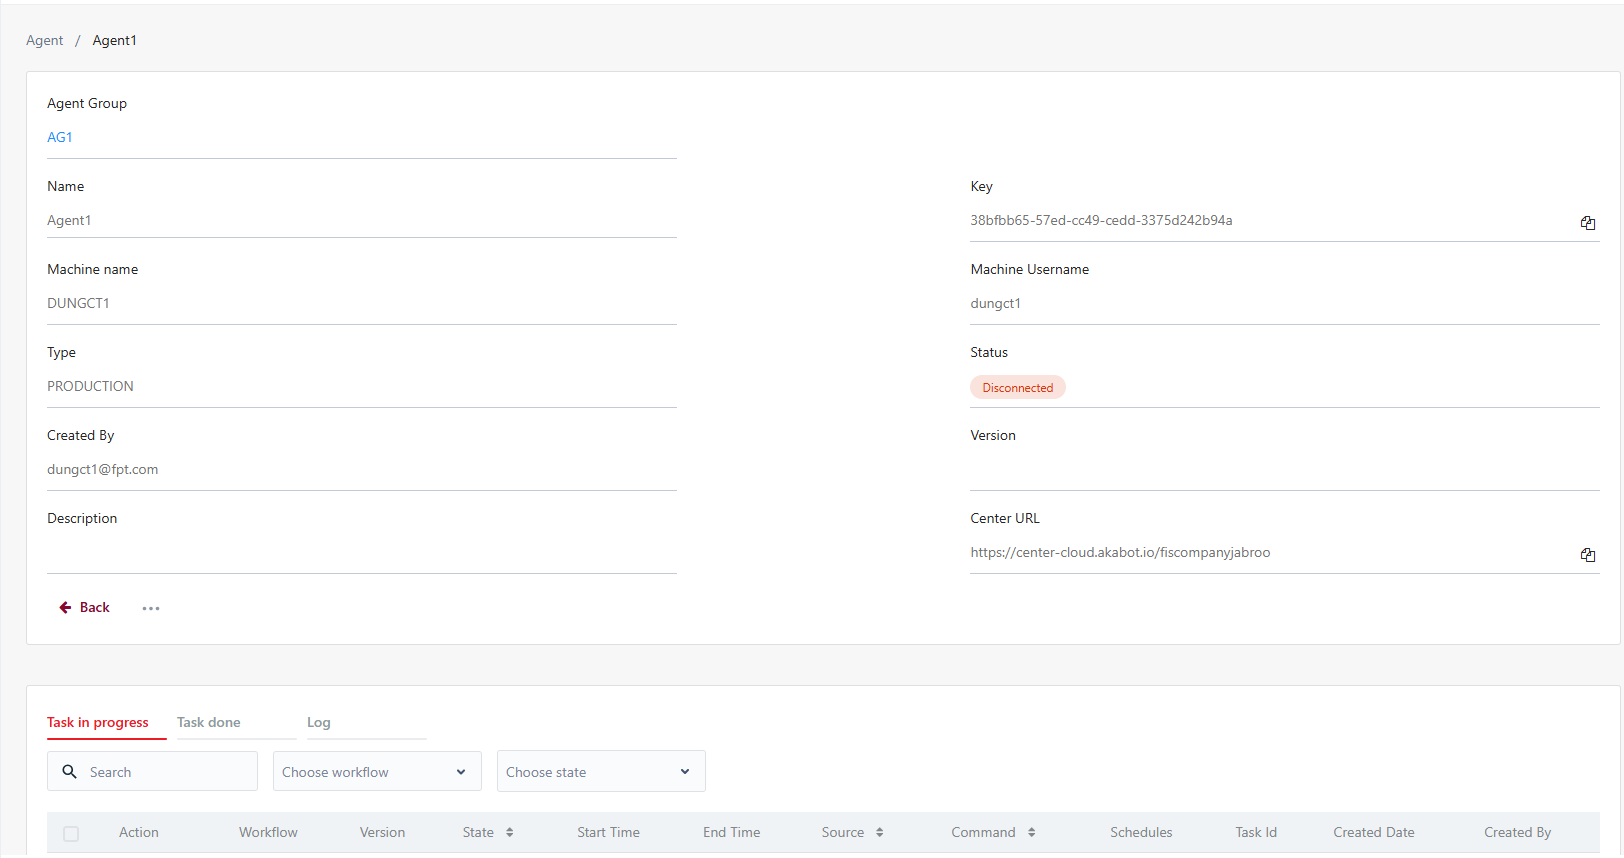
3.2.2. Connecting akaBot Agent Desktop Client to akaBot Center
To enable your workstation Agent to receive and execute automation tasks dispatched remotely from akaBot Center, follow these steps on your akaBot Agent client:
-
Step 1: On the akaBot Agent dashboard, click the Settings (gear icon) in the upper-right corner.
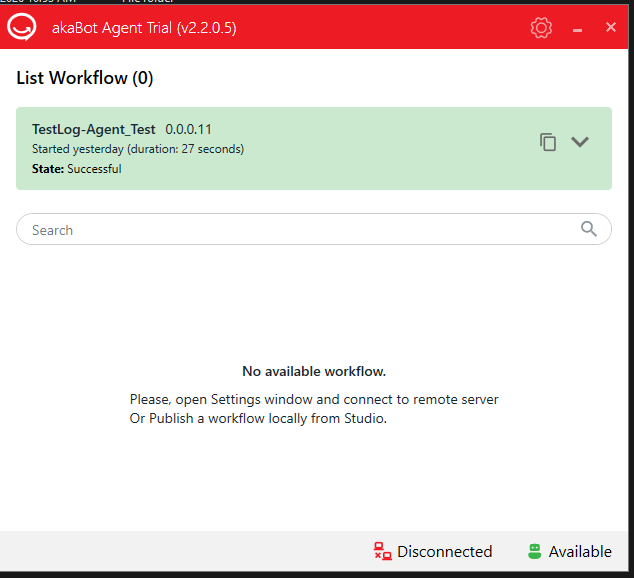
-
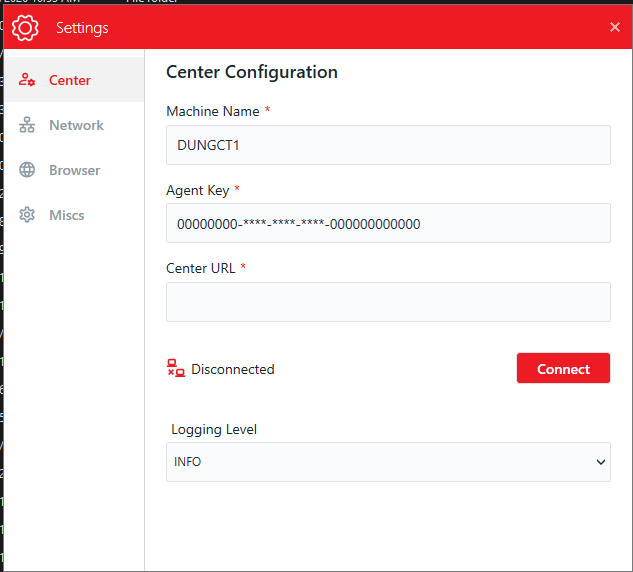
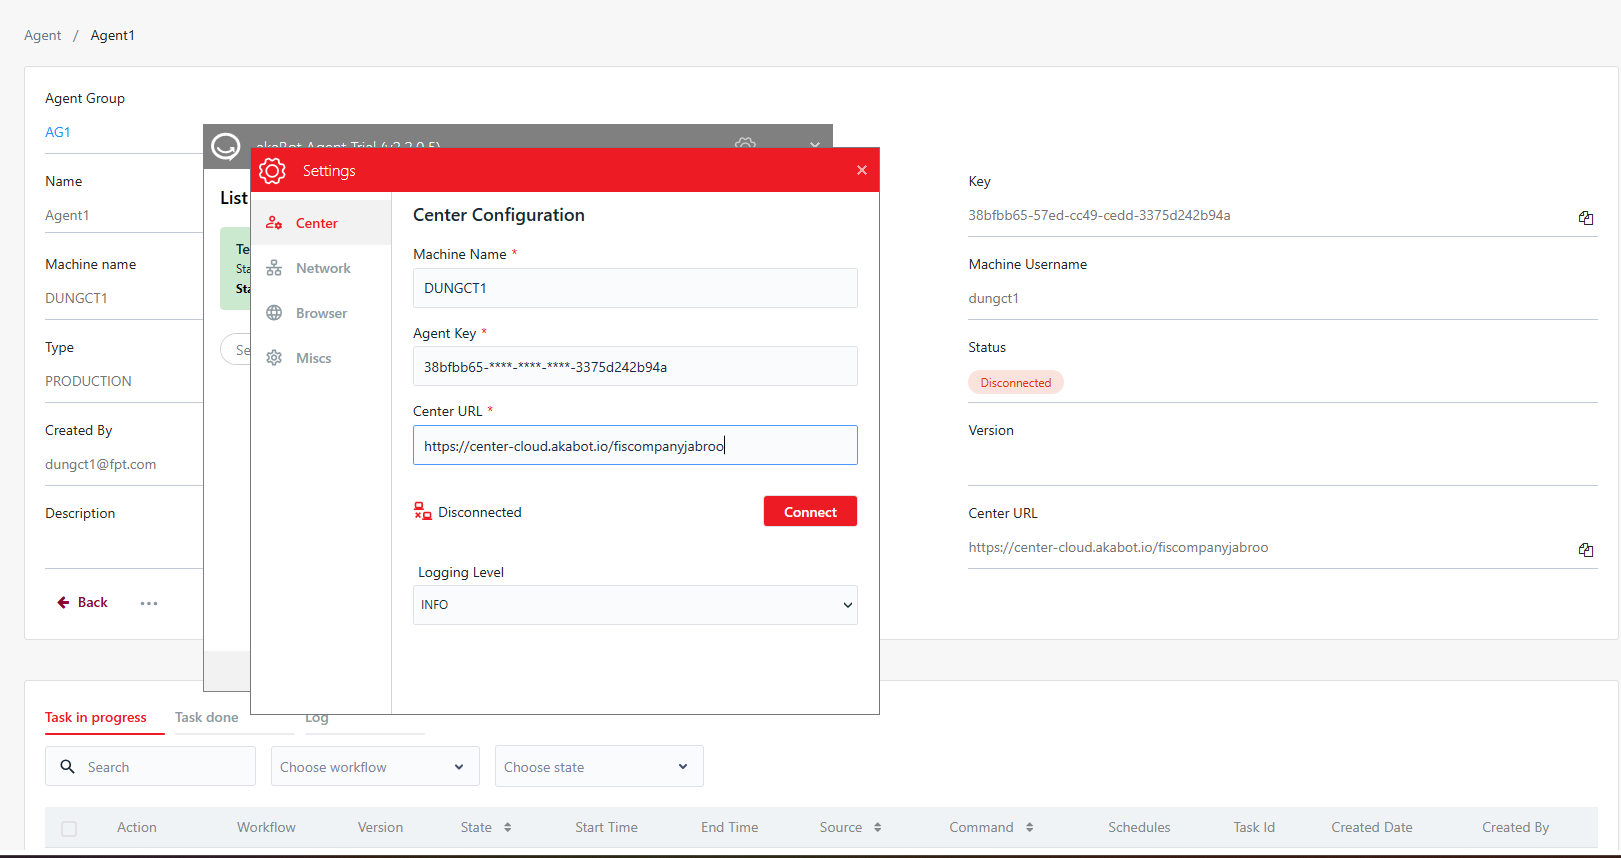
Step 2: Select the Center tab and fill out the Central Configuration form:
- Machine name: Your computer name (auto-populated by the system).
- Agent key: Paste the Agent Key copied from your akaBot Center detail screen (see Viewing Agent Details and Copying the Agent Key above).
- Center URL: Enter the direct connection address to your dedicated akaBot Center.
-
Step 3: Click the Connect button to establish the link.
- Once connected successfully, the connection status on the Agent client will show Connected (highlighted in Green), and the corresponding Agent state on the Center portal will toggle to Available (Ready for execution).
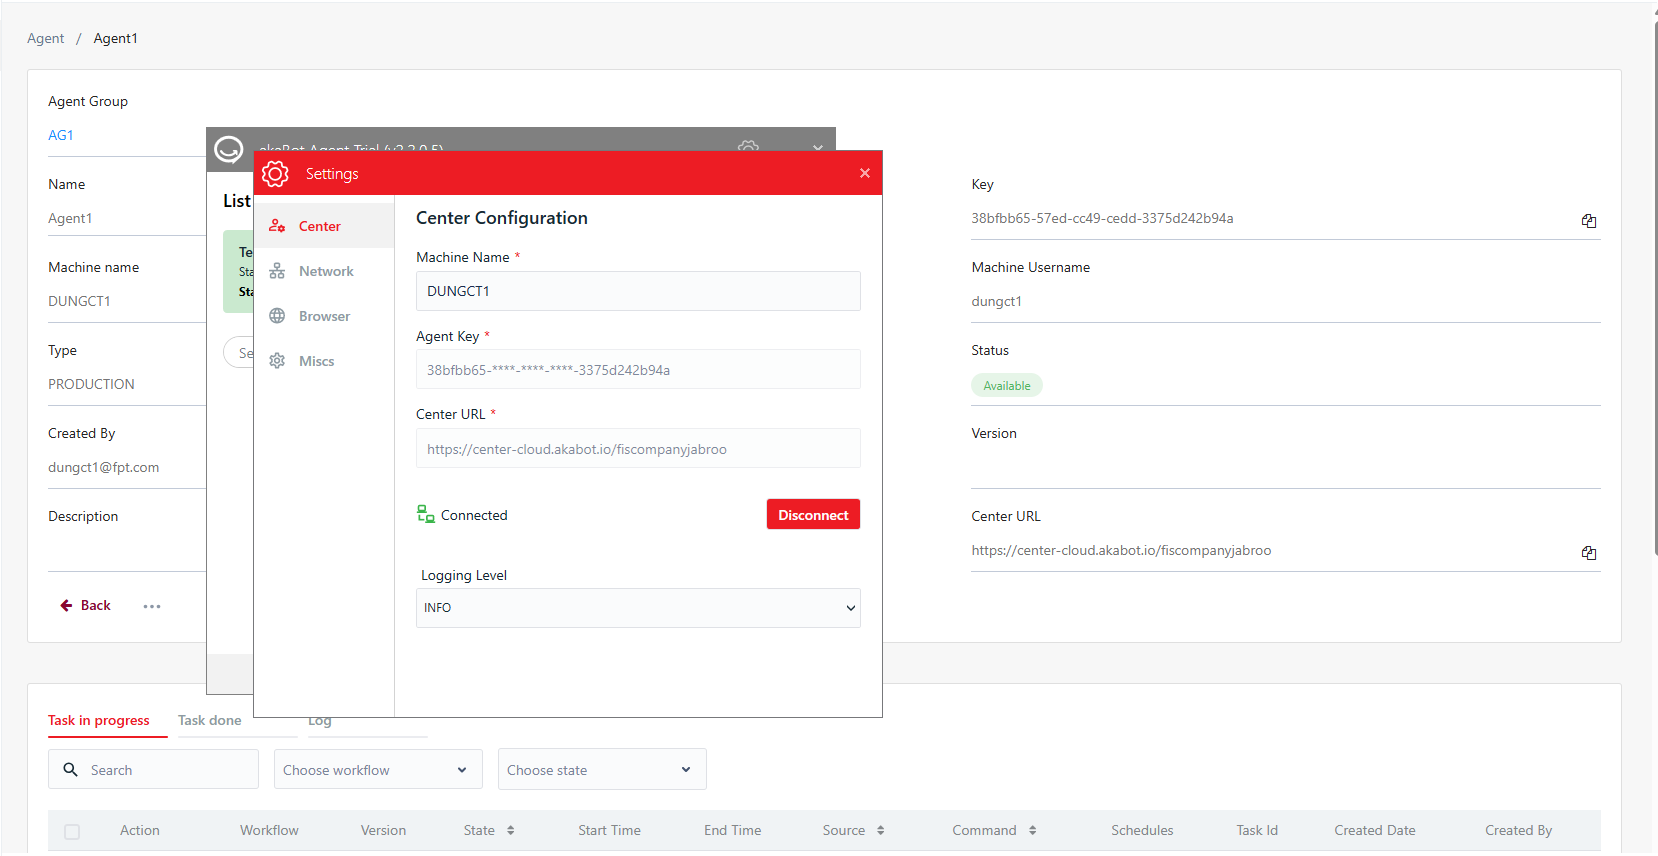
[!NOTE] You can disconnect the Agent from the Center management engine at any time by clicking the Disconnect button under the Center settings tab.
3.2.3. Troubleshooting: Agent Fails to Connect or Connects Incorrectly
If the Agent stays Disconnected after clicking Connect, or connects but does not correspond to the machine you expect, this is almost always caused by one of the following — especially when your organization manages multiple Agents/machines:
-
Wrong Agent Key copied from a different Agent record. Each Key on akaBot Center belongs to exactly one Agent record (one Machine Name). If you manage several Agent machines, it is easy to accidentally open the wrong Agent's detail screen and copy its Key by mistake. Pasting that Key into a different physical machine will not connect it correctly — the Key is already tied to another machine's Agent record.
- Fix: On akaBot Center, open the Agents list, find the Agent record whose Machine Name column exactly matches the target computer, click its View (eye) icon, and re-copy the Key from that specific record — do not reuse a Key copied earlier for a different machine.
-
Machine Name mismatch between the Center record and the physical machine. The Machine Name entered when creating the Agent record on Center must be the exact hostname of the machine that will connect (as shown in the Agent client's Center settings tab). Any difference — a leftover value from renaming/reimaging the machine, a typo, or copying the hostname of a different workstation — will prevent the Agent from being correctly recognized.
- Fix: Compare the Machine Name field on the Agent's Center settings tab with the Machine Name shown on the Agent's detail page on Center. If they don't match, either correct the Machine Name on the Center record, or create a new Agent record using the machine's actual, current hostname.
[!TIP] When troubleshooting a connection issue, always verify the Key, Machine Name, and Center URL on the Agent client against the exact same fields on that one Agent's detail page on Center — not against a different Agent record that happens to look similar.
4. Verification & Operation Status Confirmation
Following the successful registration and connection of the Agent, navigate back to the license dashboard (Administration ➔ License) on your akaBot Center portal.
The Activated Agents counter will automatically increment from 0 to 1 (or by the number of newly connected machines), confirming that your license asset has been allocated and is operating correctly.
5. Reference Materials & Detailed User Guides
After activating your licenses and establishing device connections, you are fully equipped to build, schedule, and orchestrate automation workflows. To master the features of each product module, please consult the official akaBot guides:
-
akaBot Center User Guide (Central Management Platform):
- Learn how to manage users, assign granular roles, construct schedules, manage assets, and monitor bot execution logs.
- Access Link: akaBot Center Operations Guide
-
akaBot Agent User Guide (Task Execution Client):
- Learn how to trigger attended bots, manage local queues, view execution history, and adjust local client preferences.
- Access Link: akaBot Agent User Guide
-
akaBot Studio User Guide (Automation Workflow Designer):
- Step-by-step documentation for building processes, using drag-and-drop activities, debugging code, and publishing packages.
- Access Link: akaBot Studio User Guide
[!TIP] The akaBot technical documentation portal is updated continuously in tandem with every product release. If you encounter any functional issues or need advanced support during your deployment, please submit a service ticket on our Customer Support Portal or contact our Technical Support Desk.