Development Guidelines
This guide describes the rules to follow when you build automation projects with akaBot Studio. Following them helps the people who maintain, review, and run your agent, such as teammates, reviewers, and administrators, read and understand it.
Many of the rules in this guide are checked automatically by Workflow Analyzer. Where a rule is enforced by Workflow Analyzer, the guide gives its rule ID, for example ST-MRD-009, and its default value.
Rules marked Required must be followed. The other rules are recommendations.
Required rules at a glance
| # | Required rule | Section |
|---|---|---|
| 1 | Use only the installer and license provided by your organization. | 1.1 |
| 2 | Do not add package sources other than the default ones and those your organization provides. | 1.2 |
| 3 | Name the project with your organization's naming format. | 2.1 |
| 4 | Do not nest activities more than 7 levels deep. | 2.2 |
| 5 | Keep a Sequence to at most 30 activities. | 2.3 |
| 6 | Give variables and arguments meaningful names with the agreed prefix. | 2.4 |
| 7 | Do not type IDs and passwords directly into a workflow. | 2.5 |
| 8 | Do not write confidential information or personal data to logs. | 2.7 |
| 9 | Do not automate the approval, submission, or sending of an email. | 2.7 |
| 10 | Back up a file before the agent updates it. | 2.7 |
| 11 | Do not publish a project that has Workflow Analyzer errors. | 3.2 |
| 12 | Do not run an agent in production before it is registered in your automation list. | 4.1 |
Who should read this guide
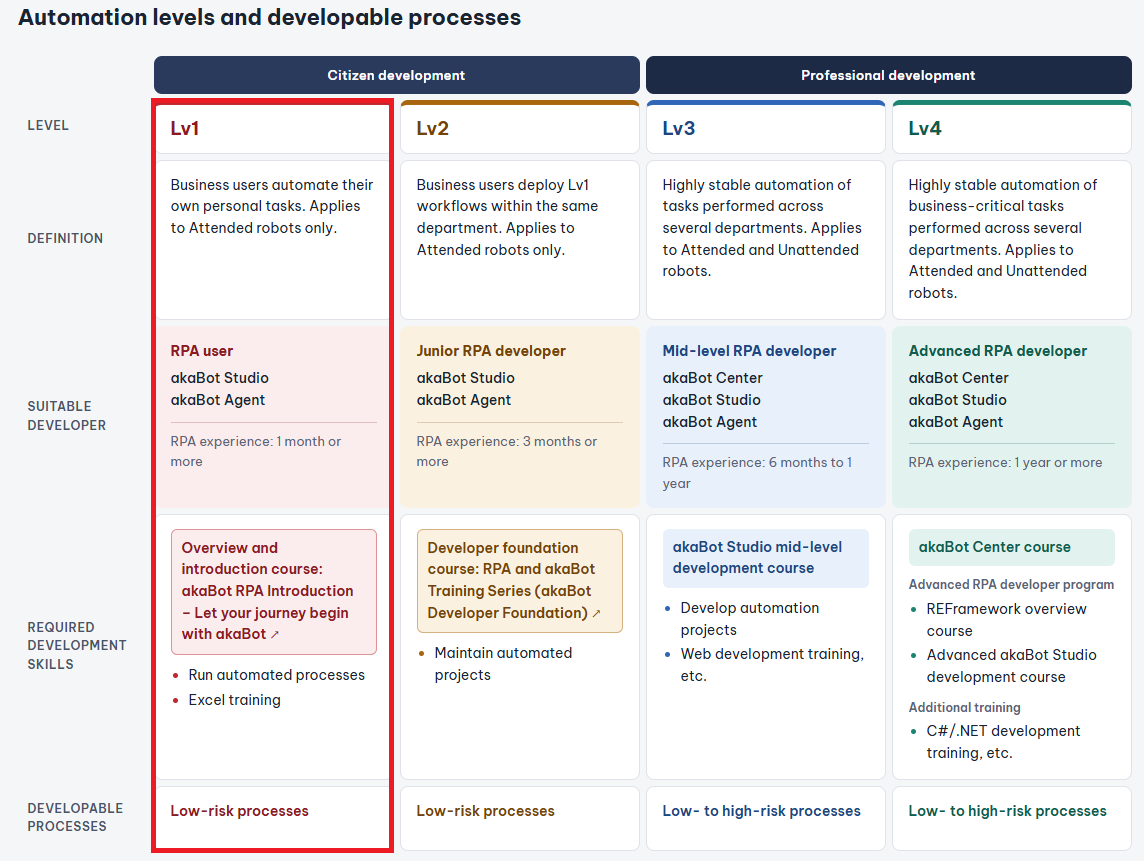
This guide is for developers and citizen automators who use akaBot Studio to build automation projects. It focuses on Lv1 (citizen development), outlined in red below, and the rules also apply at the higher levels.
The agents that run your projects are either Attended or Unattended.
| Attended | Unattended | |
|---|---|---|
| Strength | Assists individual users with small, repetitive tasks, and collaborates with humans to complete long-running processes. | Runs long processes without human interaction. |
| How it starts | A user or a specific user event triggers the process. | The agent is assigned tasks and scheduled to run through akaBot Center. |
| Where Agent runs | On the same machine where the user does daily work. | On any machine connected to akaBot Center. |
For more details, see Attended - Unattended Agent.
1. Before you start
Set up your environment before you build an agent. This setup has rules too: the license, package sources, extensions, and where to get help.
1.1. Activate your license
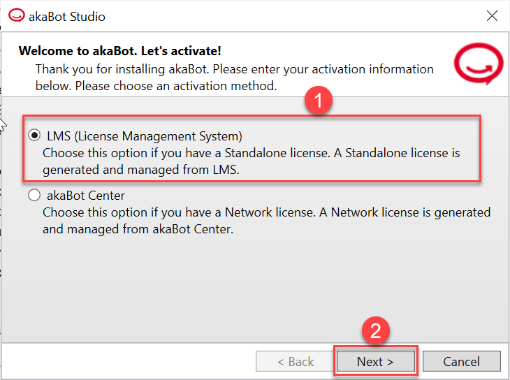
akaBot Studio needs a license before you can use it. Choose the activation method that suits your environment:
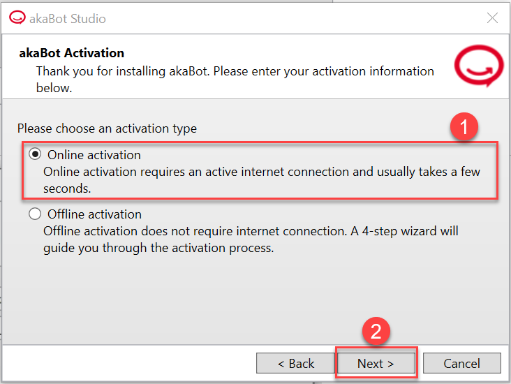
- Online Activation: for a Standard license on a computer with an Internet connection.
- Offline Activation: for a Standard license on a computer without an Internet connection.
- Activation through akaBot Center: for an Enterprise (Network) license. Your Studio computer must be able to connect to your akaBot Center.
When Studio starts, choose LMS (License Management System) for a Standard license, or akaBot Center for an Enterprise (Network) license. For a Standard license, you then choose Online or Offline activation.
If your network connects to the Internet or akaBot Center through a proxy server, prepare the proxy information before you activate. For the full steps, see License Activation.
Required: Use only the akaBot installer and license provided by your organization. Do not install or use a copy from another source, such as a trial or a personal license, for work.
1.2. Check your package sources
Studio installs activity packages from package sources. By default, Studio uses these sources:
| Source | Location |
|---|---|
| Local folder for the current user | %localappdata%\akaBot\Packages |
| Local folder for the machine | %programdata%\akaBot\Packages |
| NuGet.org | https://api.nuget.org/v3/index.json |
| akaBot package feed on GitLab | https://gitlab.com/api/v4/projects/75840319/packages/nuget/index.json |
In Package Manager on the Home tab, you can also add your own package source. Each source needs a unique name and either an address or a local folder.
Required: Do not add package sources other than the default ones and those your organization provides. If you need a package from another source, ask your automation team (CoE).
If your network reaches the Internet through a proxy server, allow access to the GitLab and NuGet.org addresses. See Configure akaBot in an on-premises network with an internet proxy.
Your organization can restrict or require packages with the Workflow Analyzer rules Package Restrictions (ST-USG-014) and Required Packages (ST-USG-027).
1.3. Install the akaBot Web Extension
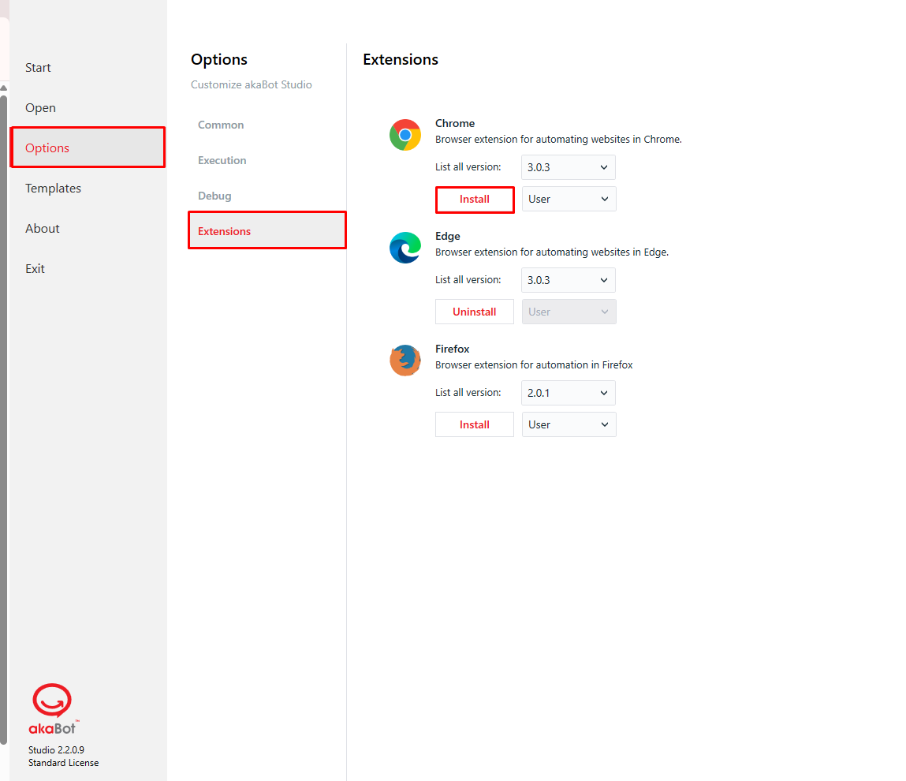
To automate websites, install the akaBot Web Extension for your browser. akaBot supports the Chrome, Edge, and Firefox extensions.
- In akaBot Studio, open Options, and then select Extensions.
- In the section of your browser, click Install.
- If the browser is running, Studio asks you to close it. Click OK to continue.
- Reopen the browser and enable the extension when the browser prompts you. You can also turn it on from the browser's Extensions page.
For the full steps, see How to install Akabot Web Extension.
To automate Java applications, install and enable Java Access Bridge. See Install and Enable Java Access Bridge.
To automate SAP GUI, enable SAP GUI Scripting on both your PC and the SAP server. See SAP Logon.
To automate Citrix or Remote Desktop, use the CV selector or the Image selector. See Choose the right selector type.
If your browser updates automatically, the browser driver may no longer match the browser version, and your agent may fail at run time. Update the driver as described in Configure Browser Driver, and then turn on Auto Detect in Studio under Options > Execution > Browser Version.
1.4. Where to find help
-
The akaBot documentation: the Studio user guide describes the interface and common tasks, the Activities section describes each activity and its properties, and each Workflow Analyzer rule has a description and a recommendation.
-
The Debugger and the Open Logs button on the Home tab help you investigate what an agent did.
-
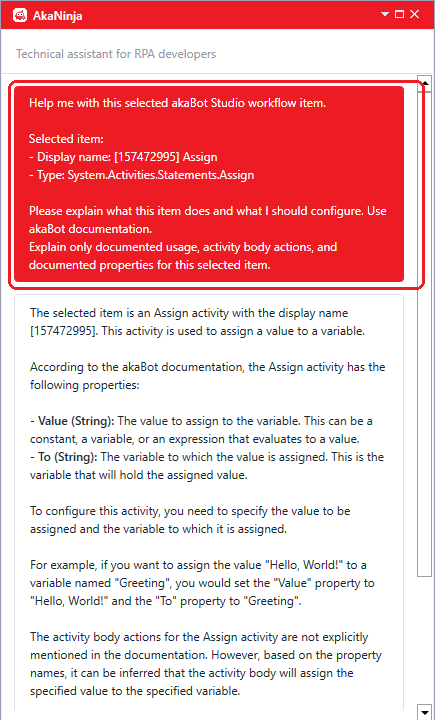
AkaNinja, the AI assistant built into Studio, can explain activities and their properties, analyze an error message and suggest how to resolve it, and generate VB.NET or C# expressions. Configure the AI provider in Options > AI Integration before you use it.
For example, select an activity in the Designer and ask AkaNinja about it. AkaNinja receives the display name and type of the selected item, outlined in red below, and explains what the activity does and which properties to configure.
-
The akaBot Academy offers courses, and the Community Forum lets you ask other akaBot users.
-
You can also contact the akaBot support team at support@akabot.com.
2. Basic development rules
Build agents that your teammates, reviewers, and administrators can read and understand, not only you.
2.1. Project
- Every project needs a file named
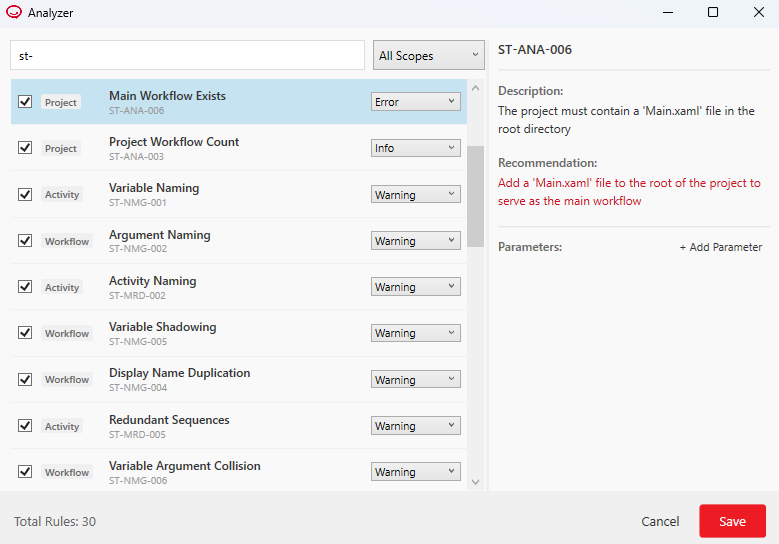
Main.xamlin its root folder. This file is the entry point of the project. When you run a published project through akaBot Center or Agent, execution starts fromMain.xaml. Workflow Analyzer reports a missingMain.xamlas an error (ST-ANA-006). - If your main workflow has another name, rename it to
Main.xaml, or right-click it in the Project panel and select Set as Main.
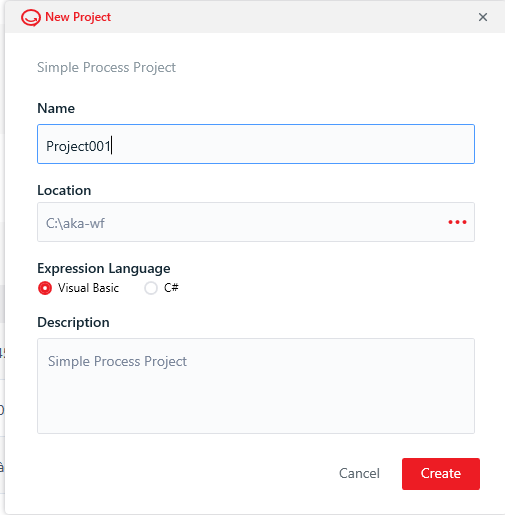
- When you create a project, enter a name and a description. The description is required and can have at most 250 characters. It appears in the Description column of the Package page in akaBot Center after you publish the project, so use it to summarize what the process does.
Project name rules
The project name becomes the package ID when you publish the project, so Studio checks it against the NuGet package ID rules when you create it. A project name must follow these rules:
- Use only letters, digits, underscore (
_), period (.), and hyphen (-). - Do not use spaces, either half-width or full-width.
- Do not start or end the name with a period or a hyphen.
- Do not use
..,--, or.-in a row. - Use at most 50 characters.
| Valid names | Invalid names |
|---|---|
Invoice_Check | Invoice Check (contains a space) |
RPA00301-1 | -Invoice (starts with a hyphen) |
Invoice.Check_01 | Invoice..Check (two periods in a row) |
請求書、チェック (contains the Japanese punctuation 、) |
"Letters" includes non-English letters. Studio accepts names with Vietnamese diacritics, such as Hóa_Đơn_Kiểm_Tra, and Japanese characters, such as 請求書チェック. Punctuation from these languages, such as 、 and 。, is not accepted. Because the name is also used as the package ID and in file paths, we recommend English letters without diacritics, for example HoaDon_KiemTra. Write the name in your own language in the description instead.
Recommended naming format
Studio does not enforce a naming format. To make projects easy to find, review, and report on, agree on one format in your organization.
Required: Name every project with your organization's naming format. If your organization has none yet, use this one:
Department_Team_ID_ProcessName_AgentType
| Part | Example | Note |
|---|---|---|
| Department | SLS | Short code of the department |
| Team | SLS1 | Short code of the team |
| ID | 0001 | The process ID in your automation list |
| ProcessName | DailyReport | What the process does, in PascalCase |
| AgentType | AA or UA | AA for an Attended agent, UA for an Unattended agent |
For example: SLS_SLS1_0001_DailyReport_AA. Keep the name within 50 characters, and do not rename a project after you publish it, because the new name creates a new package in akaBot Center.
2.2. Workflow
Choose the workflow type
| Type | Use it when |
|---|---|
| Sequence | The process is linear, going from one activity to the next. |
| Flowchart | The business logic is complex and needs decisions and multiple branches. |
| State Machine | The project is very large and has many states triggered by transition conditions. |
You can create all three types from the New button on the Home tab.

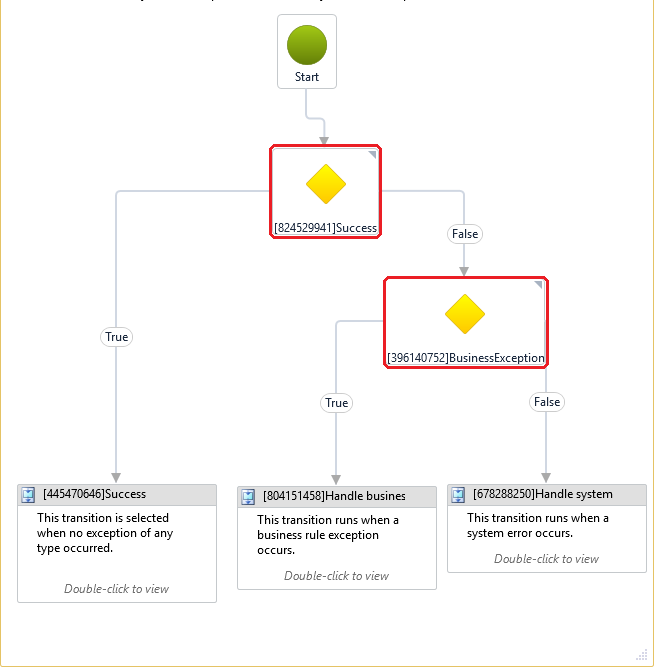
Use a Flowchart when the process has several branches or loops. A Sequence with many branches and loops still runs correctly, but it is hard to read and maintain.
For example, the following Flowchart has two decisions, outlined in red. They split the process into three branches: Success, Business Rule Exception, and System Error.
Keep workflows shallow and modular
Required: Do not nest activities more than 7 levels deep.
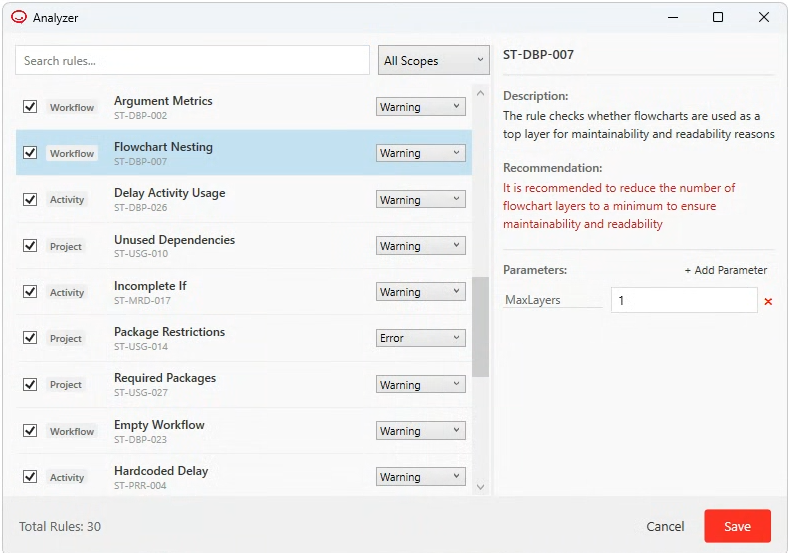
Deeply nested logic is hard to read, test, and maintain. Break complex logic into smaller workflows and call them with the Invoke Workflow File activity. Workflow Analyzer checks the following limits by default. You can change the values in Analyze Settings.
| What is checked | Rule ID | Default value |
|---|---|---|
| Activities nested inside one another | ST-MRD-009 | 7 levels |
If activities nested inside one another | ST-MRD-007 | 3 levels |
| Flowchart layers | ST-DBP-007 | 1 layer |
| Arguments in one workflow | ST-DBP-002 | 20 |
| Workflow files in a project | ST-ANA-003 | Information only, no limit |
A project with only one or two workflows can become one large, hard-to-debug file. A project with dozens of tiny workflows can be hard to trace. Use the workflow count as a reference during code reviews.
2.3. Activity
-
Give each activity a meaningful display name. Do not keep default names such as
ClickorType Into. Describe what the activity does in the process, for exampleClick Login ButtonorEnter Username(ST-MRD-002). The rule does not checkSequence,Flowchart, andStateMachineby default, and you can change this list in the ExcludedActivities parameter.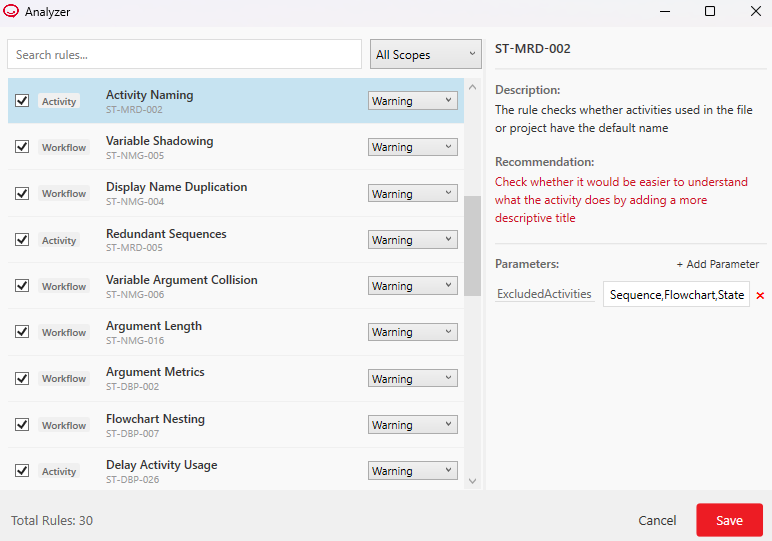
Avoid Use instead ClickClick Login ButtonAssignSet Report DateType IntoEnter Employee IDSequenceLog In to Attendance SystemExcel Application ScopeRead Weekly Attendance File -
Use a unique display name for each activity in a workflow (
ST-NMG-004). -
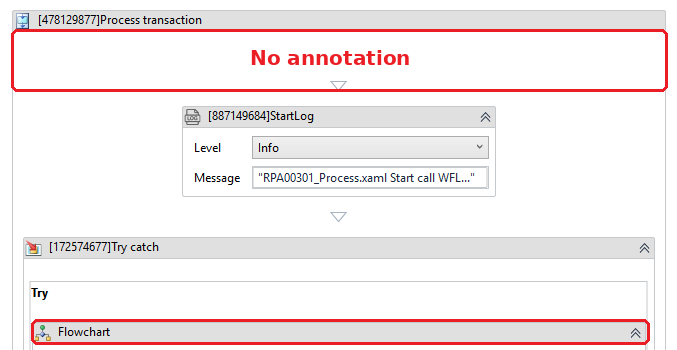
Add an annotation to each Sequence and Flowchart that briefly describes what it does, in addition to its display name.
-
Required: Keep a Sequence to at most 30 activities. A longer Sequence is hard to follow. Move part of it into a separate workflow and call it with Invoke Workflow File.
-
Remove leftovers. Workflow Analyzer reports the following cases:
- A
Sequencewith no child activities (ST-MRD-008). - A
Sequencethat contains only one activity (ST-MRD-005). - An
IfwhoseThenandElsebranches are both empty (ST-MRD-017). - A workflow file with no executable activities (
ST-DBP-023).
Delete what you no longer need, or complete the logic. If you leave a branch empty on purpose, add a
Commentactivity that explains why. - A
Examples to fix
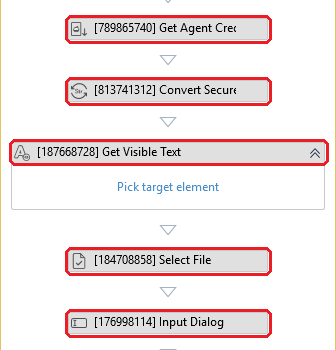
In the following workflow, the activities outlined in red keep their default names, such as Get Agent Credential, Convert SecureString, and Select File. The names do not say what each activity does in the process. Rename each one, for example to Get Login Credential.
In the following workflow, the main Sequence has no annotation, and the Flowchart inside it keeps its default name. Add an annotation that describes what the workflow does, and give the Flowchart a name that describes its logic.
2.4. Variables and arguments
Required: Give every variable and argument a name that says what it holds, with the prefix your organization agreed on. Avoid names such as a, temp, or test.
Use String for short text such as a name, an email address, or a comment, and Int32 for numbers. Use other types, such as Boolean or DataTable, when an activity needs them.
Variables
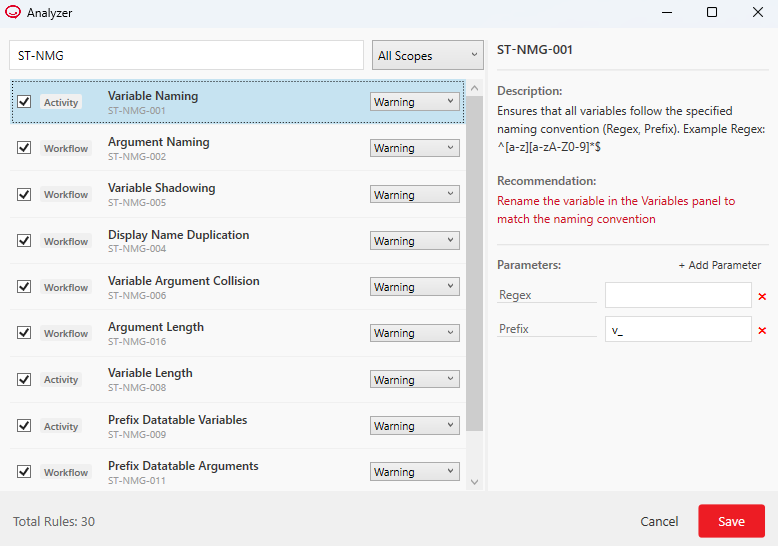
| Rule | Rule ID | Default |
|---|---|---|
| Variable names follow the naming convention. | ST-NMG-001 | Prefix v_, for example v_Result. The Regex is empty by default and can be configured. |
DataTable variable names start with dt_. | ST-NMG-009 | Prefix dt_, for example dt_EmployeeData. |
| Variable names are not too long. | ST-NMG-008 | 20 characters |
| A variable does not share a name with an argument. | ST-NMG-006 | |
| A variable in an inner scope does not reuse the name of a variable in an outer scope. | ST-NMG-005 |
You can change the prefix and the Regex in Analyze Settings to match your organization's convention. For example, you can use prefixes by data type such as str_, int_, bool_, list_, and dict_.
Arguments
Argument names should not exceed 30 characters (ST-NMG-016). When you create an argument, choose its direction: In, Out, In/Out, or Property.

Expression language
akaBot Studio supports both VB.NET and C# as the expression language of a project. For C# projects, see C# Expression Editor & IntelliSense.
2.5. Credentials and sensitive data
Required: Do not type IDs and passwords directly into a workflow. Store them in a credential store, and retrieve them at run time. akaBot Studio provides these options:
| Option | How it works |
|---|---|
| Assets in akaBot Center | An Asset of type Credential stores a username and password. Credentials stored in Center are encrypted with the AES 256 algorithm, and their values can be hidden from developers. The Get Agent Credential activity retrieves a credential by Asset Name and returns the username as a String and the password as a SecureString. See Assets. |
| Windows Credential Manager | The Add Credential activity stores a credential. The Get Secure Credential activity retrieves it by its target name and returns the username as a String and the password as a SecureString. The activities are under Core > Credentials. See Credentials. |
| SecureString | The System.Security.SecureString type holds sensitive text in memory. Use the Type Secure Text activity to type it into an application. |
Choose the store by agent type:
| Agent | Recommended store | Why |
|---|---|---|
| Unattended | A Credential asset in akaBot Center, with Get Agent Credential | The credential is managed in one place, its value can be hidden from developers, and you do not need to set it up on each agent machine. |
| Attended | Windows Credential Manager, with Get Secure Credential | Each user keeps their own credential on their own machine. |
A credential in Windows Credential Manager belongs to one Windows user on one machine. An Unattended agent can read it only if it was created on that machine under the Windows account the agent runs as.
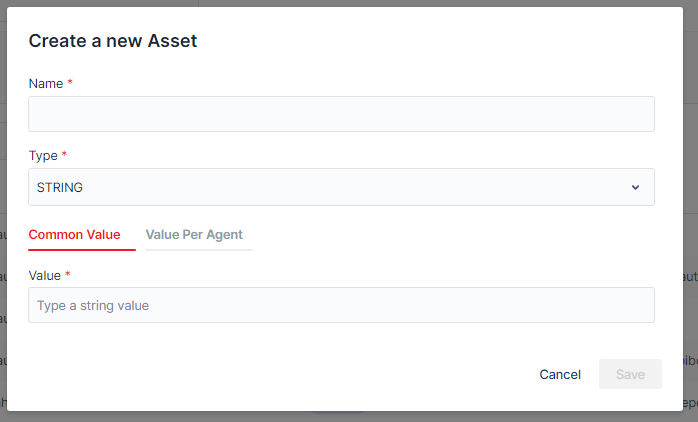
To create a Credential asset in akaBot Center, open the Assets page, click Create new, and select Credential as the type.
Follow these rules when you work with sensitive values:
- Keep passwords in the
SecureStringtype. Use Get Secure Credential instead of Get Credential, because Get Credential returns the password as a plainString. - Use the
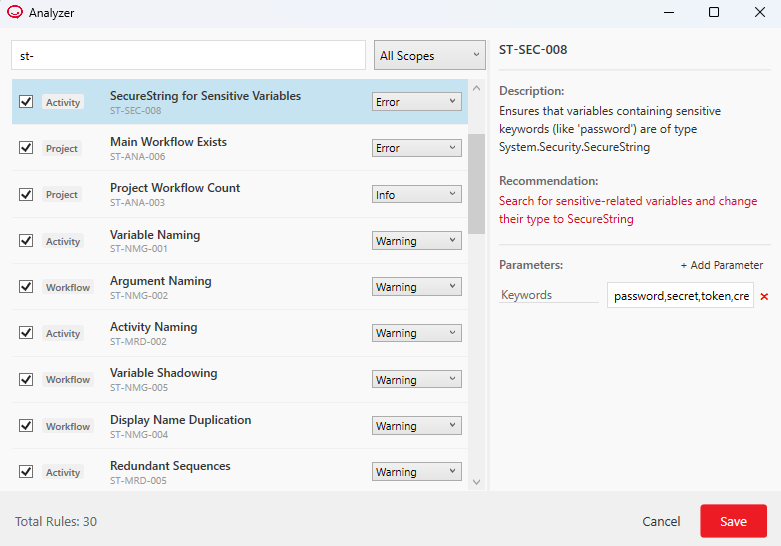
SecureStringtype for arguments and variables whose names contain a sensitive keyword. By default, Workflow Analyzer checks forpassword,secret,token,credential,pass, andapikey. A violation is reported as an Error (ST-SEC-007for arguments andST-SEC-008for variables). You can edit the keyword list in the rule's Keywords parameter. - Define variables that contain credentials in the narrowest scope possible.
- Do not use arguments to pass credentials from one workflow to another.
- Do not select Public on activities that handle credentials or personal data. See What the logs contain.
Examples
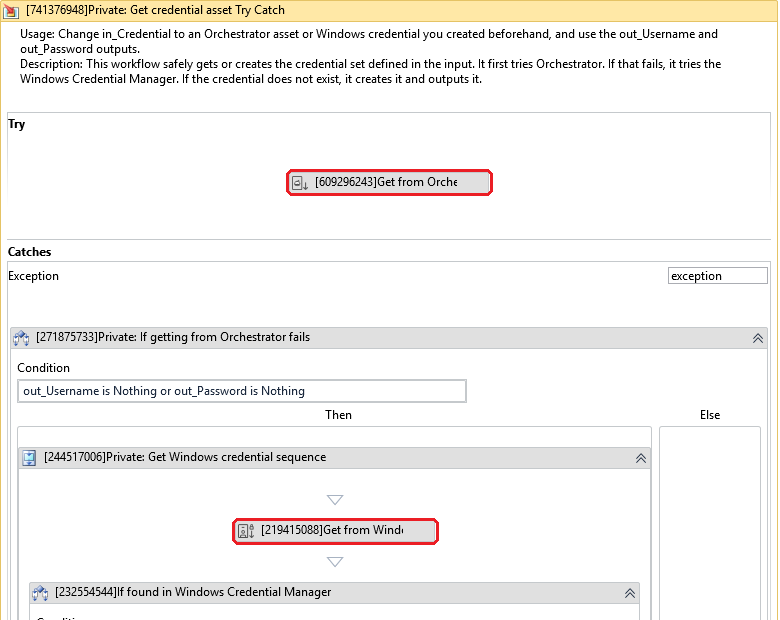
Recommended: Get the credential from a credential store. The following workflow first gets a Credential asset from akaBot Center. If that fails, it gets the credential from Windows Credential Manager. No ID or password is written in the workflow.
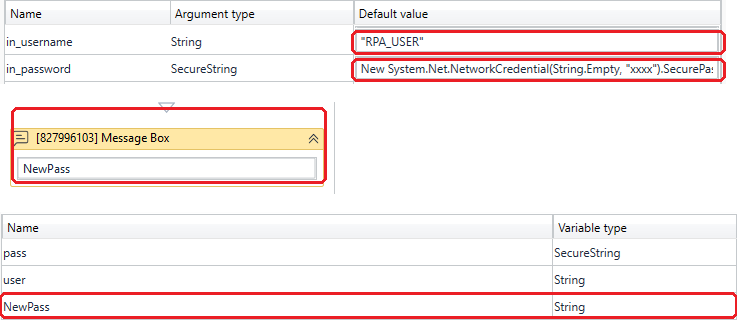
Avoid: The following example shows two mistakes, outlined in red:
- The username and the password are typed in as the default values of the
in_usernameandin_passwordarguments. - The password is converted to a
Stringvariable,NewPass, and shown in a Message Box.
2.6. Logging and error handling
-
Use Log Message to record what the agent does. It has five levels:
Trace,Info,Warn,Error, andFatal. Log messages are also sent to akaBot Center and shown on the Logs page, so consider data security before you include sensitive data in a message.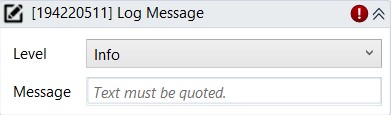
-
Add at least two Log Message activities to each workflow (
ST-USG-020,MinLogsdefaults to 2). Log at the start, at the end, and at important decision points.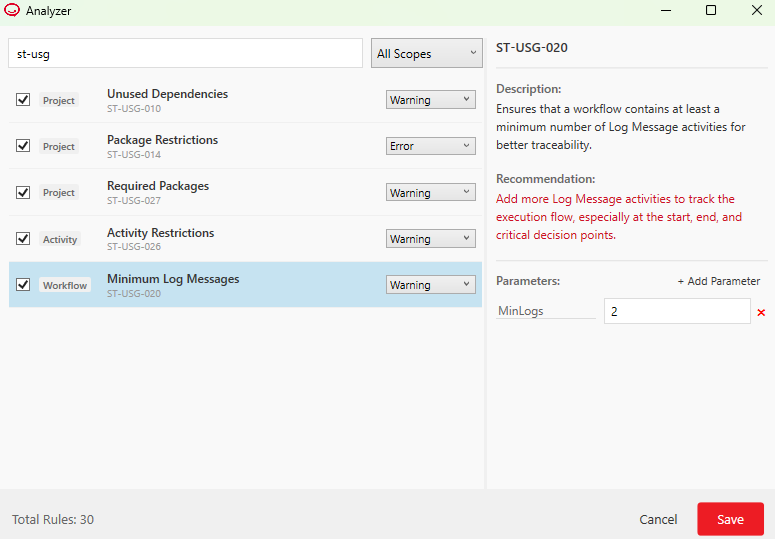
For example, the following workflow writes a Log Message when it starts and when it finishes. Each message names the workflow file, so you can follow the run in the logs. Use the same format in every workflow, for example
"<FileName>.xaml Start call WFL..."and"<FileName>.xaml Finish call WFL...".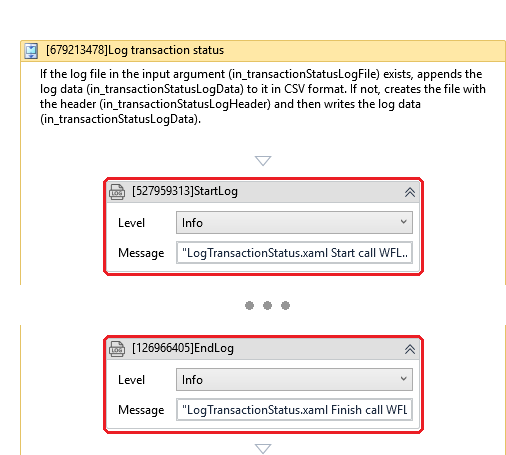
-
Do not leave a
Catchblock empty (ST-DBP-003). An emptyCatchhides the error, and the agent fails without leaving a trace. Add at least a Log Message activity to record the error details. -
By default, the logs show messages from the
Infolevel and higher. To see more detail, open Agent Settings, select the Center tab, and change the Logging level. For example, at theVerboselevel, messages written with Log Message at theTracelevel are also included. See Agent Logs. -
To open the folder that contains the log files, click Open Logs on the Home tab. The log files are stored in
%localappdata%\akaBot\Logs\.
What the logs contain
| Log entry | Level | What it contains |
|---|---|---|
| Log Message | The level you choose (Info by default) | The text of the Message property exactly as you wrote it. Nothing in the message is masked. |
| Each activity starting and ending | Verbose | The activity's display name and state, for example Click Login Button Executing or Closed. Values are not included unless the activity is Public. |
| A Public activity starting and ending | Verbose | The values of all the activity's input and output arguments, and of all the variables in its scope. |
| An error that stops the workflow | Error | The error message of the activity. Property values are not added automatically, but the error message of some activities includes values such as a URL or a file path. |
Every log entry also includes the process name and version, the job ID, the agent name, the machine name, the Windows user, and the workflow file name, plus any fields added with Add Log Fields.
Public is an option of every activity, in every package. When you select it, Studio adds Public: in front of the activity's display name. The values of a Public activity are written at the Verbose level, so they reach the logs only when the logging level is Verbose.
Keep the following in mind:
- akaBot does not hide values by name. A
Stringvariable namedpasswordis written as it is. ASecureStringvalue is not written in readable form. - akaBot Agent sends log entries to akaBot Center as they are written. It does not mask or filter their content.
2.7. Practices to avoid
Avoid the following practices to reduce the risk of security incidents and serious failures when an agent runs into an error.
Do not write confidential information or personal data to logs
Required: Writing confidential information or personal data to a log can lead to a security incident. Do not put passwords, tokens, or personal data in a Log Message, and do not select the Public option on activities that handle them. See Credentials and sensitive data and What the logs contain.
Examples of dangerous log messages:
| Message | Problem |
|---|---|
"Login: " + v_UserName + " / " + v_PasswordText | Writes a password (confidential information) |
"Customer: " + v_FullName + ", phone: " + v_Phone | Writes personal data |
Do not output large amounts of unnecessary logs
Logs are used to check how a process ran and to investigate incidents. Avoid writing too many unnecessary log messages, especially inside a loop.
Do not automate the approval, submission, or sending of an email
Required: Limit the scope of automation to the step just before the approval, submission, or email sending. A person performs the final step. This limits the risk of a serious incident if the agent fails for any reason.
For example, in a process that sends an email to a customer, the agent does the following steps, and a person sends the email:
- Read the data from an Excel file.
- Check and get the data in the system.
- Compose the email for the customer.
Do not update a file directly without a backup
Required: Before you edit or update a target file, create a backup copy of it, for example with the Copy File activity. If a processing error occurs, you can restore the file to its original state.
3. Advanced development rules
Once the basic rules are familiar, you may meet cases they do not cover. Build those cases within these advanced rules.
3.1. Waiting for and locating elements
Avoid fixed delays
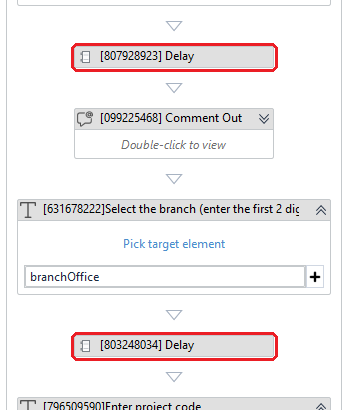
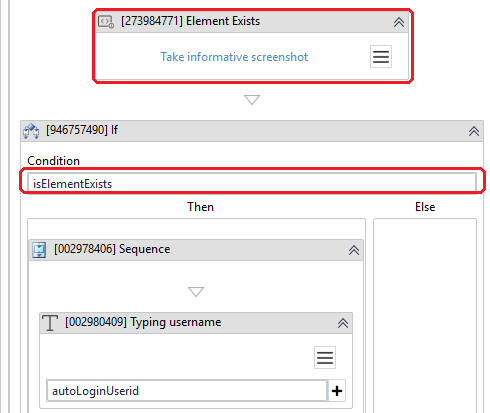
A fixed Delay can make an automation brittle (ST-DBP-026). Wait for a condition instead. For example, the Native Browser package provides Wait Element Vanishes, Wait Page Load Complete, Wait Page Title, Wait Page URL, and Wait Web Attribute, and the Element Exist activity checks whether an element exists.
If you must use Delay, do not type the duration directly into the activity (ST-PRR-004). Store it in a variable, an argument, or a configuration file, so that you can use a different value in Test and Production without editing the workflow.
Avoid: In the following workflow, a Delay of a fixed 5 seconds runs before each step. On a slow day, 5 seconds may not be enough. On a fast day, the agent wastes time.
Recommended: In the following workflow, an Element Exist activity checks for the login form, and an If activity continues only when the form is there.
Avoid image recognition
Activities that find an element by its image, such as Image Click and Image Found, are less stable than activities that use a selector. Raising the image accuracy helps, but does not remove the instability. When the default selector cannot find an element, adjust the selector in UI Explorer first, and use image recognition only when there is no other way.
Do not hard-code values
Do not type file paths, URLs, or thresholds directly into activities. Store them in a configuration file or in an Asset in akaBot Center, so that you can move the agent to another environment without editing the workflow.
| Instead of | Use |
|---|---|
| Image Click, Image Found | A selector adjusted in UI Explorer |
| A fixed Delay, for example 3 seconds | On Element Appear, Wait Element Exist, or Wait Page Load Complete |
| A path, URL, or threshold typed into an activity | A configuration file or an Asset in akaBot Center |
Choose the right selector type
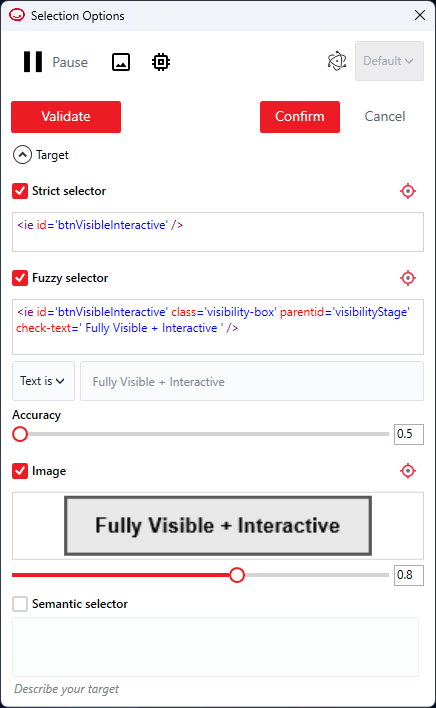
When you indicate an element on screen, Studio can generate several selector types. You can enable more than one type. At run time, Studio tries them in sequence and falls back to the next one if the first cannot find the element.
| Selector type | Use it when |
|---|---|
| Strict selector | The application has a clean, stable structure with reliable attributes. It is the fastest and most precise method. |
| Fuzzy selector | Element attributes have slight variations or dynamic tokens. It compares attributes using an Accuracy value from 0.4 to 1.0 (default 0.5). |
| Image | The element has no accessible technical attributes, or it is in a virtualized, canvas, or remote desktop environment. It uses an Accuracy value from 0.5 to 1.0 (default 0.8). |
| CV selector | You automate Citrix, Remote Desktop, or image-heavy interfaces where the element tree is not available. |
| Semantic selector | A web page changes often. You describe the element in plain English, for example Button Save. |
The semantic selector needs a connection to a Computer Vision (CV) server. Your system administrator sets the server address in the cvsettings.json file in the project folder, and you must place the activity inside an Open/Attach Application or Open/Attach Browser scope.
For more details, see the Selector Guide, Getting Started with Semantic Selector, and How to use UI Explorer.
3.2. Check your project with Workflow Analyzer
Workflow Analyzer analyzes your workflows without running them. Run it regularly while you develop, and run it on the entire project before you publish.
- Resolve all activity validation errors first. Workflow Analyzer can analyze only valid workflows.
- On the Home tab, click Analyze, and then select Analyze File, Analyze Project, or Analyze Settings.
- Review the results in the Analysis Results window. You can filter the results and export a report in HTML or CSV format.
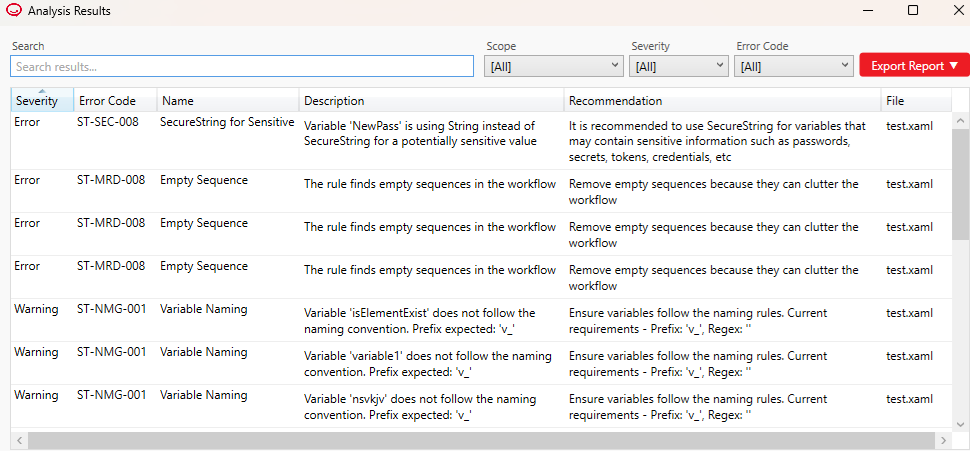

Required: Do not publish a project while Workflow Analyzer still reports an Error.
Each rule has a severity:
| Severity | Meaning |
|---|---|
| Error | Resolve it before you run, publish, or deploy the project. |
| Warning | A recommended improvement to code quality or maintainability. |
| Info | Informational guidance. |
By default, all rules are enabled. In akaBot Studio 3.2.4.0, the following rules are reported as Error by default. The other rules are reported as Warning or Info:
| Rule ID | Rule |
|---|---|
ST-ANA-006 | Main Workflow Exists |
ST-SEC-007 | SecureString for Sensitive Arguments |
ST-SEC-008 | SecureString for Sensitive Variables |
ST-USG-014 | Package Restrictions |
You can enable or disable a rule, change its severity, and change its parameters in Analyze Settings.
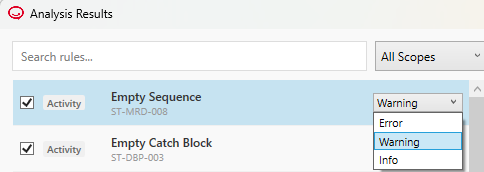
For the full list of rules, see Workflow Analyzer Rules. To run the analysis from the command line, see About Workflow Analyzer.
3.3. Debug and publish
- Debug your project on the machine where Studio is installed before you publish it. See How to Use the Debugger.
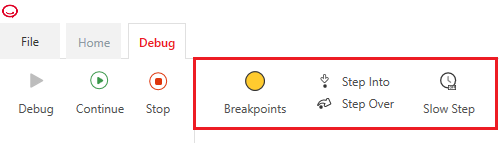
- Publish the project from the Home tab. You can publish to Center or Local. When you publish to Center, Studio and Agent must be connected to Center, and your account must have the required permissions. You can add Release Notes, and the version is generated automatically. If you edit the version, it must be in the
x.x.x.xformat and greater than the current version. See How to Use akaBot Studio.

4. Organizing the business process
Before you build an agent, organize the work that people do today, and then decide which part of it the agent will do. A process that is not organized first often blocks development and causes errors in operation.
4.1. Register the process in your automation list
Write down the information of the process you will automate, and register it in your organization's automation list. The list is also used to report agent usage across the organization.
Required: Do not run an agent in production before it is registered in your automation list and managed by your automation team (CoE). Test runs are an exception.
An example entry:
| Item | Example |
|---|---|
| Agent ID | 01 |
| Agent name | SLS_SLS1_0001_Attendance_AA |
| Process | Check working hours, and warn when overtime is close to the limit |
| Input → Output | Attendance data → Email |
| Users | Sales Department 1 |
| Schedule | Weekly, 9:00 |
| Systems | Chrome (attendance system) |
| Status | In development |
4.2. Draw the process flow
Draw the process flow on paper, in Excel, or in PowerPoint before you develop.
- Make the conditions of each branch and loop clear. If a condition is unclear, decide it yourself, or ask your manager.
- Separate the steps the agent does from the steps people do.
For example, in an invoice process the agent checks whether the invoice file exists, reads the invoice CSV, and enters the data in the system. A person checks the content and sends the email. If there is no invoice file, the agent writes a log entry and stops.
For a professional project, describe the process in detail in a Process Definition Document (PDD). For a Level 1 project, a simple flow is enough.