Connecting to Office 365
The Office 365 Application Scope activity connects akaBot to Microsoft Office 365 services (Files, Mail, Calendar, Groups, SharePoint) through the Microsoft Graph API.
Before running any Office 365 activity, you must configure the scope with a valid Authentication Type and the Services you need. This guide explains each option and what setup is required.
Step 1 — Register an Application in Azure
All authentication types require an Application ID (Client ID) from a registered application in Microsoft Entra ID (formerly Azure Active Directory). This is a one-time setup.
- Sign in to the Microsoft Entra admin center with a Cloud Application Administrator account or higher.
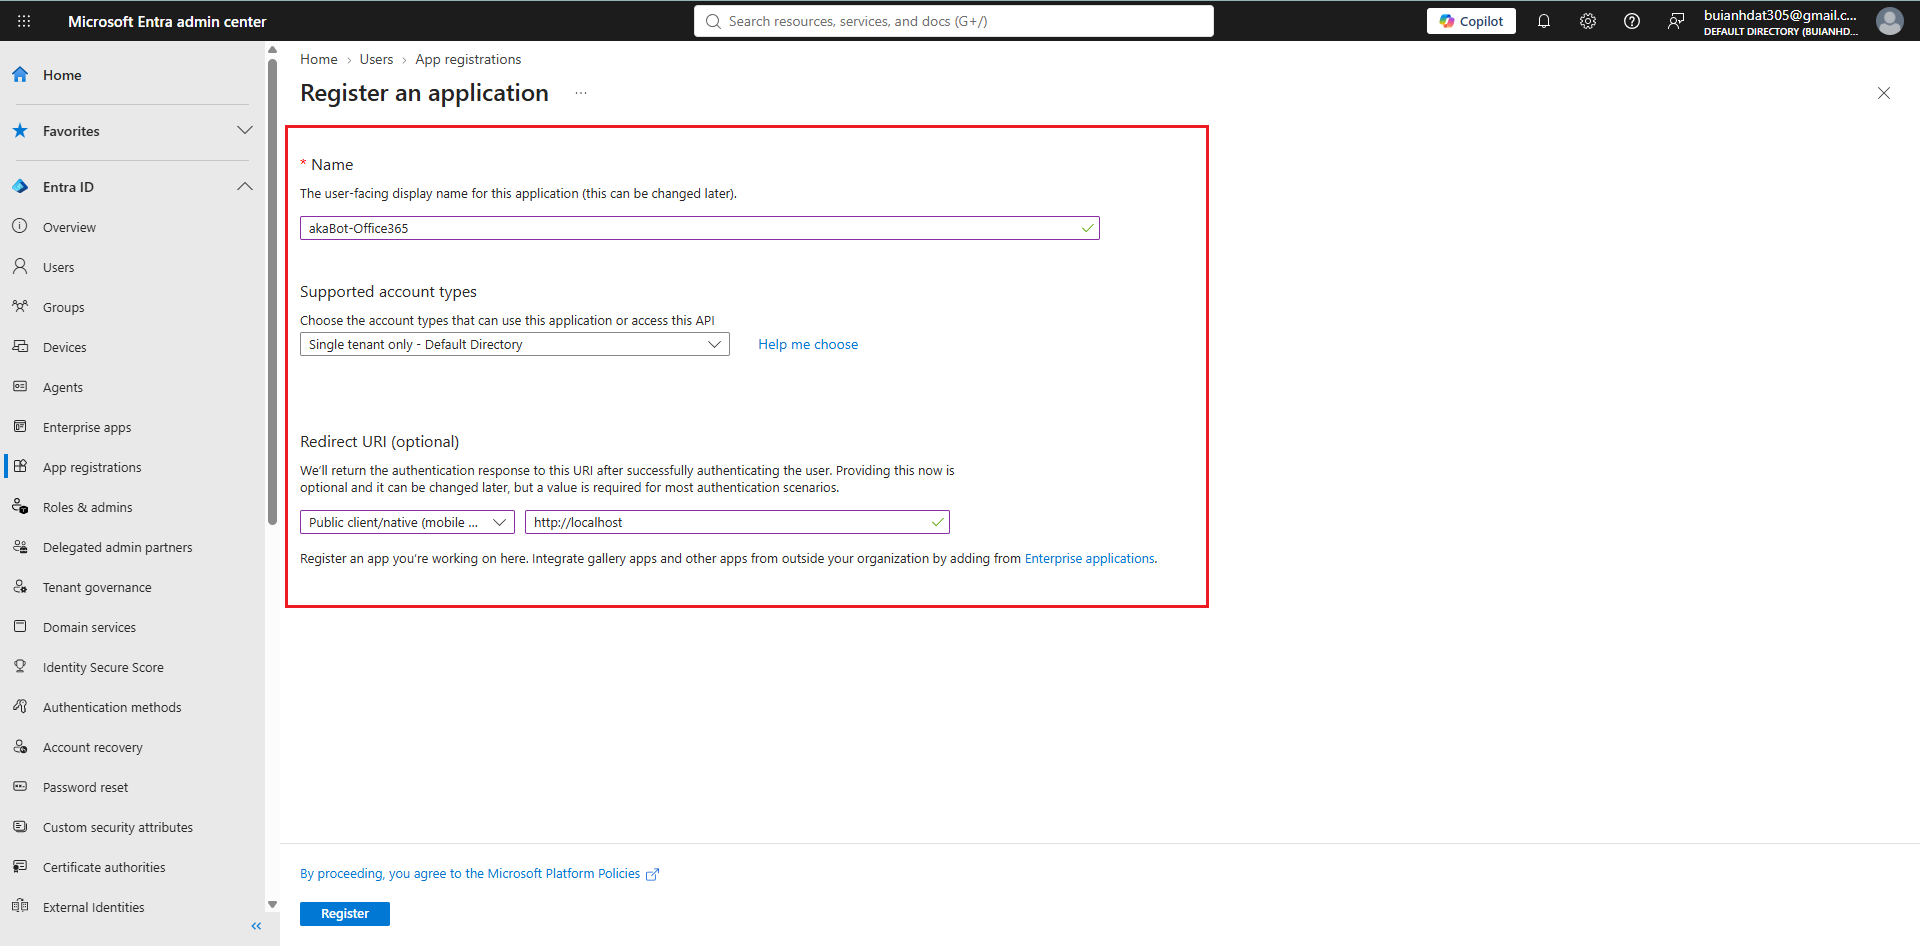
- In the left navigation menu under Entra ID, select App registrations (or search for App registrations in the top search bar), then click New registration (
+ New registration). - Fill in the form:
- Name: A descriptive name, for example
akaBot-Office365. - Supported account types: Select Accounts in this organizational directory only (Single tenant) or multi-tenant depending on your organization.
- Redirect URI:
- For
InteractiveToken, select Public client/native (mobile & desktop) and enterhttp://localhostorhttps://login.microsoftonline.com/common/oauth2/nativeclient. - For unattended modes (
ApplicationIdAndSecret,ApplicationIdAndCertificate), leave blank.
- For
- Name: A descriptive name, for example
- Click Register.
- On the Overview page, copy the two values you will need in akaBot Studio:
- Application (client) ID → the Application Id property.
- Directory (tenant) ID → the Tenant property.
Step 2 — Select Your Authentication Type
In the Office 365 Application Scope activity, set the Authentication Type property to one of the following options:
| Authentication Type | What It Does | Azure Setup Required |
|---|---|---|
| InteractiveToken (default) | Opens a browser popup for the user to sign in to their Microsoft account. | Register an Azure app and enable Allow public client flows under Authentication settings. |
| IntegratedWindowsAuthentication | Signs in using the current Windows user's credentials (Windows SSO). No browser popup. | Register an Azure app and enable Allow public client flows. Machine must be domain-joined. Requires Tenant. |
| UsernameAndPassword | Signs in using a stored Office 365 username and password. | Register an Azure app and enable Allow public client flows. MFA must be disabled on the account. Requires Tenant. |
| ApplicationIdAndSecret | Signs in as the application itself using a Client Secret. Fully unattended automation. | Register an Azure app and create a Client Secret (see Step 3A below). Requires Tenant. |
| ApplicationIdAndCertificate | Signs in as the application itself using a certificate. The most secure unattended option. | Register an Azure app and upload a Certificate (see Step 3B below). Requires Tenant. |
Which type should I use?
- For attended automation or initial testing: use InteractiveToken.
- For unattended robots running automatically on schedule: use ApplicationIdAndSecret or ApplicationIdAndCertificate.
- For corporate domain-joined machines: IntegratedWindowsAuthentication offers seamless single sign-on.
Step 3 — Set Up Credentials (for Unattended Types Only)
This step is only required for ApplicationIdAndSecret and ApplicationIdAndCertificate. Skip to Step 4 if you are using InteractiveToken, IntegratedWindowsAuthentication, or UsernameAndPassword.
Option A — Create a Client Secret (for ApplicationIdAndSecret)
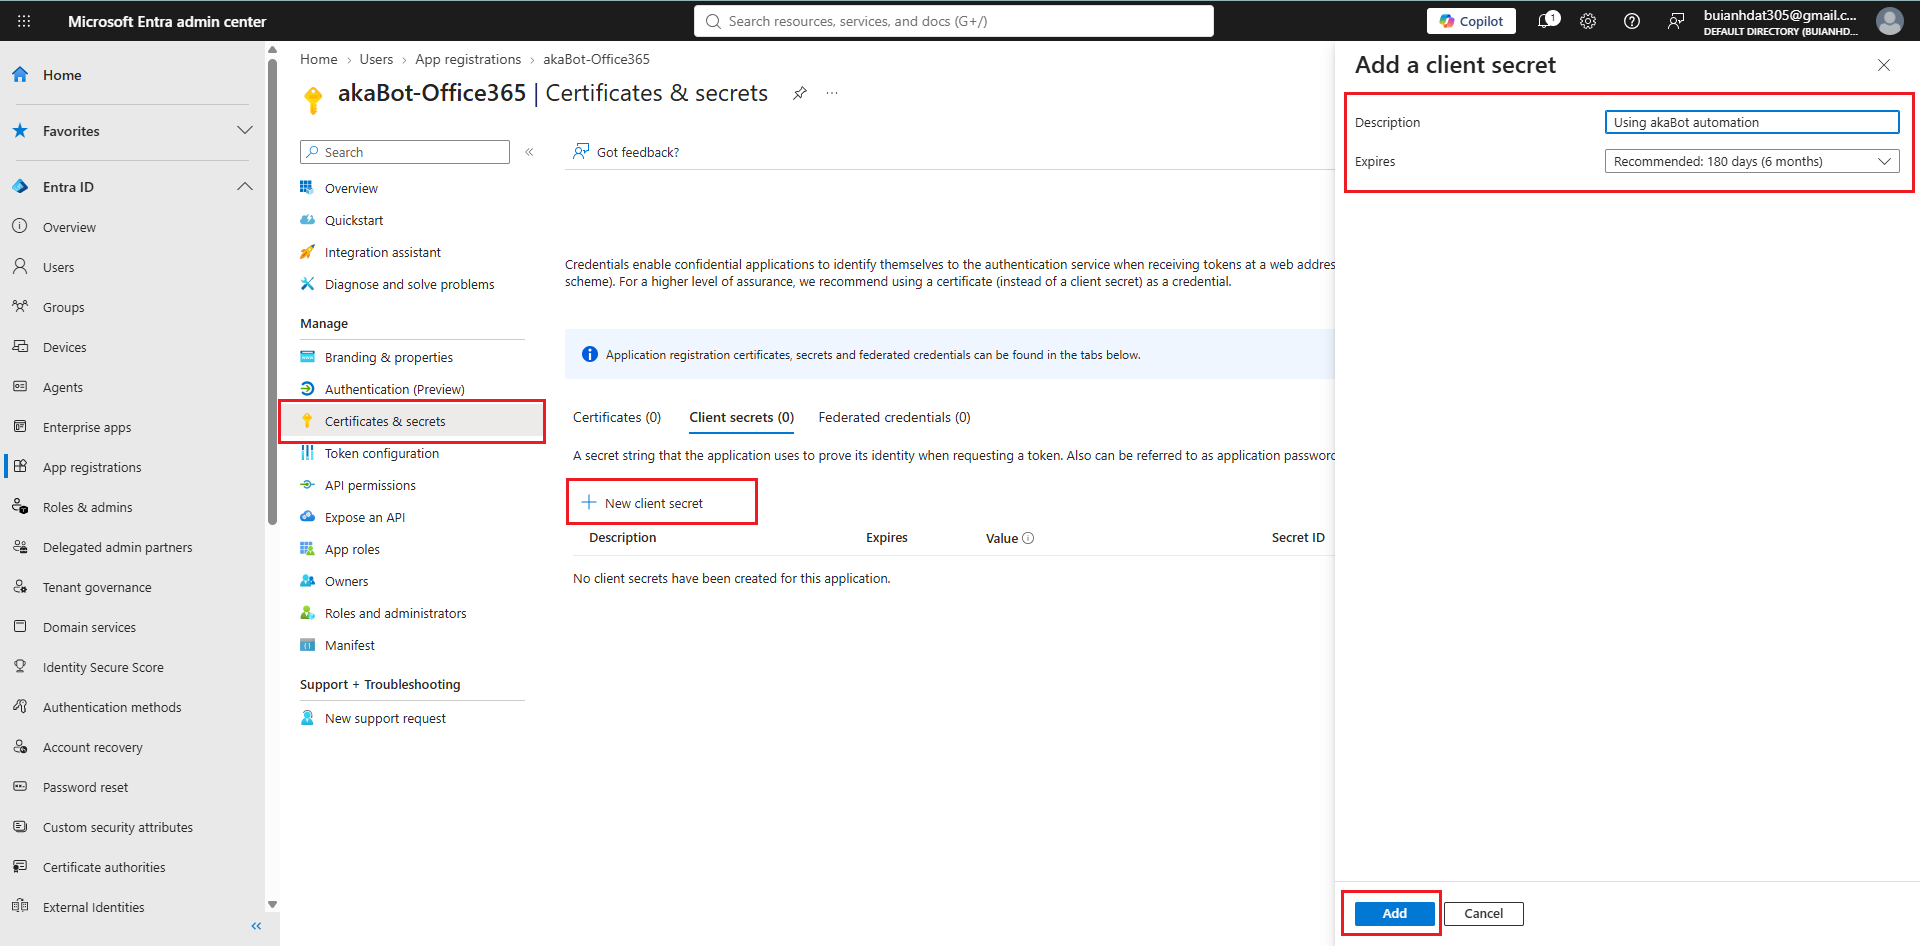
- In your registered app, go to Manage > Certificates & secrets.
- Under Client secrets, click New client secret.
- Enter a description and select an expiration period. Click Add.
- Copy the secret Value immediately. It is only displayed once upon creation.
Important: When the secret expires, automations using this app will fail. Set a calendar reminder to regenerate and update the secret in akaBot before it expires.
Option B — Generate and Upload a Certificate (for ApplicationIdAndCertificate)
Using an X.509 certificate is the most secure authentication method for unattended robots because certificates cannot be accidentally exposed as plain text and support strict cryptographic expiration policies.
1. Generate the Certificate Files in PowerShell
Open PowerShell, navigate (cd) to any directory where you want to store the certificate files (e.g., your project or credentials folder where your user account has write permission), and run each command below:
Step 1.1 — Navigate to your working directory:
cd "<path-to-your-folder>"
Step 1.2 — Create a 2048-bit self-signed certificate (valid for 6 months):
$cert = New-SelfSignedCertificate -Subject "CN=akaBot-Office365" -CertStoreLocation "Cert:\CurrentUser\My" -KeyExportPolicy Exportable -KeySpec Signature -KeyLength 2048 -KeyAlgorithm RSA -HashAlgorithm SHA256 -NotAfter (Get-Date).AddMonths(6)
Step 1.3 — Export the public key (.cer) to upload to Microsoft Entra ID:
Export-Certificate -Cert $cert -FilePath ".\akabot-cert.cer"
Step 1.4 — Set a password and export the private key archive (.pfx):
(Replace YourStrongPassword123! with your preferred password)
$pwd = ConvertTo-SecureString -String "YourStrongPassword123!" -Force -AsPlainText
Export-PfxCertificate -Cert $cert -FilePath ".\akabot-cert.pfx" -Password $pwd
Step 1.5 — Convert the .pfx file into a Base64 text file for akaBot Studio:
[Convert]::ToBase64String([System.IO.File]::ReadAllBytes(".\akabot-cert.pfx")) | Set-Content ".\cert-base64.txt"
After running these commands, three files will be created in your current directory:
akabot-cert.cer— The public key file to upload to Microsoft Entra ID.akabot-cert.pfx— The private key file protected by your password.cert-base64.txt— The Base64 string representation of the.pfxcertificate, ready to be used in akaBot Studio.
2. Upload the Public Key (.cer) to Microsoft Entra ID
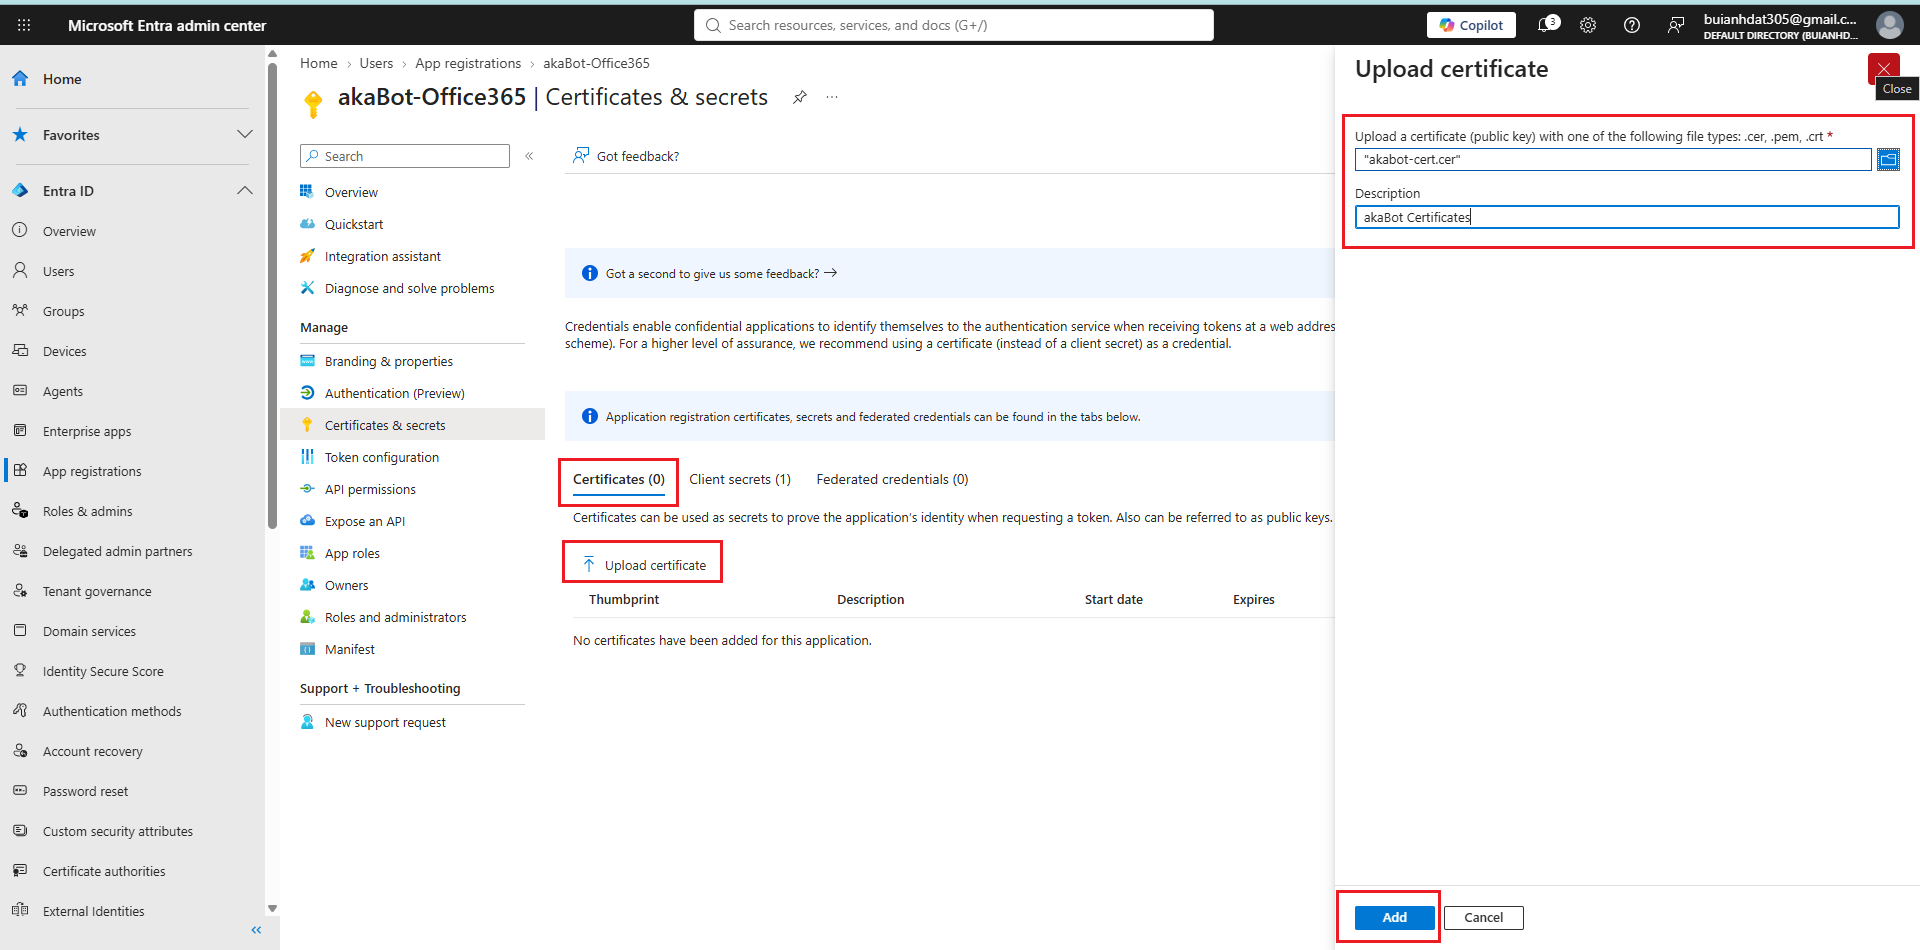
- In your registered app in Microsoft Entra admin center, go to Manage > Certificates & secrets.
- Select the Certificates tab and click Upload certificate.
- Click the browse folder icon, select your
akabot-cert.cerfile, enter a description (e.g.,akaBot Robot Cert), and click Add. - The certificate will now appear in the list with its Thumbprint, Start date, and Expires date.
3. Configure in akaBot Studio
In akaBot Studio, configure the Office 365 Application Scope activity:
- Authentication Type: Select
ApplicationIdAndCertificate. - Certificate As Base64: Supply the Base64 string from
cert-base64.txt. You can store this in an akaBot Center Text Asset, or read it at runtime using:System.IO.File.ReadAllText("path\to\cert-base64.txt") - Certificate Password: Pass your password as a
SecureStringvariable, or initialize it using:new System.Net.NetworkCredential("", "YourStrongPassword123!").SecurePassword
Step 4 — Grant API Permissions
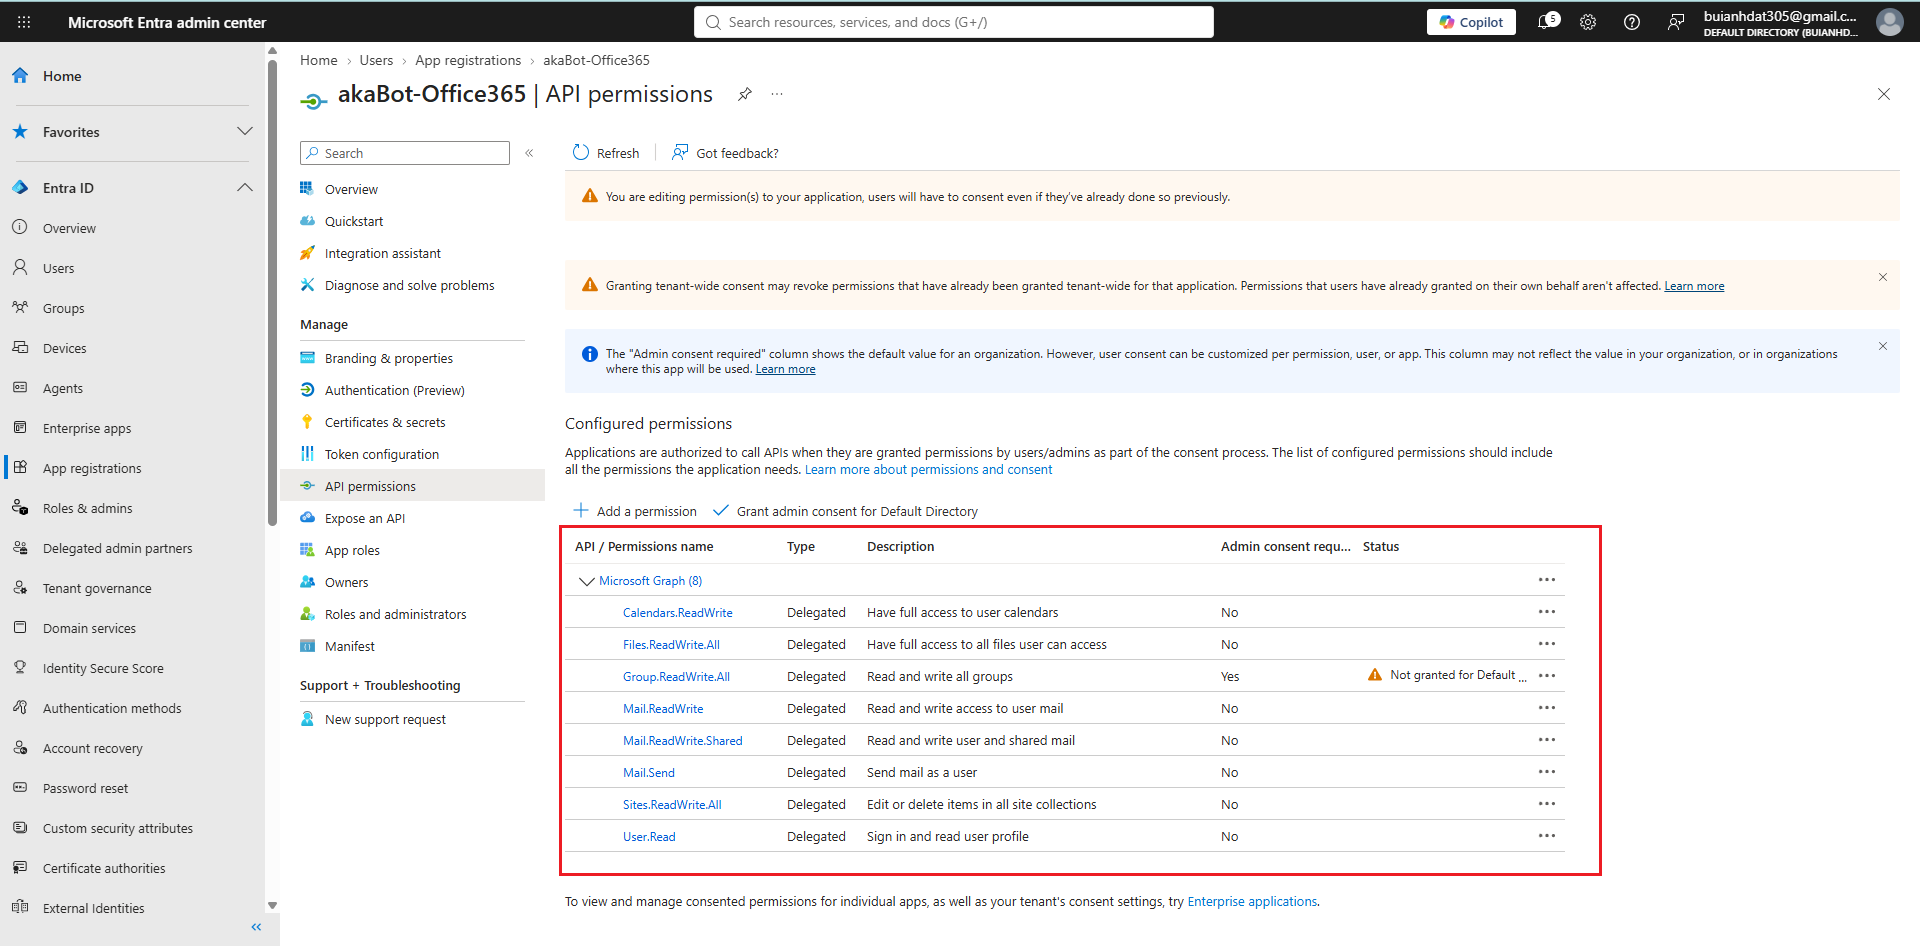
In your registered app, grant the Microsoft Graph permissions matching the Services your workflow will use:
| Services (in akaBot) | Delegated Permissions (Interactive, IWA, Password) | Application Permissions (ApplicationIdAndSecret, ApplicationIdAndCertificate) |
|---|---|---|
| (All types) | User.Read | User.Read.All |
| Files | Files.ReadWrite.All, Sites.ReadWrite.All | Files.ReadWrite.All, Sites.ReadWrite.All |
Mail.ReadWrite, Mail.Send | Mail.ReadWrite, Mail.Send | |
| Calendar | Calendars.ReadWrite | Calendars.ReadWrite |
| Groups | Group.ReadWrite.All | Group.ReadWrite.All |
| Shared (SharePoint / Shared Mailbox) | Sites.ReadWrite.All, Mail.ReadWrite.Shared | Sites.ReadWrite.All |
How to Find and Add Permissions:
- In your registered app, go to Manage > API permissions in the left menu, then click Add a permission (
+ Add a permission). - In the Request API permissions panel that opens, click the large Microsoft Graph card at the top.
- Select the permission type required for your authentication mode:
- Choose Delegated permissions if using attended modes (
InteractiveToken,IntegratedWindowsAuthentication, orUsernameAndPassword). - Choose Application permissions if using unattended robot modes (
ApplicationIdAndSecretorApplicationIdAndCertificate).
- Choose Delegated permissions if using attended modes (
- In the Select permissions search box, type the name of each permission from the table above (e.g., search
Files.ReadWrite.All,Mail.ReadWrite,Mail.Send), expand the permission group, and check the corresponding checkbox. - Click Add permissions at the bottom of the panel.
- Grant Admin Consent: Back on the API permissions table, click Grant admin consent for [Your Organization/Tenant] (located next to Add a permission), then confirm Yes. Ensure the Status column shows a green checkmark (Granted for ...) for all added permissions.
Step 5 — Configure the Scope in akaBot Studio
Open akaBot Studio, add the Office 365 Application Scope activity, and configure its properties:
| Property | Value |
|---|---|
| Application Id | The Application (client) ID from Step 1. |
| Tenant | The Directory (tenant) ID from Step 1. Required for unattended modes; defaults to common for InteractiveToken. |
| Authentication Type | Your selected mode (InteractiveToken, IntegratedWindowsAuthentication, UsernameAndPassword, ApplicationIdAndSecret, ApplicationIdAndCertificate). |
| Services | Select the services needed for child activities (Files, Mail, Calendar, Groups, Shared). |
| Environment | Global for standard commercial Microsoft 365. |
| OAuth2 Username | (InteractiveToken only) User email address to pre-fill in the sign-in prompt. |
| Application Secret / Secure Application Secret | (ApplicationIdAndSecret only) The Client Secret from Step 3A. |
| Certificate As Base64 / Certificate Password | (ApplicationIdAndCertificate only) The Base64 certificate string and its password from Step 3B. |
| Username / Password (or Secure Password) | (UsernameAndPassword only) The Office 365 user credentials. |
| Timeout | Maximum time in milliseconds to wait for API operations (default: 30000 ms / 30 seconds). |
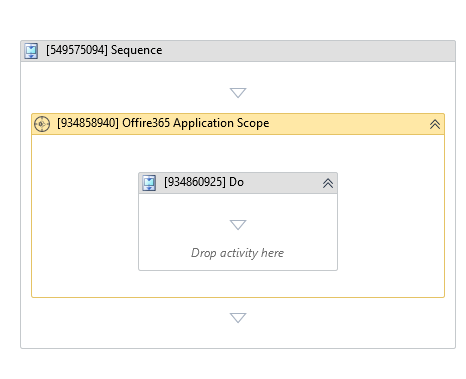
Place all your Office 365 activities (Upload File, Send Mail, Get List Items, etc.) inside the Do block. The scope handles authentication automatically for all nested activities.
See Also
- Office 365 Application Scope - Complete property and category reference.
- Outlook mail activities - Send Mail, Get Mail, Move Mail, Delete Mail, Forward Mail and Replay To Mail. Require the
Mailservice in the scope.